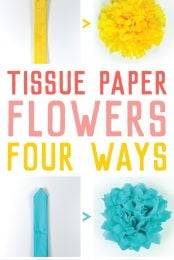
Tissue paper flowers make a gorgeous event decor with a big impact—think weddings, baby showers, bridal showers and more! Learn how to make easy tissue paper flowers, as well as different methods for cutting the petals to create four unique styles.
DIY Tissue Paper Flowers
If you’re looking for budget decor for weddings, baby showers, and bridal showers, you’ve come to the right place! These flowers also make amazing photo backdrops—you could even make small flowers for a handheld bouquet!
I’ve been making tissue paper flowers since our wedding in 2013, and they are still my go-to budget party decor. This post will teach you not only how to make tissue paper flowers quickly and easily, but you’ll also learn four different ways to cut the petals to get different looks to your flowers.
You can watch my video tutorial here, or read on for written instructions!
How did I come to love tissue paper flowers so much? Our budget was a little lopsided for our wedding. We knew we wanted great food and a fantastic photographer—which left approximately no dollars for table decorations. I’d thought about making fabric flowers for the centerpieces, but then I realized that fabric ain’t cheap either.
A while back, I bought some paper pompoms to decorate my friend’s daughter’s birthday party. I realized they are not at all hard to make, so I decided that “rivers of flowers” would decorate the centers of our long 8′ tables. I was able to get a good price on the paper through a wholesaler (learn more about buying tissue paper in bulk). Which was good, because I needed, like, 500 flowers in two different sizes.
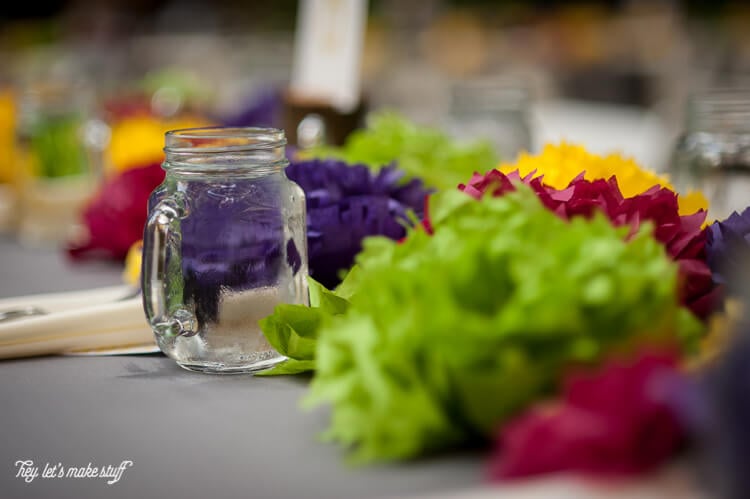
While it seemed kind of crazy to make 500 tissue paper flowers, it actually wasn’t too difficult. I had the help of many of my family and friends, who came over and helped me fluff all the flowers. They turned out beautifully and I got so many compliments on the decor at the wedding. A bunch of friends took them home after the big day to use at other parties they were throwing.
Important: make sure your tissue paper flowers are all fluffed before your event! There will be way too many to fluff the day of, and it will just stress you out. I basically had a giant box with a variety of flowers in each for each table. That way my coordinator and her team could just open each box and pop the already-fluffed paper flowers on the table.
Want to make some of your own? Here’s a tutorial on how to make tissue paper flowers!
What Supplies Do I Need for Tissue Paper Flowers?
It doesn’t take much to make these flowers! All you need is:
How to Make Tissue Paper Flowers:
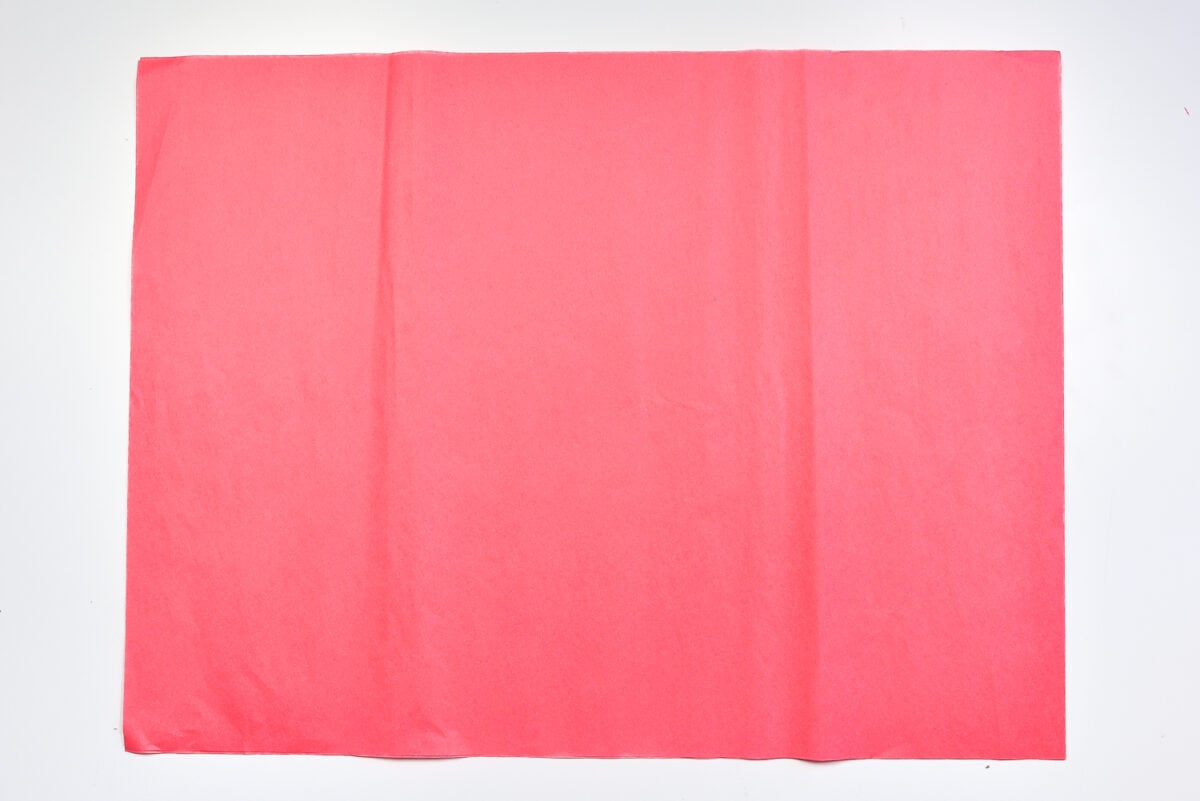
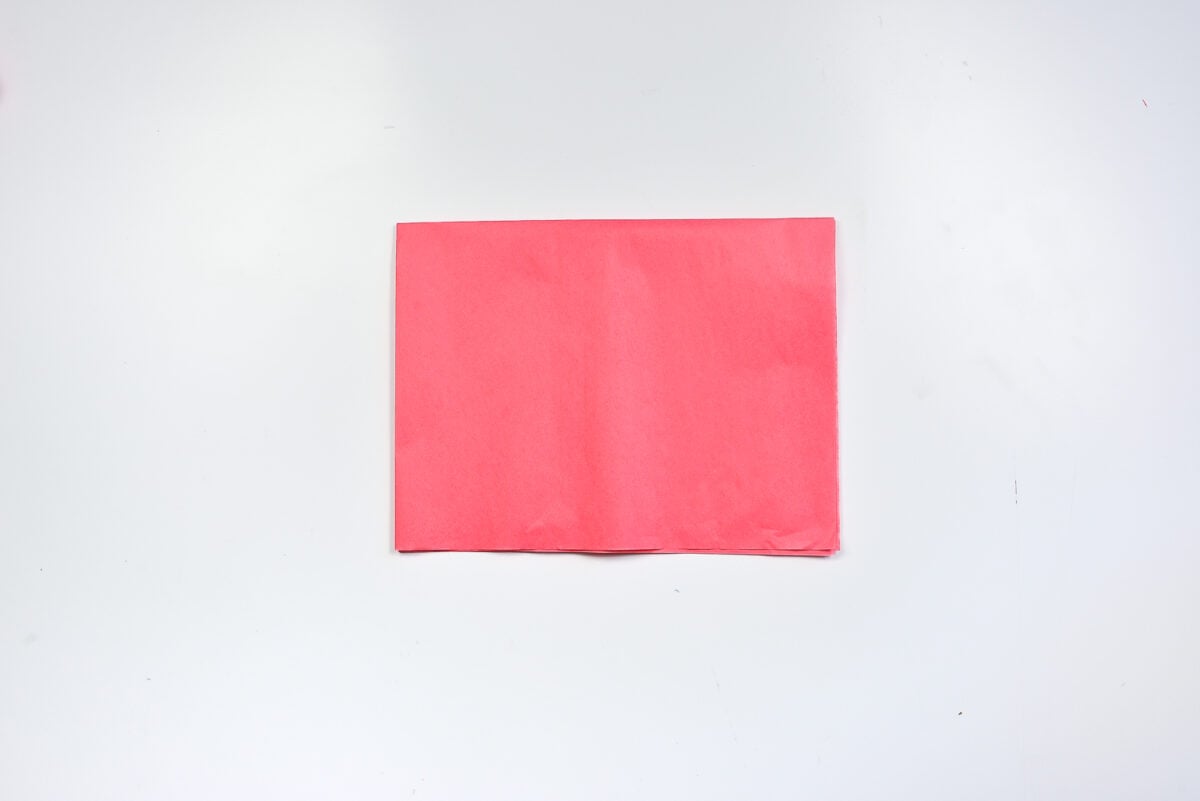
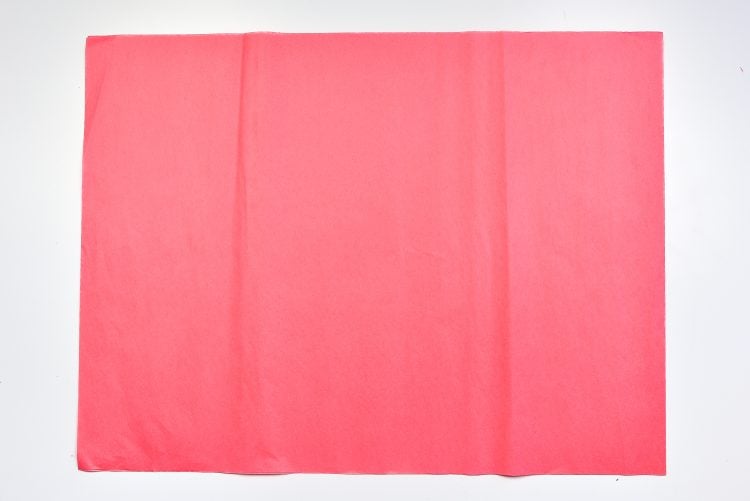
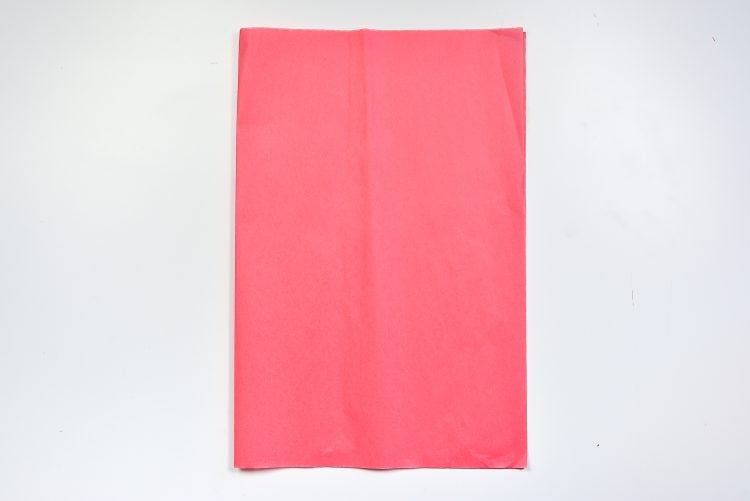
Start with two large sheets of tissue paper. I bought bulk tissue paper so it only has the center fold, but using regular tissue paper with more folds works too.
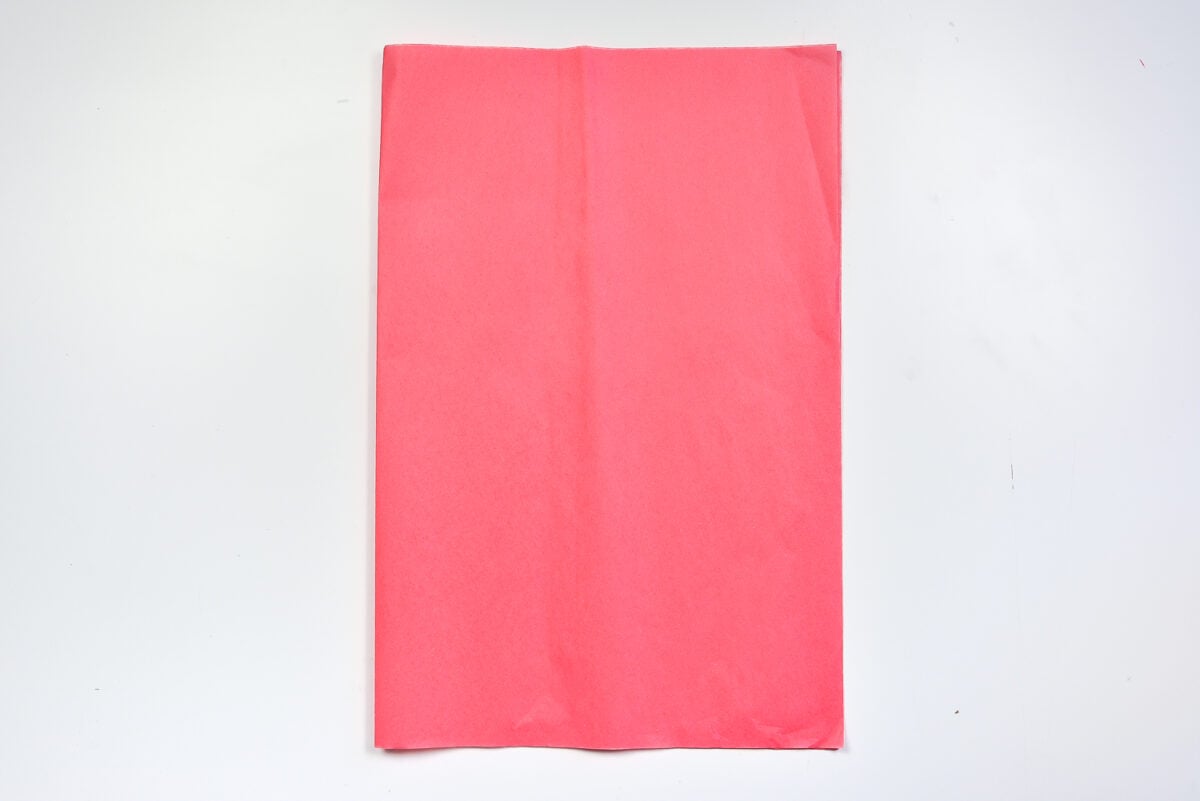
Fold the two tissue paper sheets in half.
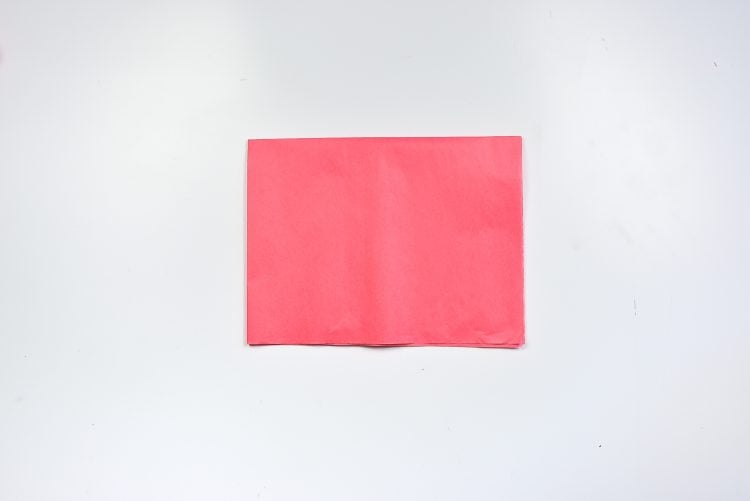
Then, fold in half again.
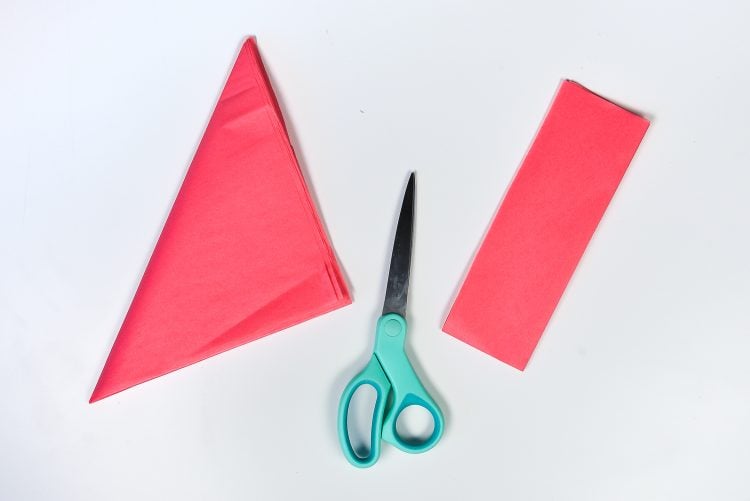
Find the corner with all of the separate pieces of paper (not one with a fold). Take this corner and fold it to the bottom edge to make a triangle.
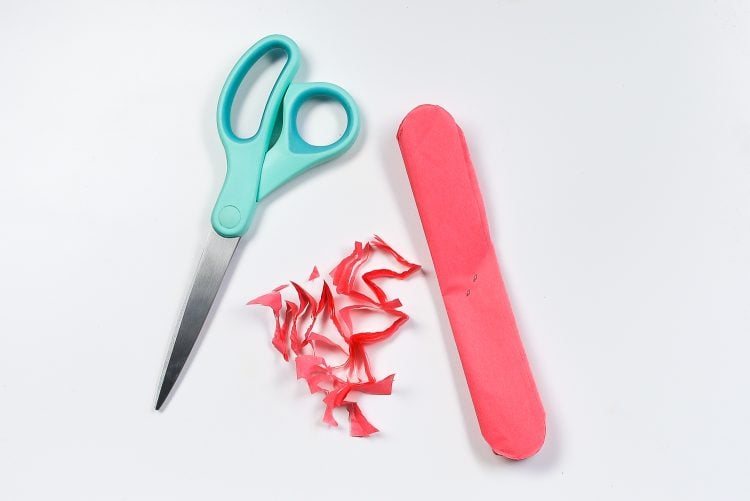
Trim off the extra rectangle of paper. Scissors work if you’re just making a few, but I really found my rotary cutter, ruler, and self-healing cutting mat were optimal for doing a lot of these.
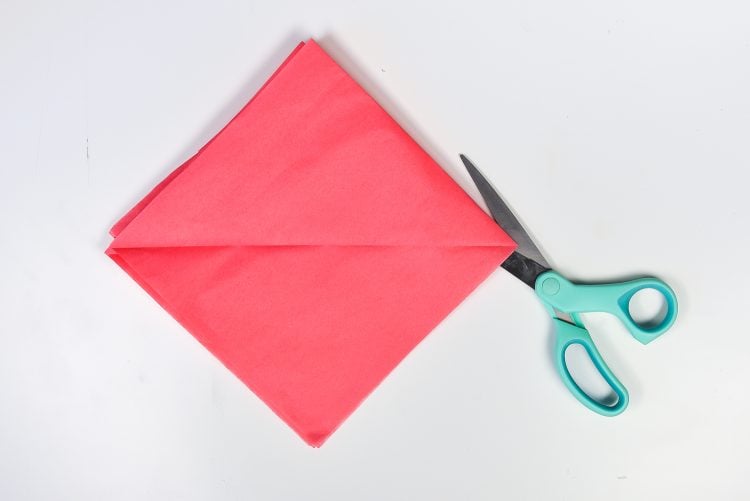
When you open up the triangle to make a square, you’ll notice that some edges still have a fold. Trim off that edge using a rotary cutter, or slip the scissors into the fold and cut to separate all the pieces of paper. Basically, you want eight individual squares.
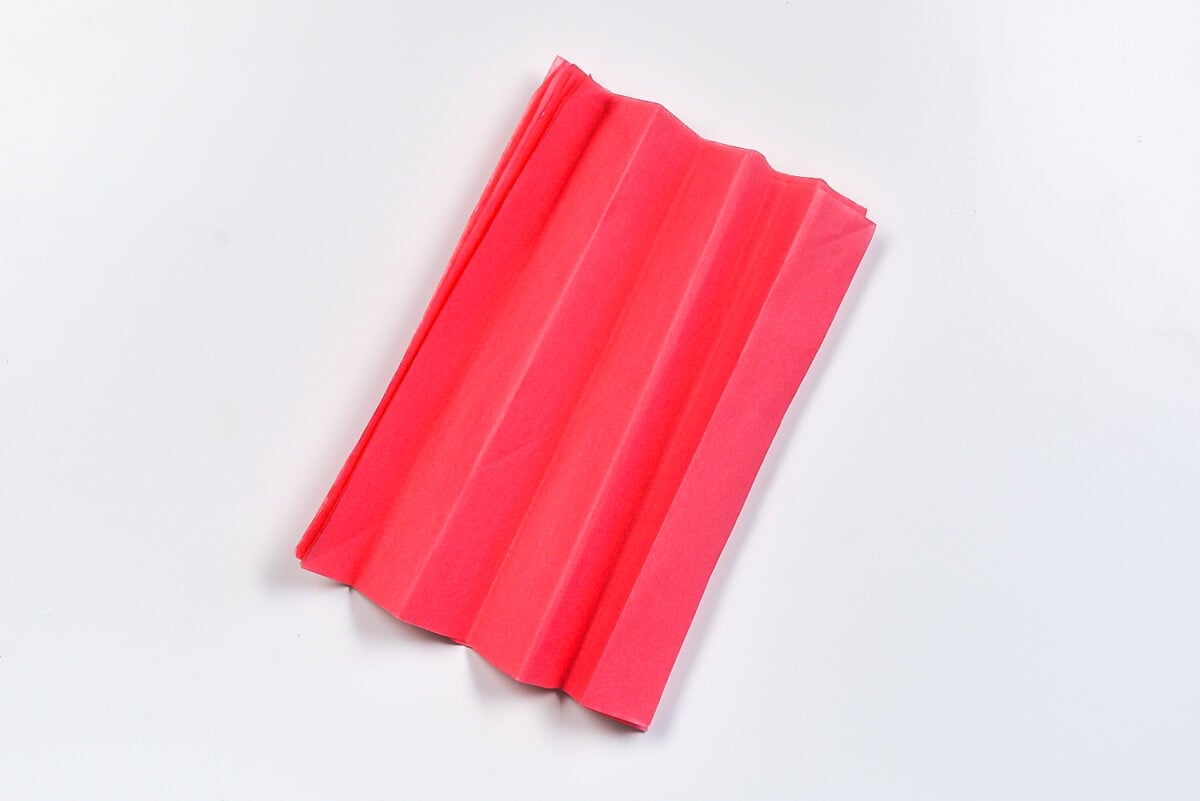
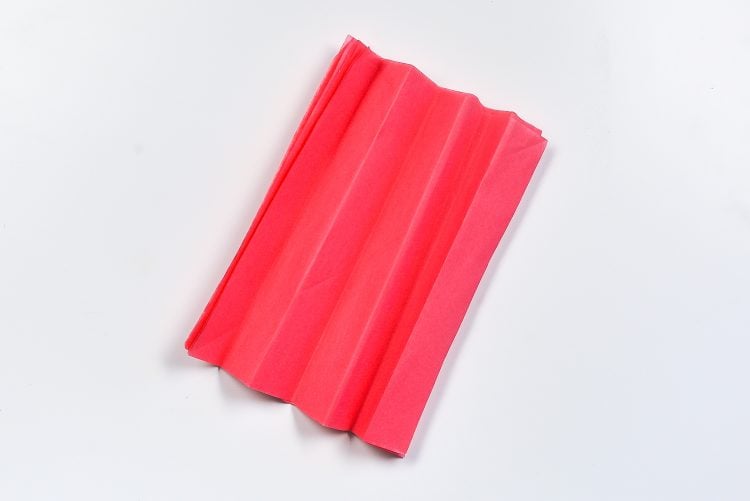
Fold the paper, accordion style. I usually ended up with six or seven folds.
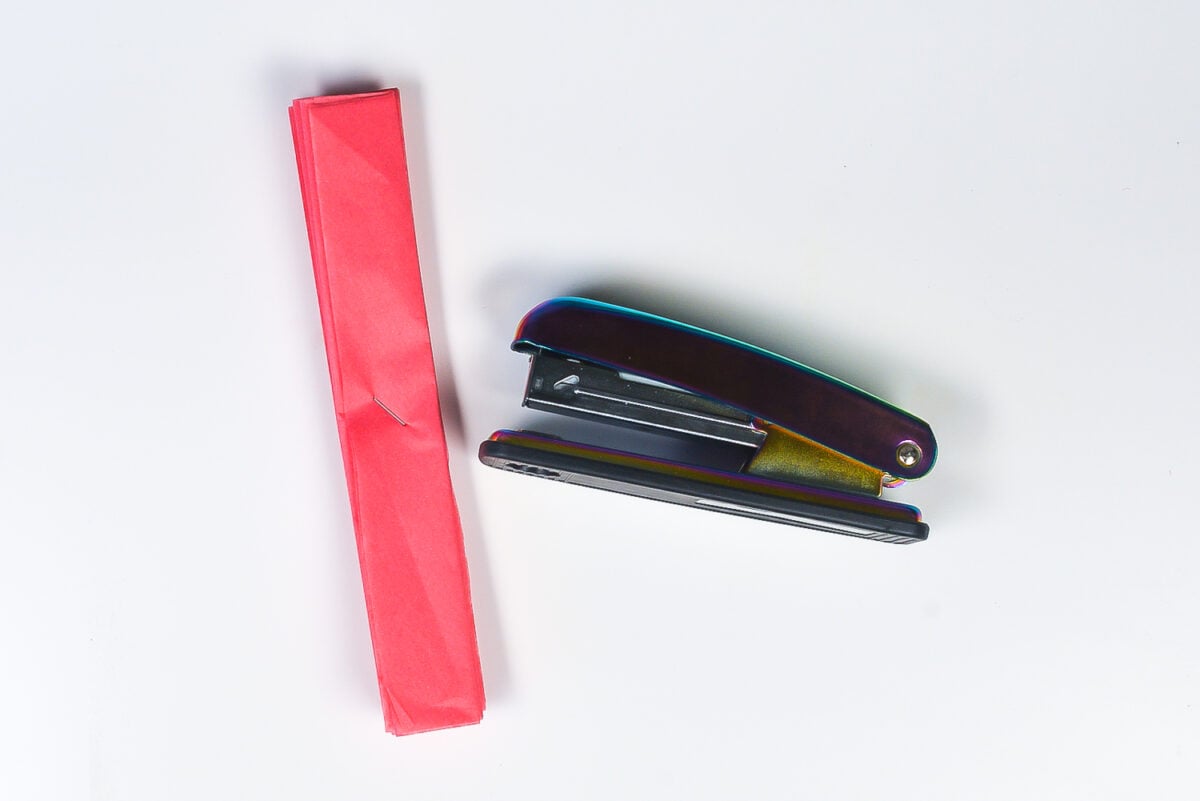
Staple the accordion in the center.
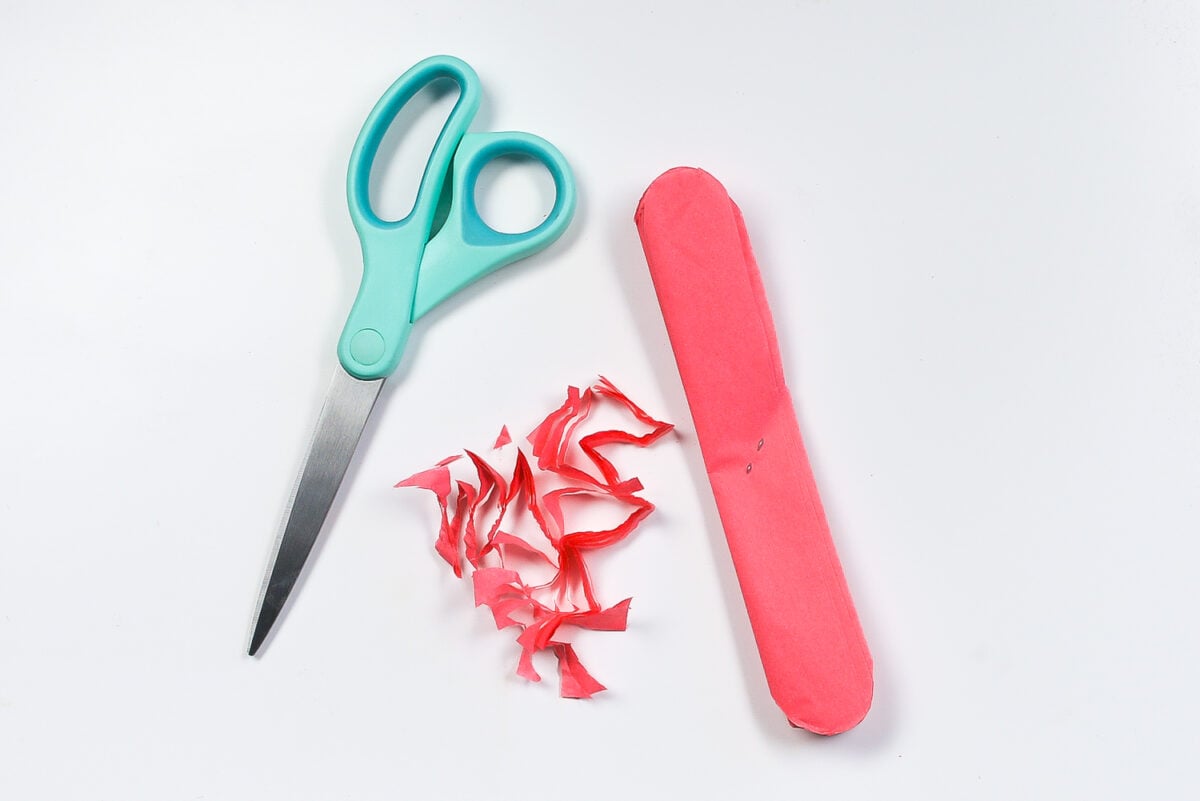
Trim each edge to create the “flower petals.” See below to find other ways of cutting the ends of each flower to create a different look.
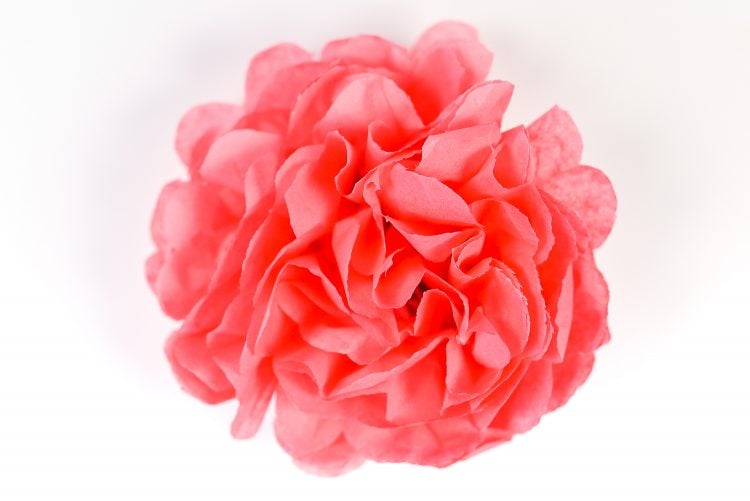
Carefully start to separate the layers of the flower. Pull from the inside of each layer, as opposed to out on each edge. This will help keep the flowers from tearing. To be honest, we ripped a lot of petals but there are so many on each flower that it wasn’t noticeable. Keep fluffing the layers until you have half the flower.
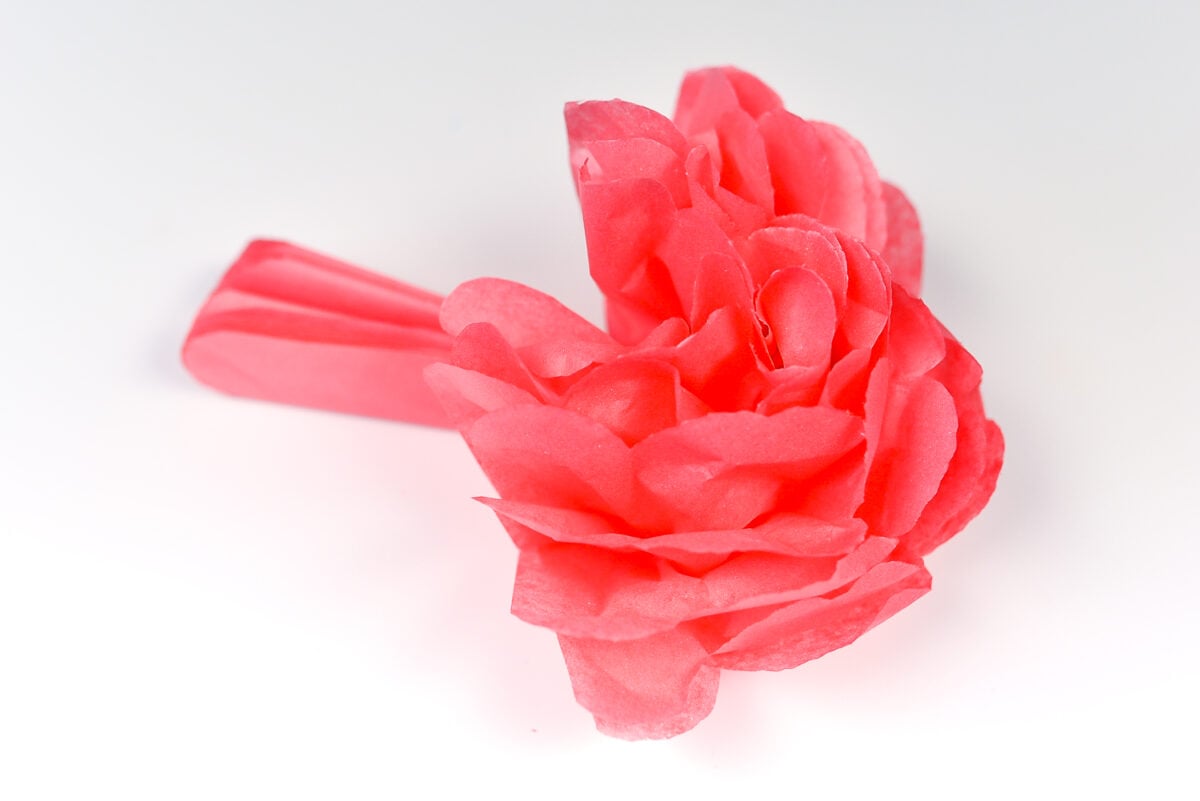
And then fluff the other side! Voila! You’ve made a paper flower!
How to Make Small Tissue Paper Flowers
If you want to make smaller paper flowers, cut down the size of your squares. Then use this guide to know how many sheets of tissue paper to use:
- 12″ wide and up — 8 layers
- 8″ – 11″ — 6 layers
- 4″ – 7″ — 5 layers
- Smaller than 4″ — 4 layers
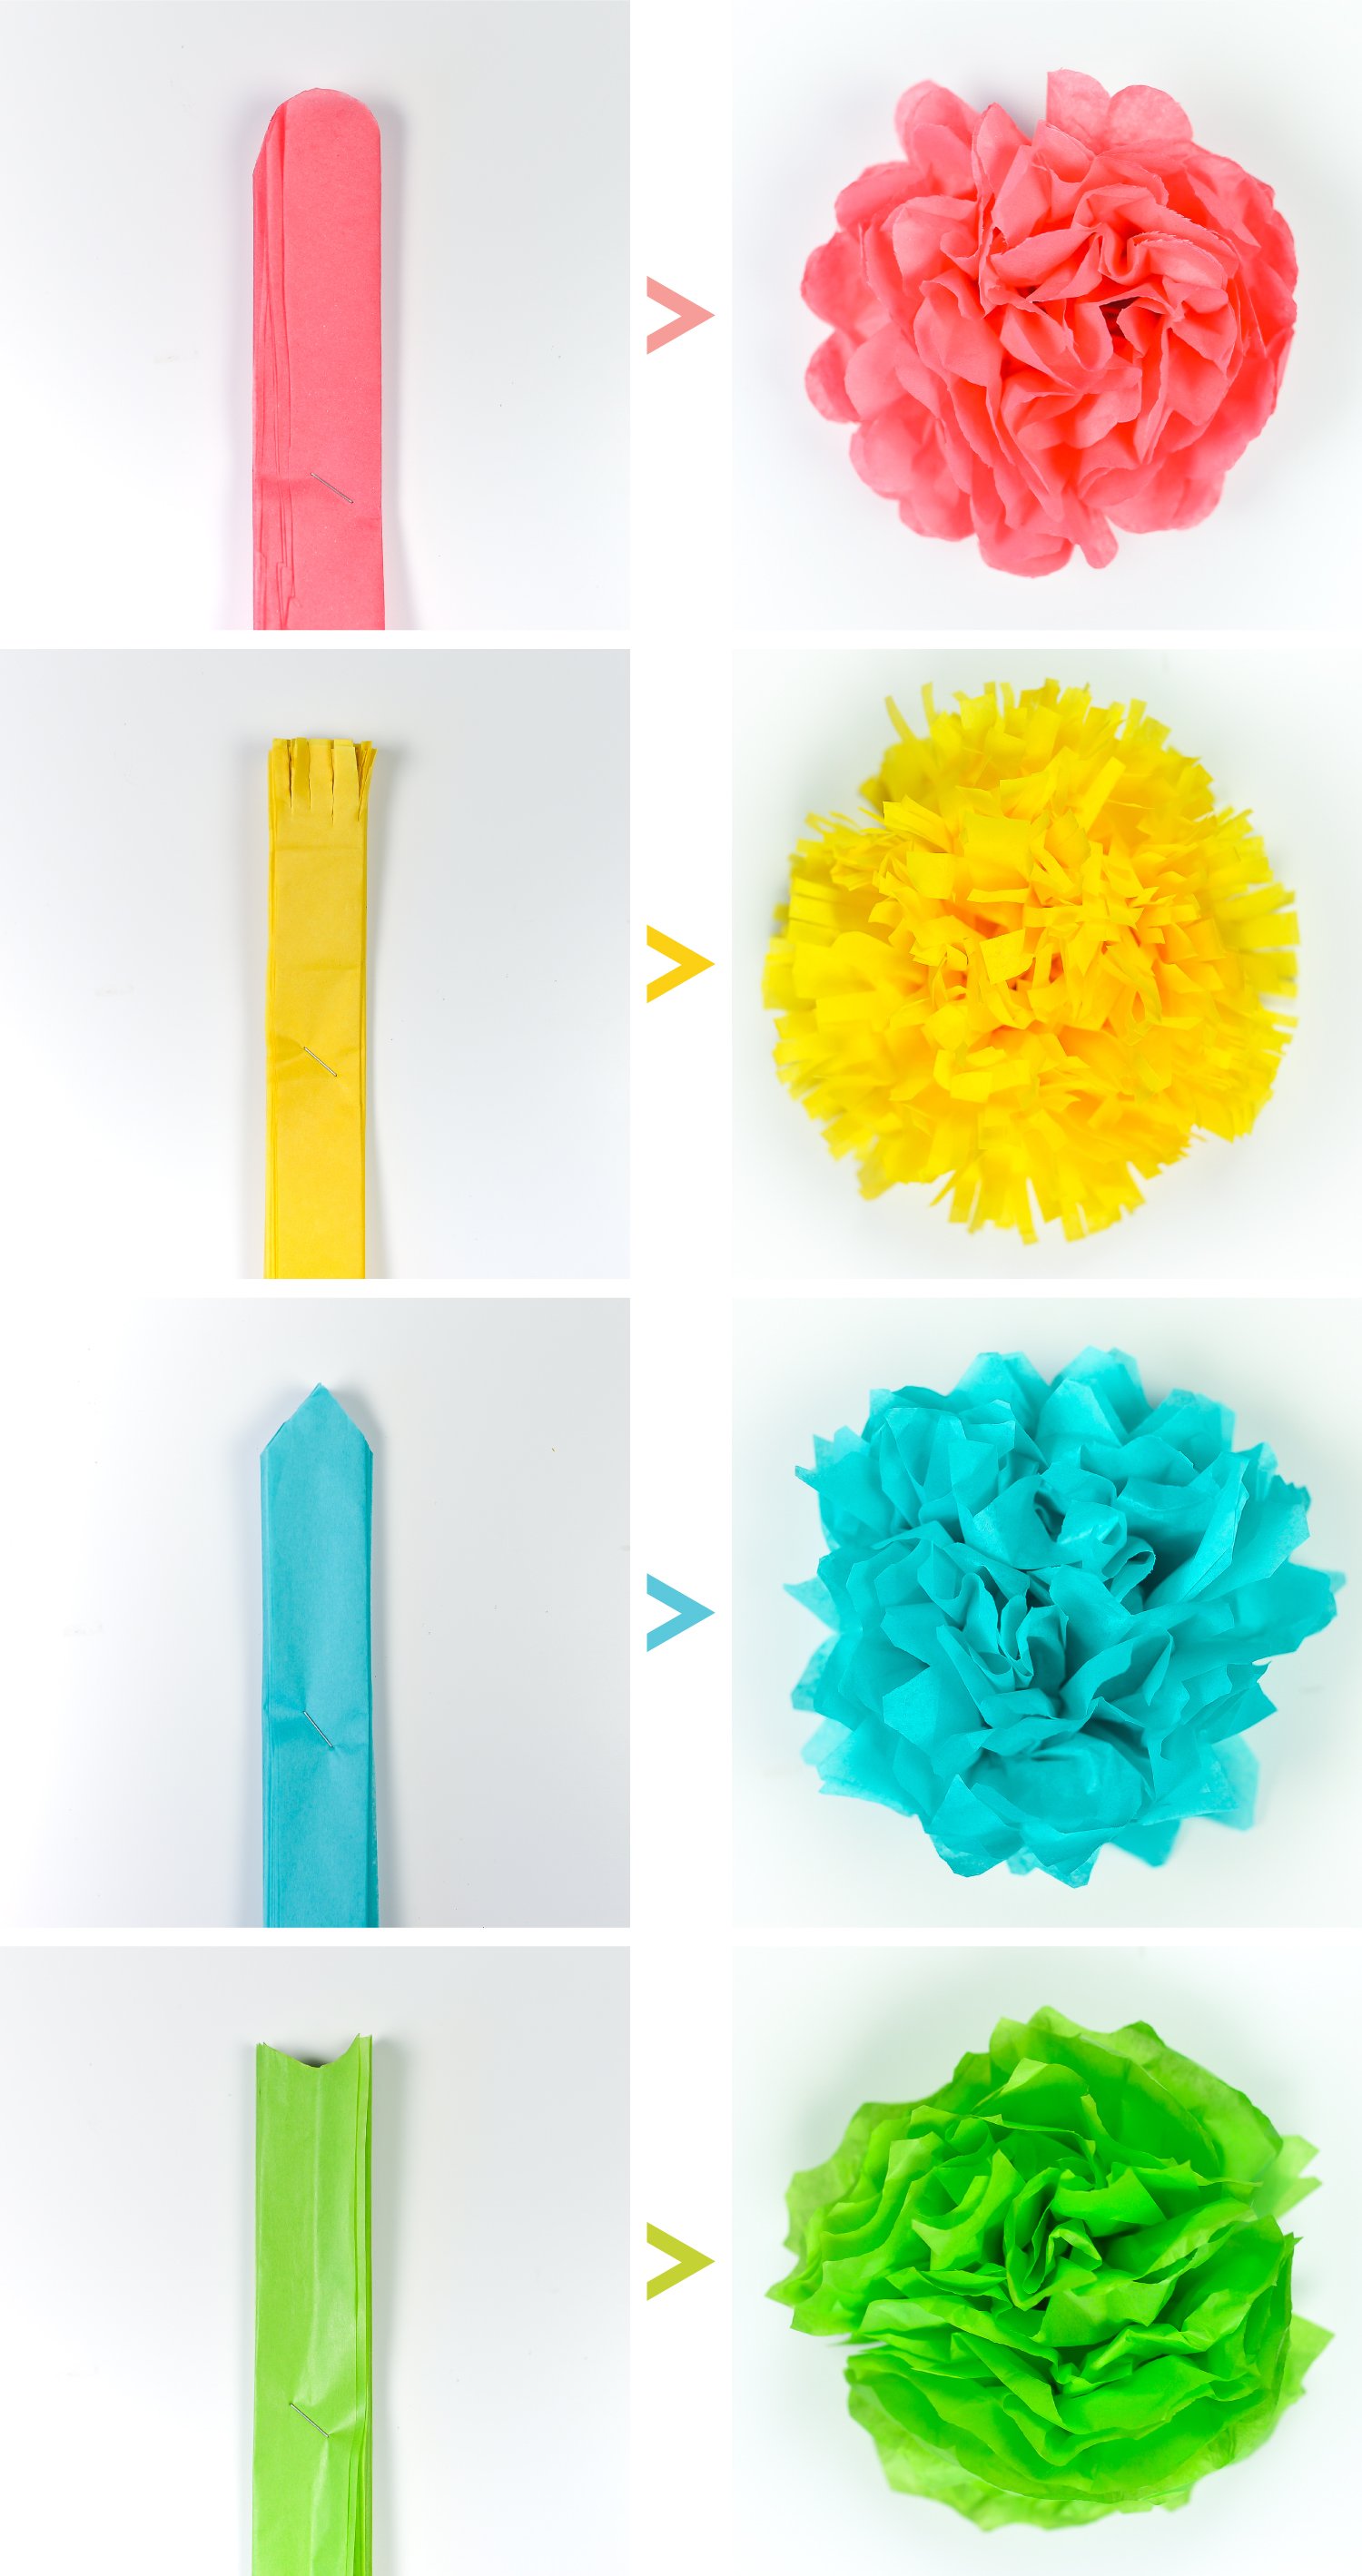
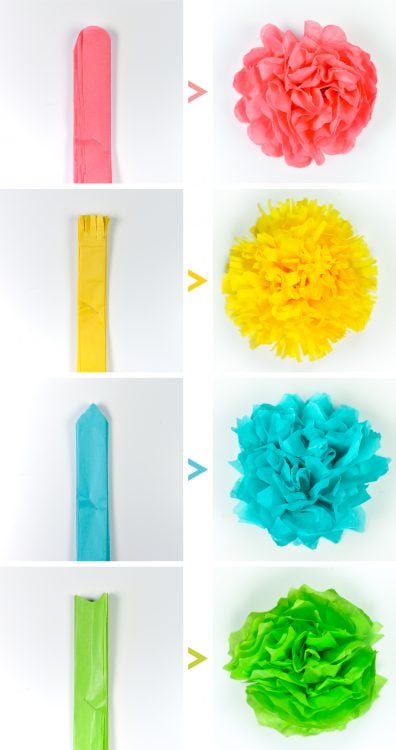
How to Make a Tissue Paper Flower Four Ways:
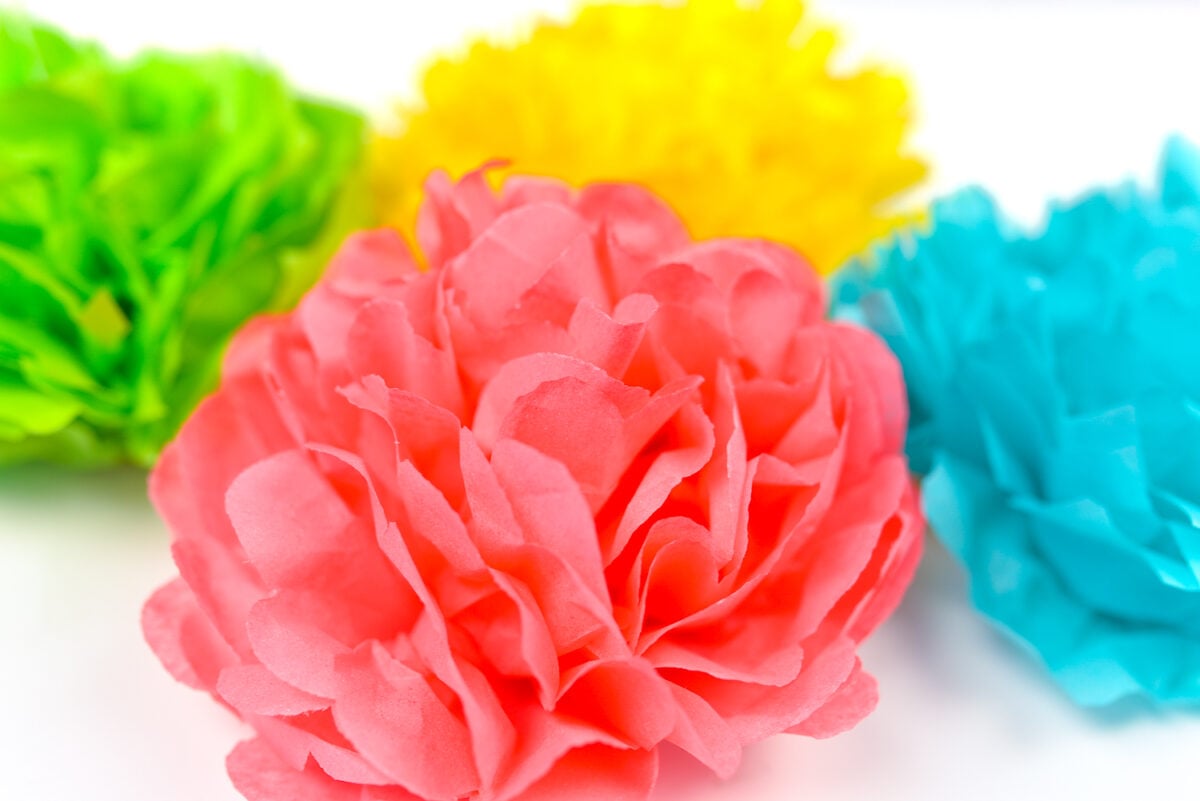
I ended up cutting four different styles of flowers — here’s how I accomplished each look:
- Cutting a rounded petal
- Cutting fringe
- Cutting a pointed petal
- Cutting an inverted rounded petal
Pretty fabulous and not so difficult! Perfect for the bride (or bridal or baby shower planner!) who wants to save a bit of money but still make an impact. Ever since the wedding, this paper flower DIY has been my go-to for almost any party I’m throwing.
I also have a handful of tutorials for other types of tissue paper flowers using different colors. Check out these paper flower tutorials:
- How to Make Tissue Paper Peonies
- How to Make Tissue Paper Sunflowers
- Tri-Color Tissue Paper Flowers
- Remembrance Tissue Paper Poppy
If you have less time than money, you can always buy your paper flowers as well. I have a whole post of The Best Places to Buy Tissue Paper Flowers.
Comments & Reviews
Meg says
These are so pretty, and very inventive! They looked lovely on your tables. I can definitely appreciate not having a ton of money left for decor . . . our centerpieces were books purchased at library book sales and secondhand stores, paired with science flasks bought wholesale from a distributor online with flowers bought wholesale locally from an Amish farmer. We still spent a bit of coin, honestly, but nothing compared to the prices I’d been looking at for “professional” decor!
Cori George says
“Professional” decor can be ridiculous. We had a few rented items that were very reasonable, but if I wanted to go all out on every single table, it would have been thousands of dollars! Heck no. $40 for paper flowers was our biggest savings!
And I looooved your wedding. So cute!
Mixi says
Nice post, thank you so much.
https://toqueparacelular.org
Steph @ Crafting in the Rain says
Really pretty, and the colors are perfect! I’ve only seen the tissue paper balls–I love these as flowers!
Cori George says
Thanks Steph! Much easier than making a whole ball :)
Tracey @letsgojunking says
Love all the color. The tutorial is well written and easy to follow and the pictures are WOW! Thanks Cori.
Cori George says
Thanks Tracey!
Ashley @ My Craftily Ever After says
I love these! I made some for my daughter’s room and they add just the right amount of sweetness and whimsy! Thanks for the tutorial!
Cori George says
Thanks Ashley! Perfect decor for a kid’s room — if they get messed up, it’s so easy to make more!
Dee @CupcakesandCrowbars says
My little absolutely LOVES paper flowers, but I’ve had a hard time finding different styles that were easy to put together – I think this will be our weekend craft this week!
Cori George says
Awesome! Would love to see what you make, Dee :)
Mrs Major Hoff says
So so pretty! I love the colors you went with–so vibrant! Congrats on the wedding (and on having awesome friends & family who fluff!
Cori George says
Couldn’t have done it without them! :)
Kaysi @ Keeping it Simple says
I love these and didn’t realize how many styles you could make! I’m so going to do this, thanks for sharing
Cori George says
You’re welcome, Kaysi!
Cherrie says
Since we have very limited funds for our wedding next May, this will be an absolute win for us! Thank you for the tutorial!
Cori George says
You’re welcome Cherrie! Congrats on your upcoming wedding!
Albion says
Paper flowers all the things!!
Cori George says
All the things!!
Heidi @ Happiness is Homemade says
These are incredible! I have always had so much trouble with the big tissue poofs looking pretty, but this smaller scale looks just as pretty and way more manageable! Great job!
Cori George says
So much easier than the big ones!
Jillene@inkhappi says
I had forgotten how to make these. now i have it forever “pinned” to my memory! They look great on your tables and I love the barn look!
Sami says
I cannot believe you made 500 of those. They look great! But holy cow! You must have one amazing mom. :)
Cori George says
She’s really the best!
GingerRachelle says
These are really lovely and the colors are great. I made some of these for my sisters baby shower years ago and they were just the right touch. I was skeptical of how they would turn out considering they were paper, but I really loved the look. Pretty, classy and feminine.
Carol Green says
These are so cute for Spring décor! Thanks for linking up on OMHG Wordless Wednesday!
Good luck and have a great week!
Carol (aka Running Granny Green)
Kyla @HouseOfHipsters says
OK, Totally pinning this! I usually buy these from Etsy because I had no idea how to make them myself. This is awesome! Thanks for linking up at Found & Foraged.
lorraine williamson says
thanks for the lovely tutorial this looks like fun visiting from many hops have a great day
Susan says
You were so smart to save your budget and create these lovely paper flowers! I’m sure I’ll be creating a bunch for my daughter’s graduation party. Thanks for sharing at the This Is How We Roll Link Party on Organized 31.
Samantha Bacon says
wow. wow. wow!
Kristina & Millie says
wow so lovely! and so many fun ways to change them up too! thanks for sharing the diy for the tissue flowers. We have a friend getting married soon, I think she will love these!
Cathy Kennedy says
When I was school, we would decorate our school’s parade floats with paper flowers. It took us hour upon hour to make these, quite similar to yours, and then attach them to usually a flat bed trailer. Seeing your creations on Inspire Me Monday reminded me this long ago memory. Thanks for sharing your creations & have an inspirational day! PS: I’m saving this page as a link, as I may do a Flashback Friday post using it. :D
Drama Queen's Momma says
These are awesome! And you make it look so easy! Thanks for sharing!
Pam says
I love these! I used to make a variation of these years ago. Pinning, thanks!
Lynn says
Hi! These look wonderful! Just wondering what were the dimensions of the tissue paper you used…I know there’s different sizes. Thanks!
Swagata says
wow..Thank you so much..Its nice :)
Anna says
Can you share the place where you purchased the tissue paper? Thanks!
Cori George says
Yes! I got it through Nashville Wraps.
Crystal says
Thanks for the tutorial!! I’ve always wanted to try and make tissue flowers myself, but didn’t know how. Can’t wait to make some. Thanks :)
Mariha says
I love these! I read over your tutorial and one of each style in less than an hour!! The last looked better than the first albeit, but its a learn as you go process. My question is, how did you store them beforenyoue big day so that they didn’t flatten or wrinkle. I noticed that if I wasn’t barely I very easily flattened one side while I was fluffing the other. Makes me nervous about storage. My wedding is in October.
Adele Grisham says
These are awesome, can’t wait to try them….Thanks!
Susan says
I know this is an older post but I just found it. I have a vague memory of making these when I was younger, and your photos got me off the couch and searching for tissue paper. I really like the different versions you get with the small changes to the petal edges. I’ve already made several. Thanks for posting this!
Cecilia Kennedy says
Thanks so much for this post! I’ve always wanted to make paper flowers, so I just made some on Saturday. I wrote about my experience here and I credited your blog: https://fixinleaksnleeksdiy.blog/
This is such a simple and beautiful craft. I don’t know why I’ve waited so long to try it!
stephanie says
How many sheets did it take to make 500 flowers (approximately)? I’m trying to estimate how much to buy and not end up with a lifetime supply of tissue paper :)
Cori George says
I think it would take about 1000 sheets. Each sheet gives you four squares, and it takes 8 to make a flower. Hope that helps!
brabusday says
thanxs very helpful :)
Erica Moseley says
I followed this tutorial & made my own tissue paper flower. This may sound a bit silly, but what is the bottom of the flower supposed to look like? I want to make sure that I made mine correctly.
Cori George says
I don’t have a photo, but it should be flat with two sides sort of fanning out. Hope that helps!
Ravi says
What a nice wedding decoration ideas using flowers. it is really great ideas. And really loving it. Keep sharing such a great wedding tutorial
Kece Photobooth says
I’m lucky to find your website. There’s so many idea to make stuff for decoration. Cheap but fabulous…
Really useful for my occupation in photo booth decoration. Thank you very much…
Cori George says
You are so welcome!
Alexandra says
Hi Cori,
This is also a perfect craft for Mother’s Day. Thanks for sharing. I loved the idea.
Sandy says
Just made my first one, not perfect but super easy and I am sure will become better with practice. Will look fantastic for my Moms bday party this weekend and such a money saver! Thank you :)
Cori George says
You’re so welcome! Still one of my favorite crafts ever.
Shelley says
Hi – I just came across your page: the flowers look great, and I love the petal variations. I made a heap of these a while back for a parade float but as I was unsure what the weather would be like I didn’t want to use tissue paper. (Wet tissue paper is a soggy mess :) ) I ended up using the thin plastic tablecloths you can buy for kids parties – they come in a great range of colours. I had to put them in bunches because the plastic was a bit floppy as I made really big flowers, but they looked great!
Cori George says
That’s a great idea! Makes me want to do a tutorial for it :)
Cathi Bender says
Will be making these for my classroom! I looked at some ideas for making paper flowers but these look much simpler to put together! Thank you!
Deborah Martin says
I never really thought about how much making these could save you in even décor until now… great link, I am glad I followed it to check out your post… from a newbie in the stream of emails. I will be looking for a stray sheet of tissue paper to try this out.
Nice to see this post is still circulating after all this time. I am wondering how to do affiliates and where to build an online presence, etc. Checking out posts has changed for me! haha.
My first link to you was through a wall-size Scrabble Board post. I am thrilled with that concept! But, sood won’t work for me. I am thinking how I could do this for me.
Anyway… just wanted to let you know I loved this post… it made the whole idea of making tissue flowers easy. I vaguely remember making Kleenex flowers with bobby pins as a child. :-)
Helena Orstem says
Just made my first one, not perfect but super easy and I am sure will become better with practice.
Klingeltonekostenlos says
The article related to the topic of music is very good.
eatfrysmith says
I think I will give it to my daughter, she loves to do things like that
Suonerie Telefono says
Thank you, these are helpful things to me!
Peter Crouch says
I will instruct my little daughter to make these paper boats ….
suonerie gratis says
Very nice. Thank you for sharing
Lula Knox says
Cool I’ll have to try these i did it differently and those were flops this looks pretty easy
Thomas says
Awesome! They’re really great, easy to follow, I think my daughter will love this job. Thanks for your sharing
RingtonesCloud says
Amazing, I want to have these flowers in my wedding
sanal sunucu says
greetings dear writer friends and readers we have all read as our company we liked it very much thank you now follow every article of yours
Tonosdellamada Cancines says
Thanks for sharing such secrets of making handmade things so beautiful.
tonos gratis says
me too.
toquedeceluar says
Thanks for your sharing, your life is so colorful
suonerieandroid says
Very helpful, thank you for sharing
Musicdel says
Thanks for sharing
tonos para celular says
Thank you for this wonderful sharing.
Leslie says
What’s the name of the green tissue flower?
Crystal Summers says
Hi Leslie,
Unfortunately, I don’t think it has a name. It’s just a different way of cutting the tissue to give the flower a slightly different look and feel.
Hope this helps!
Crystal, HLMS Community Manager
Amber says
Hi. So excited to find this post as we are planning a baby shower. How far in advance did you make the flowers? The shower is about a month away and I’d love to knock them out over the next month and just store them but I’m not sure how well they’ll hold up/stay fluffed! Thanks!
Crystal Summers says
Hi Amber,
You can make them as far in advance as you’d like to! Just be sure to store them loosely. They’ll stay fluffed! I like to store them in plastic storage bins or boxes when I make them.
Happy crafting!
Crystal, HLMS Community Manager
Joyfully5 says
These flowers are so beautiful. Thank you for sharing the tutorial, so we can make them ourselves. Mother’s Day is coming up, and I will be making them for my daughter, and with my 4 & 6-year-old grandkids help, for my daughter-in-law.
Vickie says
I made tissue flowers and attached them to dowel rods to make a bouquet for my sister. She was in the hospital and wasn’t allowed to have fresh flowers. They were a big hit with the nurses and staff. Fun to do when you don’t know what to do.
Casey says
Hi! This looks easy and so fun! How do you vary the sizes? Just cut a little more off when you trim the edges? Thanks!
CHRIS GARA says
THANK YOU FOR THIS TERRIFIC TUTATORIAL AND GREAT PHOTOS FOR EACH STAGE OF CONSTRUCTION.
Sharon says
How do you attach sticks for stems.? I love these flowers and looking for ideas for “Fiesta” clas reunion theme,,
Crystal Summers says
Hi Sharon,
I would use pipecleaners as stems. You can wrap them around the base of each flower.
Happy crafting!
Crystal, HLMS Community Manager
Kristina says
Do you have a pdf for this project? It’s telling me it’s 30 pages long to print. Thanks!
Crystal Summers says
Hi Kristina,
We do not have a pdf. However, if you decide to print, you can adjust settings to print more than 1 page on each sheet of paper. Another trick is to decrease the size of the print to less than 100%. That may help save paper.
Hope this helps!
Crystal, HLMS Community Manager
JANET KENNEDY says
GREAT IDEAS
Cori says
Hi Janet,
Thank you! I’d love to see your creations!
Birthday Wishes says
Its truly amazing. Will try the same in our upcoming events at our home. Thanks.
Cori says
So happy you like them! They are so fun and easy to make and are a very inexpensive party decoration to add a festive flair!:)
hurley thurston says
Thank you for including simple Photos with your tutorials. So many only have a video, and I don’t have time for that. I really appreciate the multiple size tips. I am going to an elementary school play and wanted to get flowers for one of the actors. I am excited to create these flowers. She will get to keep them! Thank you so much!
Cori says
Hi Hurley,
My pleasure! I find it helpful to have images and a video when I learn a new craft too! So happy to hear you found it helpful! :)
sanal sunucu says
Thank you for usefull article, we liked it so much we are waiting for new articles about it
Cori says
Hi Sanal,
Thank you! I’m thrilled you found it helpful! Here is another tissue paper flower tutorial you may like! :) https://www.youtube.com/watch?v=TiP4kJrnjbA
Gracie says
How to get the most followers in fortnight with the best friends flowers 💐 I want to get more