If you’re looking for an easy and free way to print sublimation designs, try Google Docs! While the design capabilities are limited, Google Docs is perfect for printing designs you purchase from Etsy or other online shops!
Welcome back to my sublimation for crafters series! This is another post in my series of deep dives into some of the software programs you can use for your sublimation crafting. You can check out the other posts in the series here:
- Sublimation Software: What’s Best for Your Needs?
- How to Use Photoshop for Sublimation Crafts
- How to Use Cricut Design Space for Sublimation Crafts
- How to Use Google Docs for Sublimation Crafts
Today we’re going EASY and talking about Google Docs.
Google Docs is best used with images that have already been designed in another program. It’s perfect if you’ve purchased designs from somewhere like my shop, Etsy, Design Bundles, or another online marketplace. It’s a great place for beginners to start!
Pros for Using Google Docs
- Free
- Easy to use
- Larger print area than Cricut Design Space
Cons for Using Google Docs
- Limited design features
- You need a Google account
In this post, we’ll learn how to upload images and print your designs using Google Docs, so that your color is as true as possible.
If you do not have a Google account, you will need to set one up. Here are Google’s instructions for setting up an account.
Uploading a File to Google Docs for Sublimation
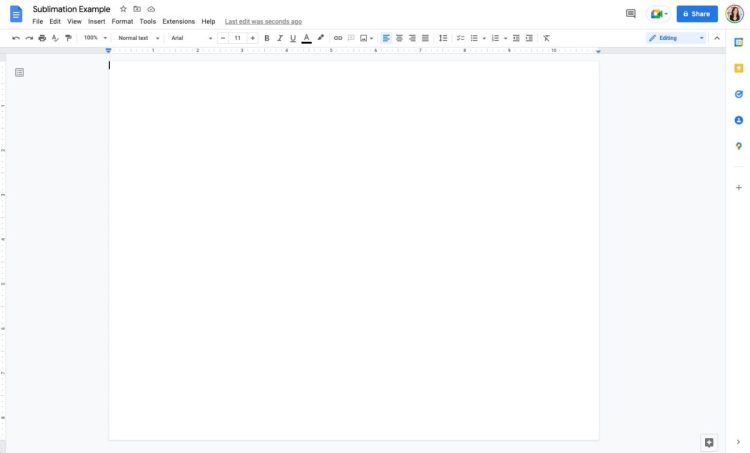
Open Google Docs. At the top, you’ll see a plus sign to create a blank document.

If your design is larger than about 7″ across, you’ll want to change some of the page settings. This is particularly important if you’re doing large designs, like a tumbler wrap.
Click File > Page Setup. If your image is wider than it is tall, change to a landscape orientation. And then change your margins to zero. If you have a printer with a different sized-paper, you can also change the paper size here.
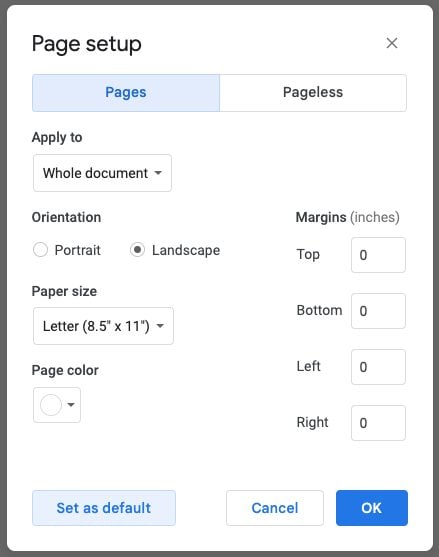
Now you’ll have a much large print area to work with.
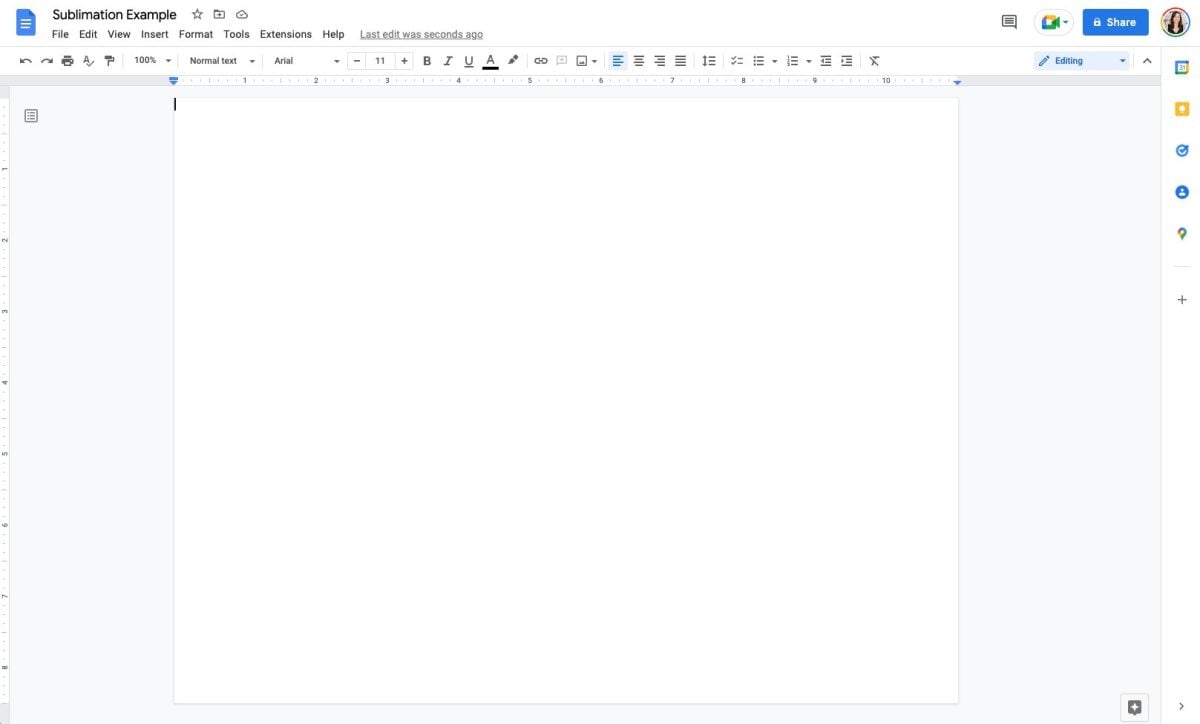
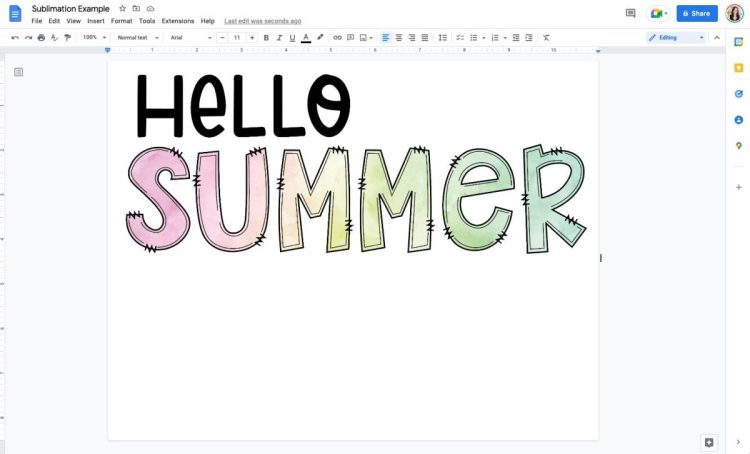
Click Insert > Image > Upload from computer, and then navigate to your sublimation image. Google Docs will automatically size your image to fit your paper.
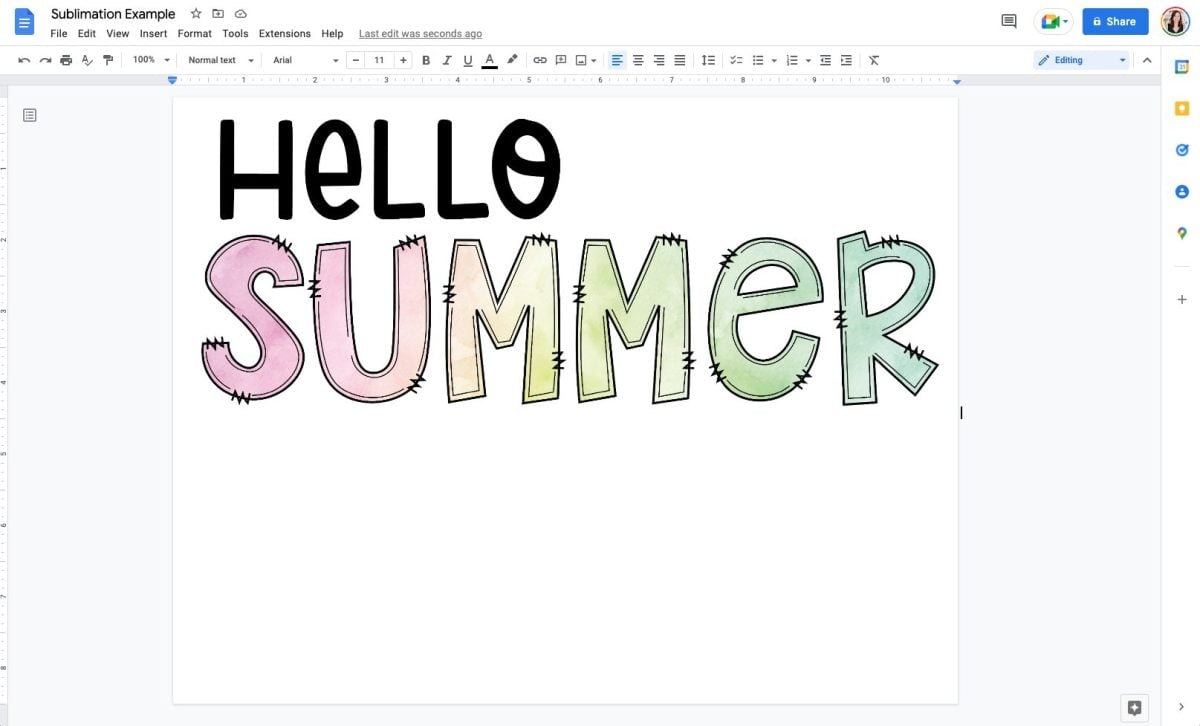
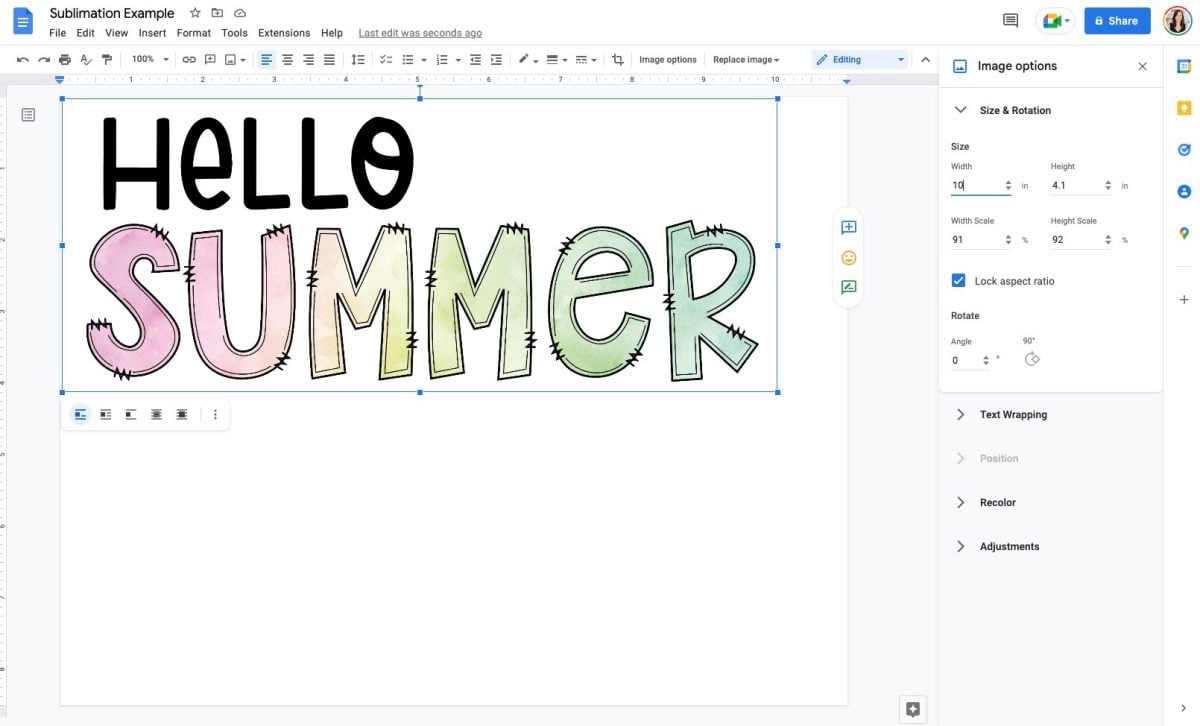
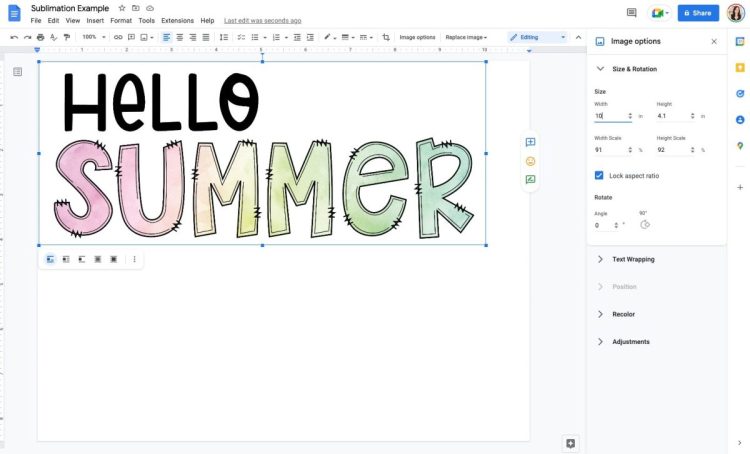
To resize your image, click Image Options at the top and it will open a sidebar with a bunch of different options.
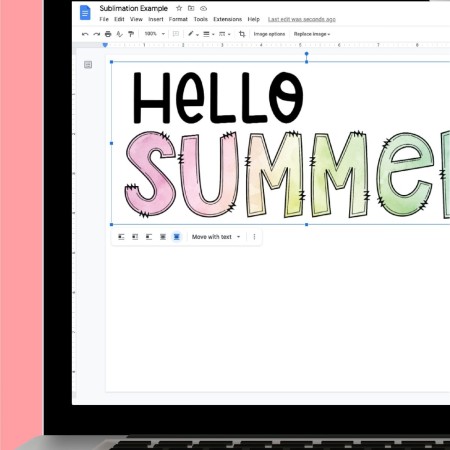
Under Size and Rotation, you can change the size of your image to fit your project. I’m changing this Hello Summer image to be 10″ across to fit on a tank top.
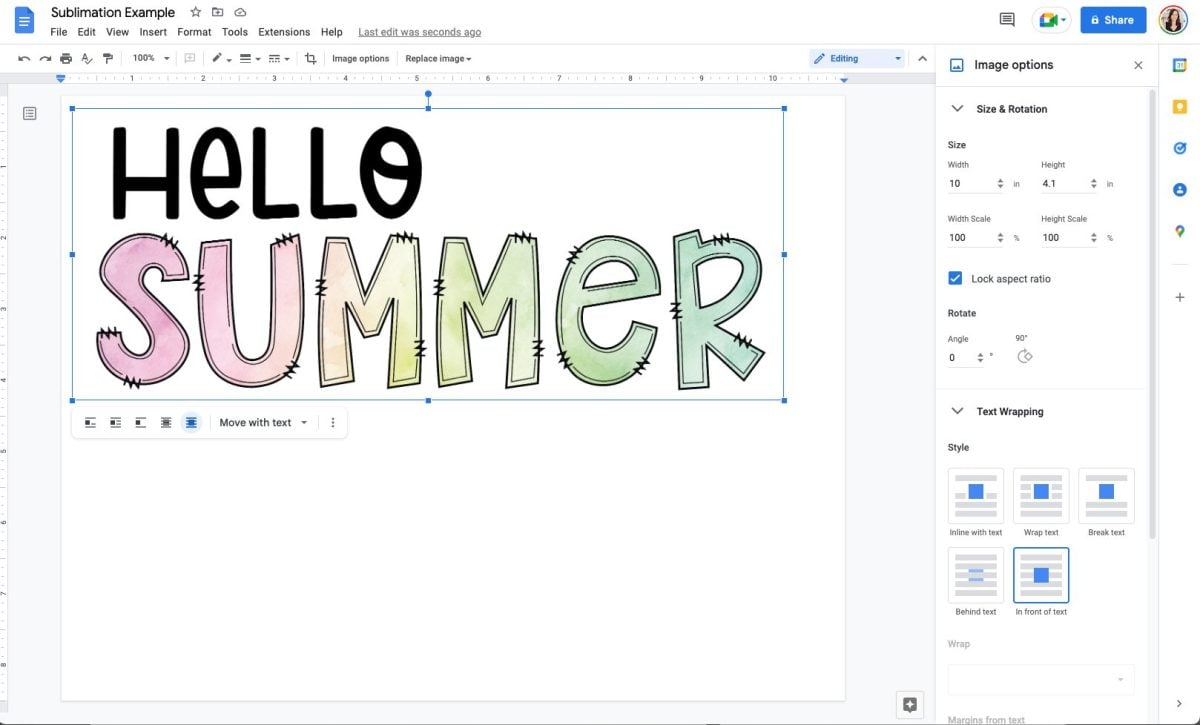
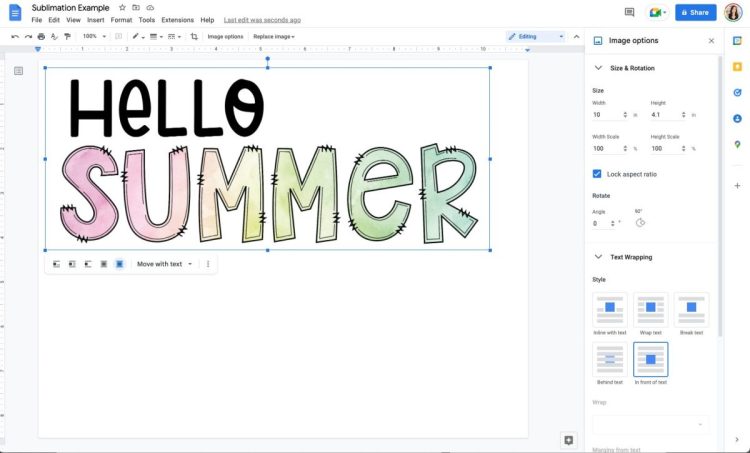
Next, if you click Text Wrapping in the side bar and choose “in front of text,” you’ll be able to move your image anywhere you want on the page. This is important to give yourself a bit of space around the edge of your image (since printers don’t print edge-to-edge) or to place something large like a tumbler wrap in the center of your page.
Then you’re good to go! Before we go to printing our file, we have to talk color!
Google Docs Color Management
Unlike other more robust software programs like Photoshop, Google Docs doesn’t have a built-in way to manage the color within the program using an ICC profile. An ICC profile is basically a small computer file that makes sure your color is as accurate as possible when you print.
BUT, there is a way to use an ICC profile with Google Docs—you just need to know where to look!
Important: Read my deep dive into using ICC profiles, which includes how to install ICC profiles on your Mac or PC. Start there—this post picks up after you’ve already installed the ICC profile onto your computer. You have to install your ICC profile first or you will not be able to manage the colors in Google Docs!
Printing Your Sublimation File in Google Docs
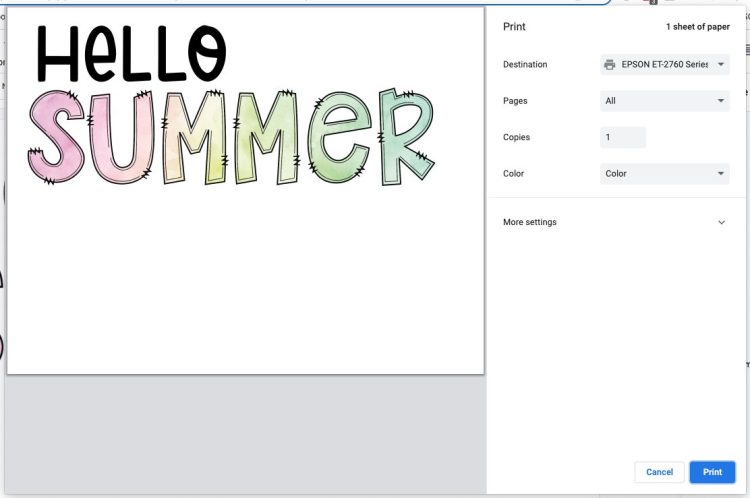
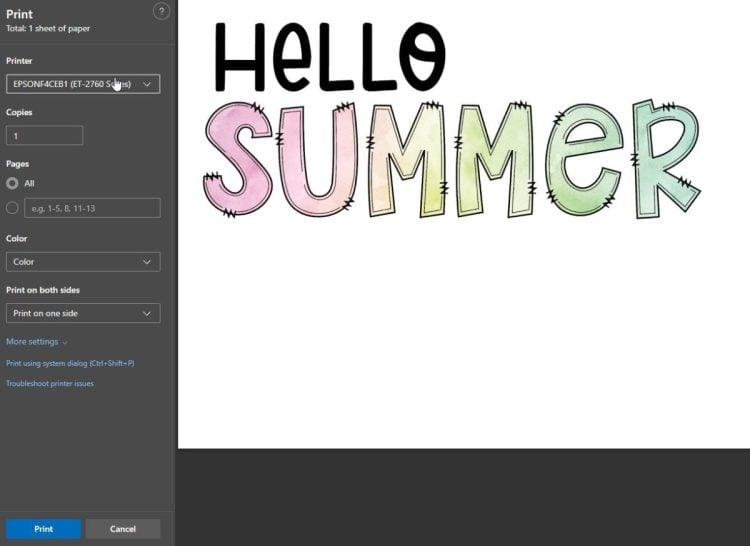
Once you have your image ready to print, go to File > Print. You’ll see the Google Docs printer window.
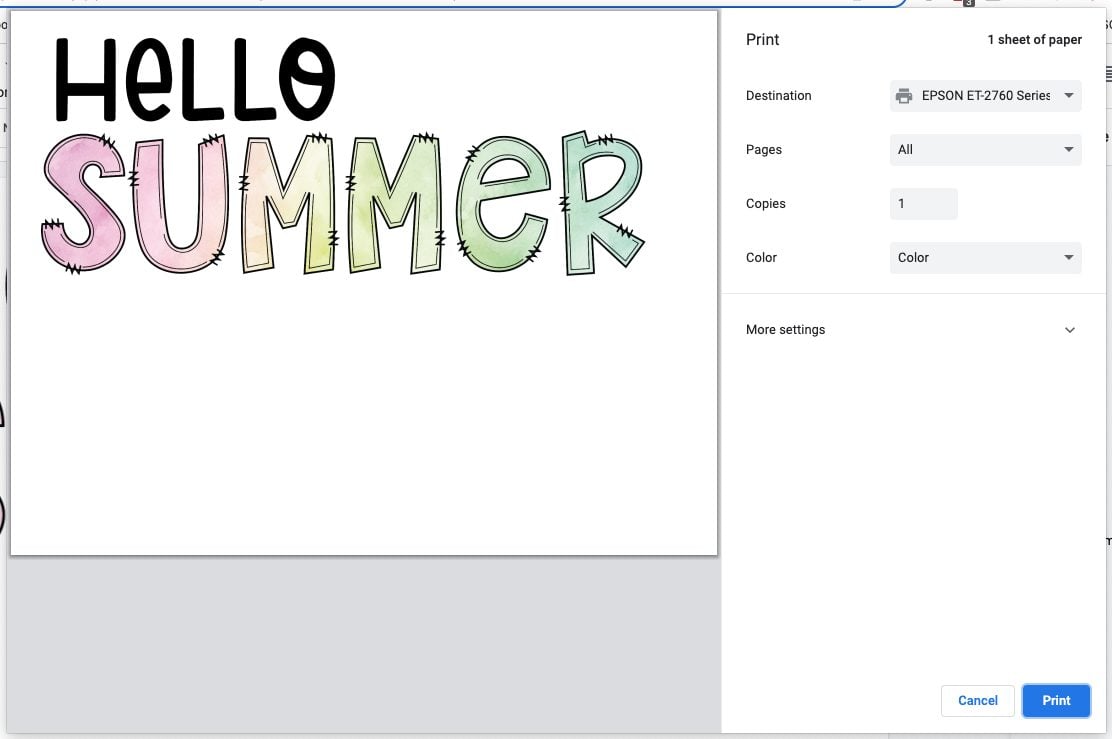
Here, you’ll want to choose your Sublimation Printer. The next steps change whether or not you’re on a PC or a Mac.
Print Dialog on a PC
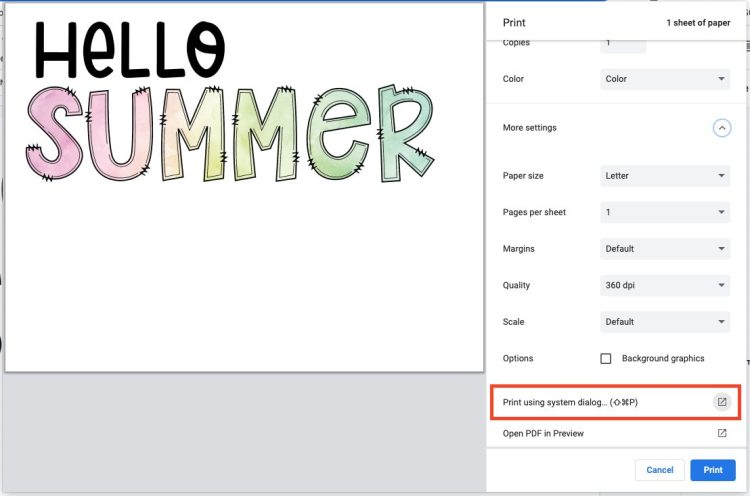
Click More Settings in the Print Box and toward the bottom you’ll see an option for Print Using System Dialog.
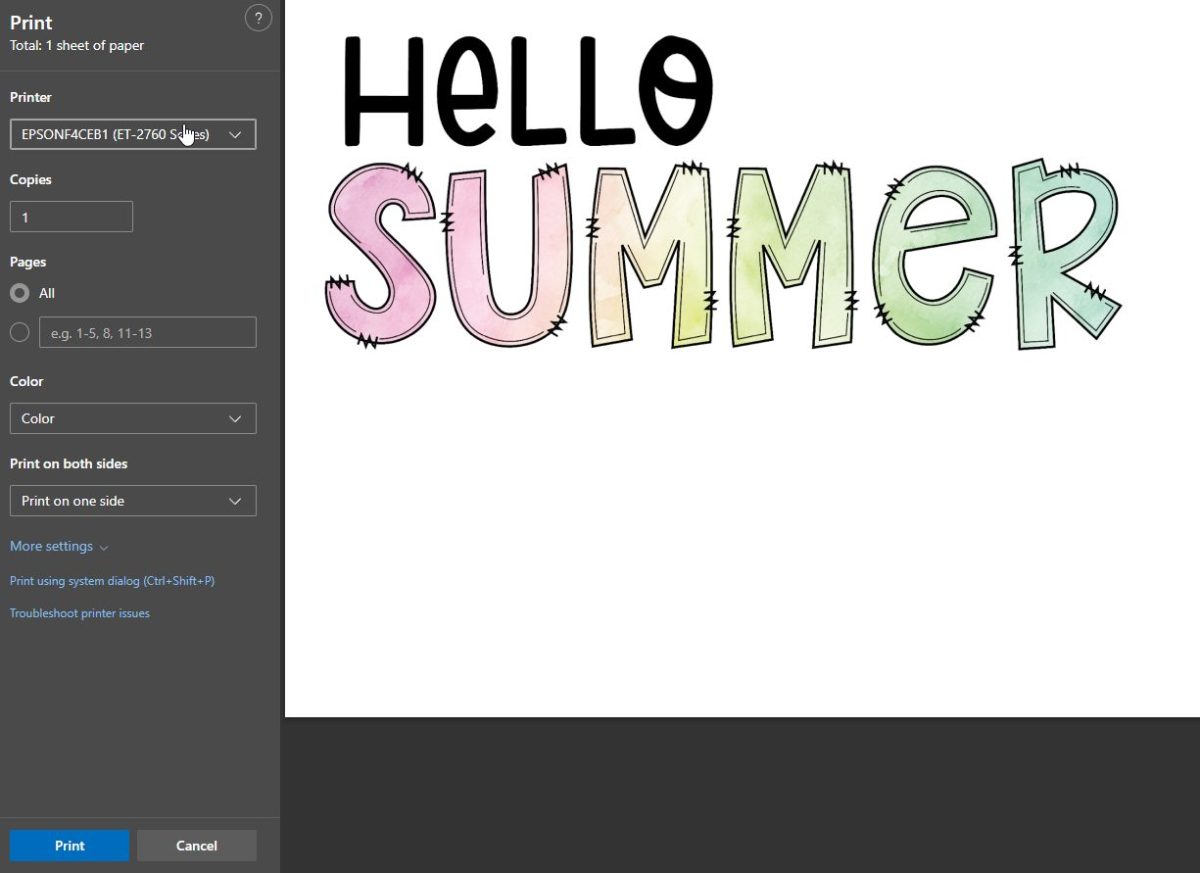
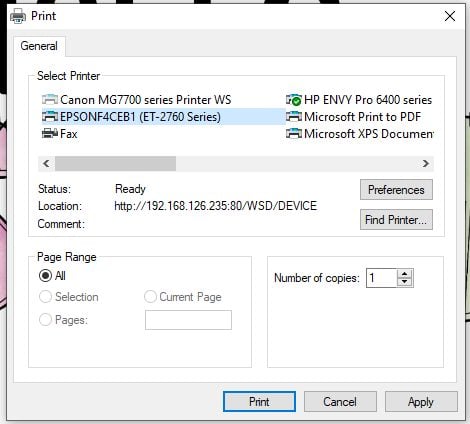
This will open up a separate window with more printer settings. Select your printer, and click Preferences.
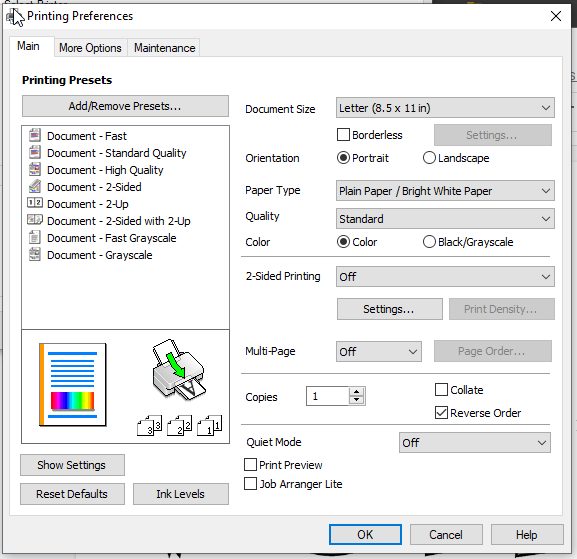
Then choose the second tab for More Options.
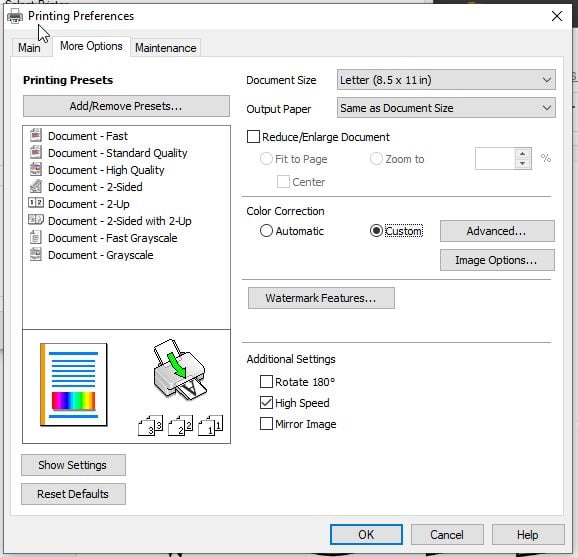
Under Color Correction, click Custom.
Depending on your computer, a new box may pop up, or you may need to click Advanced. Another window will open. Choose No Color Correction, which means that it will default to the ICC profile you installed using the directions in the post Sublimation ICC Profiles & Color Management for Beginners.
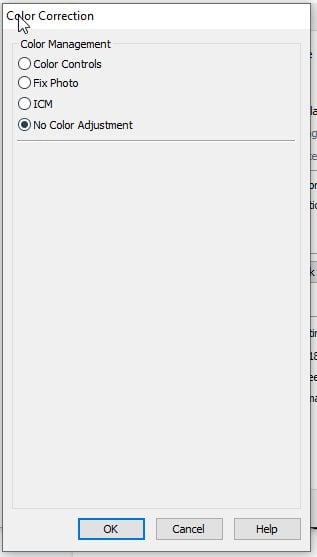
Then click OK and you can print your image from Google Docs!
Print Dialog on a Mac
Click More Options in the Print Box and toward the bottom you’ll see an option for Print Using System Dialog.
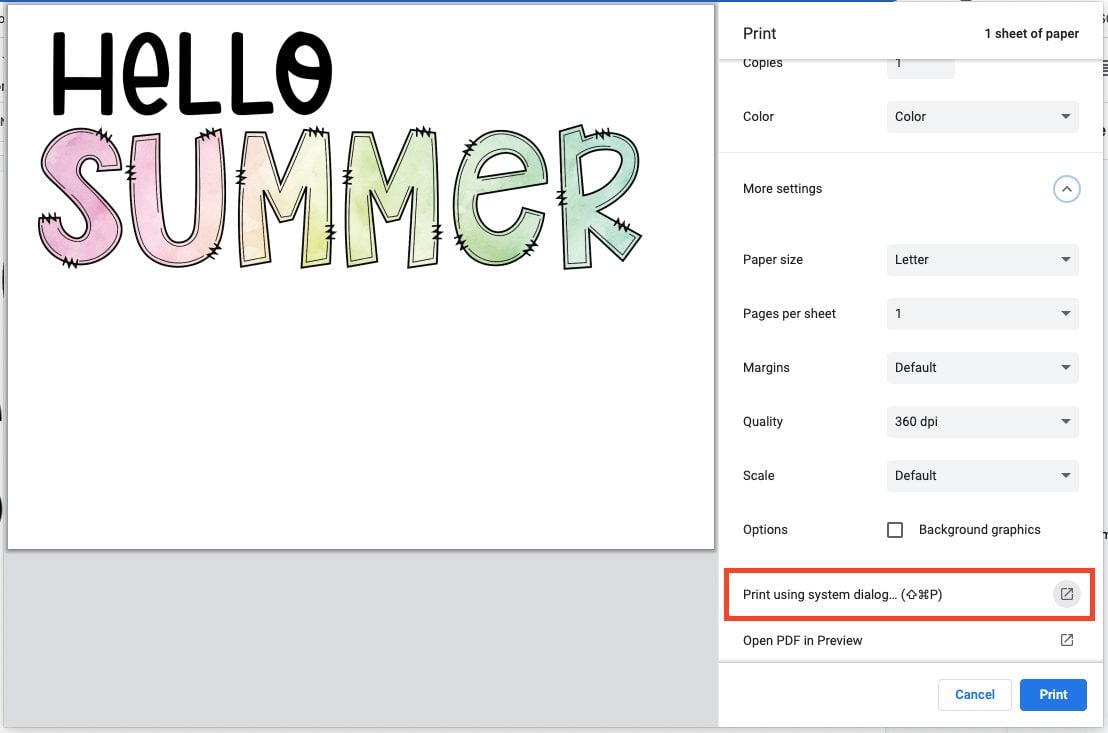
This will open up a separate window with more printer settings. (If Google Docs doesn’t open the System Dialog box, you may need to restart your computer—I find mine gets a little glitchy).
From here, you can use the dropdown in the center to choose Color Matching. And from there, choose ColorSync and use the ICC Profile you uploaded according to the directions above. You may need to navigate to the ColorSync folder to find it.
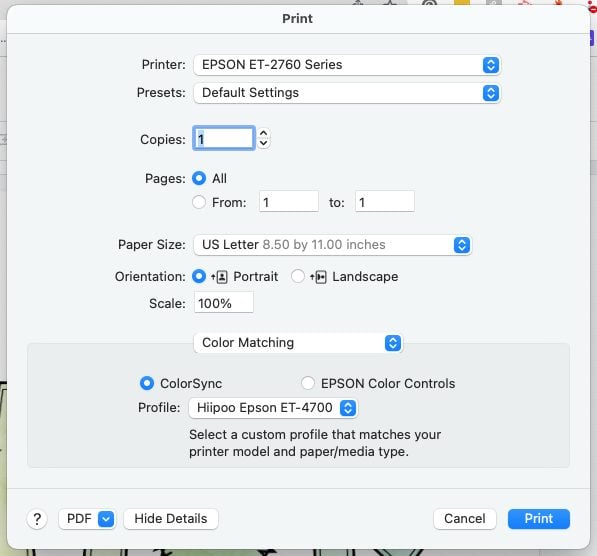
Then click Print and you can print your image from Google Docs and sublimate it onto your blank!

Did you find this tutorial on using Google Docs for sublimation helpful? Check out these other tutorials in my Sublimation for Beginners series!
- The Ultimate Guide to Sublimation Printing & Crafting
- What’s the Difference Between Sublimation, Cricut Infusible Ink, and HTV?
- How to Convert a Printer for Sublimation
- ICC Profiles & Color Management for Beginners
- Sublimation Software: What’s Best for Your Needs?
- The Best Sublimation Blanks and Substrates for Crafters
- Must-Have Sublimation Supplies and Tools
- Sublimation Paper Comparison
- Heat Press Machine Comparison for Sublimation Crafters
- Using Sublimation Prints with the Cricut Mug Press
- The Beginner’s Guide to Sublimation on Ceramic
- Troubleshooting Sublimation Printing
- Sublimation Cheat Sheets for Time, Temperature, Pressure & More!

HOW TO USE GOOGLE DOCS FOR SUBLIMATION CRAFTS
Instructions
- If you do not have a Google account, you will need to set one up. Here are Google's instructions for setting up an account.Uploading a File to Google Docs for SublimationOpen Google Docs. At the top, you'll see a plus sign to create a blank document.

- If your design is larger than about 7" across, you'll want to change some of the page settings. This is particularly important if you're doing large designs, like a tumbler wrap.Click File > Page Setup. If your image is wider than it is tall, change to a landscape orientation. And then change your margins to zero. If you have a printer with a different sized-paper, you can also change the paper size here.

- Now you'll have a much large print area to work with.

- Click Insert > Image > Upload from computer, and then navigate to your sublimation image. Google Docs will automatically size your image to fit your paper.

- To resize your image, click Image Options at the top and it will open a sidebar with a bunch of different options.Under Size and Rotation, you can change the size of your image to fit your project. For this project this Hello Summer image was changed to be 10" across to fit on a tank top.

- Next, if you click Text Wrapping in the side bar and choose "in front of text," you'll be able to move your image anywhere you want on the page. This is important to give yourself a bit of space around the edge of your image (since printers don't print edge-to-edge) or to place something large like a tumbler wrap in the center of your page.Then you're good to go! Before we go to printing our file, we have to talk color!

- Google Docs Color ManagementUnlike other more robust software programs like Photoshop, Google Docs doesn’t have a built-in way to manage the color within the program using an ICC profile. An ICC profile is basically a small computer file that makes sure your color is as accurate as possible when you print.BUT, there is a way to use an ICC profile with Google Docs—you just need to know where to look!Important: Read my deep dive into using ICC profiles, which includes how to install ICC profiles on your Mac or PC. Start there—these instructions pick up after you’ve already installed the ICC profile onto your computer. You have to install your ICC profile first or you will not be able to manage the colors in Google Docs!
- Printing Your Sublimation File in Google DocsOnce you have your image ready to print, go to File > Print. You'll see the Google Docs printer window.Here, you'll want to choose your Sublimation Printer. The next steps change whether or not you're on a PC or a Mac.

- Print Dialog on a PCClick More Settings in the Print Box and toward the bottom you'll see an option for Print Using System Dialog.

- This will open up a separate window with more printer settings. Select your printer, and click Preferences.

- Then choose the second tab for More Options.

- Under Color Correction, click Custom.

- Depending on your computer, a new box may pop up, or you may need to click Advanced. Another window will open. Choose No Color Correction, which means that it will default to the ICC profile you installed using the directions in the post Sublimation ICC Profiles & Color Management for Beginners.Then click OK and you can print your image from Google Docs!

- Print Dialog on a MacClick More Options in the Print Box and toward the bottom you'll see an option for Print Using System Dialog.

- This will open up a separate window with more printer settings. (If Google Docs doesn't open the System Dialog box, you may need to restart your computer.From here, you can use the dropdown in the center to choose Color Matching. And from there, choose ColorSync and use the ICC Profile you uploaded according to the directions above. You may need to navigate to the ColorSync folder to find it.

- Then click Print and you can print your image from Google Docs and sublimate it onto your blank!




Leave A Reply!