
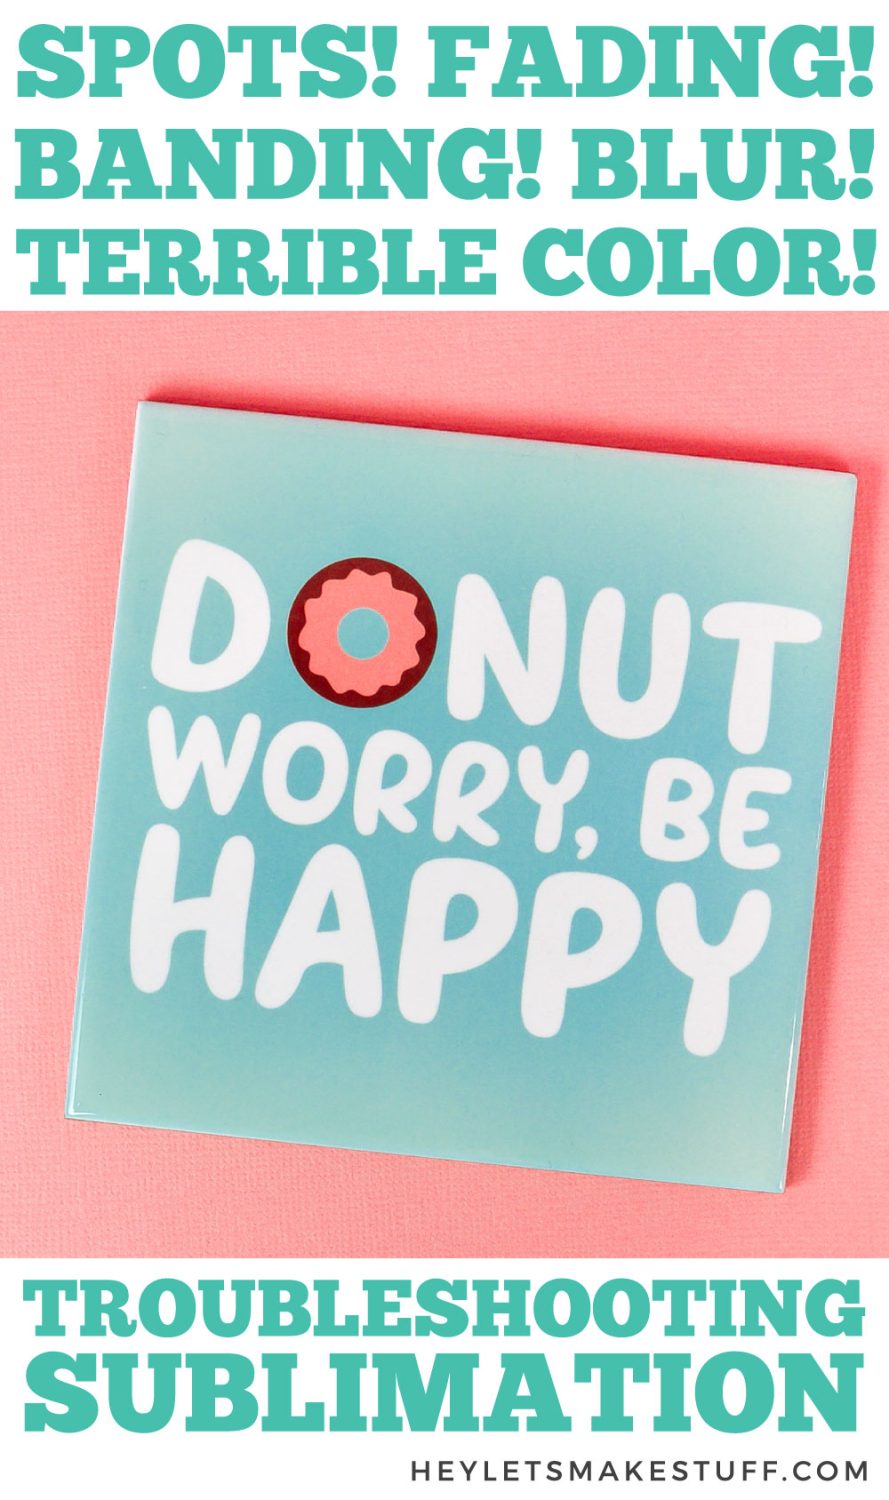
Sublimation woes? If you’re having problems like ghosting, fading, banding, or your sublimation color is off, this guide will help you troubleshoot sublimation printing. Stop wasting time and materials and learn how to get your sublimation projects right on the first try!

So, you bought a sublimation printer or converted an Epson EcoTank printer, purchased your sublimation supplies, read a tutorial…and somehow, something goes wrong with your sublimation print or transfer.
We’ve all been there. In fact, I’ve had so many fails during all of my testing and learning, it’s really easy for me to have examples for this post, as you’ll see! Even us “professionals” struggle, so don’t be too hard on yourself as you work to get better.
Join our Sublimation Made Simple Facebook group for tips, tricks, support, and resources!
Full disclosure: I do not plan to get super technical in the ways of sublimation technology, large professional printers, specialized heat presses, etc. If you suspect something is wrong with your printer or heat press, it’s best to reach out to the manufacturer or distributor directly. They can best support you.
Watch the Video
Want a video walkthrough of everything I discuss in this post? Just hit play below! If not, keep reading for a written tutorial.
How to Avoid Mistakes in the First Place
The number one thing I recommend to avoid mistakes before you make them is to read the instructions. Read ALL the instructions. Watch or read several tutorials because often people will show you tips and tricks for getting it right or share where they went wrong. Sublimation can be so finicky and there are lots of places things can go wrong, including your blanks, your transfer, your heat press, the humidity, how you prepare your project, and more.
I see so many people just jump right in without doing the proper research and testing to make sure they get good results.
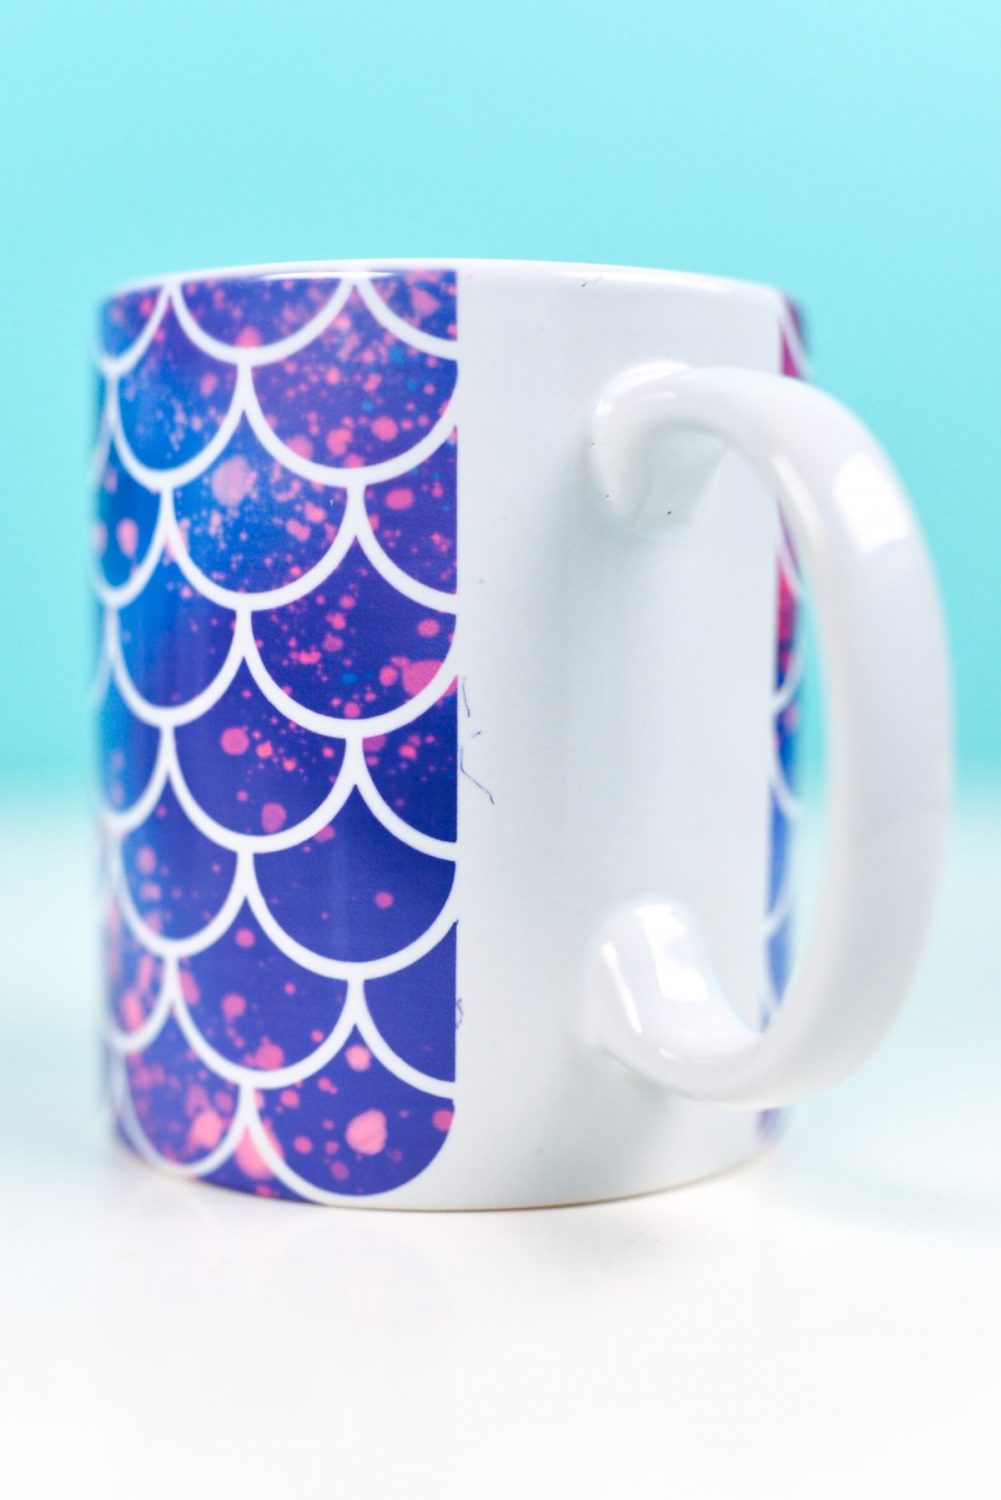
Sublimation Transfer Has Streaks or Banding

If you notice that you can see the “printer lines” in your printed image (like on the mug on the left above), or if you have white or mis-colored streaks in your print, there are a few things you can try to fix this problem:
Print Quality is Low
The first thing you want to ensure is that you have the highest quality print setting turned on. When a printer is in normal or ink-saving mode, you are much more likely to see printer banding. Sometimes this setting is hard to find, depending on whatever program you are using to print your images.
Check your printer settings. You may not know that if you click the dropdown show with my first arrow, you’ll see additional settings. And there you can select your print quality so you know you’re getting the highest quality print.
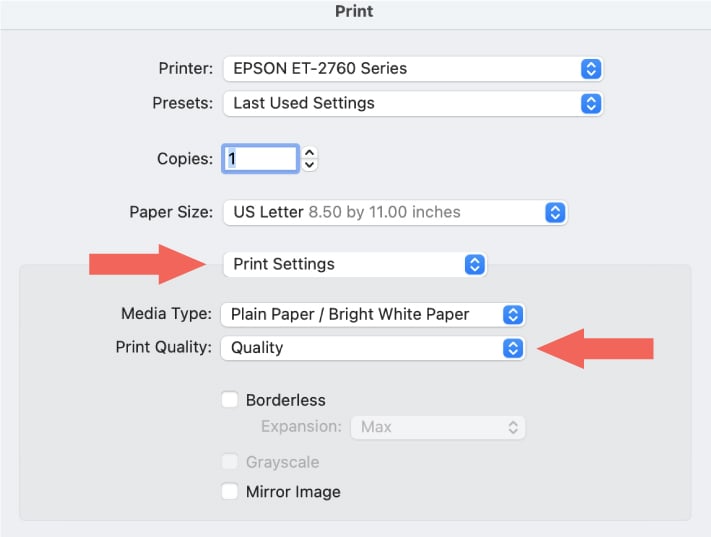
If you don’t see this, poke around and do some research to make sure you’re getting the best print quality possible.
Bi-Directional Printing is Turned On
Turn off bi-directional printing. Bi-directional printing means the print head prints in both directions from left to right and then right to left. This increases the print speed but may reduce vertical alignment, causing banding.
Printer Heads are Clogged
Additionally, streaks or bands may appear on a printed image due to clogged printer head nozzles. This can happen more with converted printers (like Epson printers) vs. purpose-built sublimation printers (like Sawgrass printers), especially if it’s been a while since you’ve printed anything.
Here are my recommended steps for cleaning a clogged print head. Each printer will have their own process doing a print head cleaning, but generally it’s pretty easy to find .
- Run a nozzle check to see what colors are the issue.
- Run a printer head clean. On many printers, you can run cleaning on individual colors so you won’t waste ink.
- Run a nozzle check to see if the cleaning worked.
- If not, try printing 10 purge pages using the color(s) that are clogged. You can download a free set of purge pages below. Only print the colors that you need.
- Run a nozzle check to see if the print pages worked.
- Run another printer head cleaning.
- Run a nozzle check to see if the cleaning worked.
- You can run more purge pages, but at this point you may want to run the Power Clean. Many people will tell you not to do this because it “wastes so much ink” but if your printer isn’t unclogging, you’re not going to be using it anyway.
- Let the printer sit for at least 12 hours after a power clean.
- Run a nozzle check to see if the cleaning worked.
- As a last resort, you may want to manually clean the lines of your printer. I will have a tutorial for this soon.
Get the Free Printer Purge File
Want access to this free file? Join my FREE craft library! All you need is the password to get in, which you can get by filling out the form below. The file number is: S25.
Printed Sublimation Image is Faded
It’s no fun to peel back the sublimation paper to reveal….a faded image. Whomp whomp. Here are a few things you can do to ensure a bright, even image.
Paper Issues
To start, you want to make sure you’re using a high-quality sublimation paper. For example, some people will say you can use regular copy paper, but I found sublimation paper made a massive difference in the quality of my prints.
You’ll also want to be sure you’re printing on the correct (generally the whitest and brightest) side of your sublimation paper. Most sublimation paper has a watermark on the back—make sure you’re printing on the front.
Substrate Issues
You’ll also get a faded image if you’re not using a polyester or poly-coated base. For clothing, the lower the polyester content, the more faded your image will be. That may be okay if you’re going for a more vintage look, but if you want a bright, vivid image, you’ll want at least 75% polyester in the content.
Like with the paper, you want to make sure you’re sublimating the correct side of your image. It’s clear for most substates, but can be a bit harder to see on something like a sandstone coaster that’s white on both sides. You want to transfer your image to the whitest and brightest side of the substrate.
Not Enough Heat Press Pressure
You may also find that your heat press doesn’t have enough pressure. My heat press has a hand crank at the top and it took me a while to get it to the right “firm” pressure. You can see the faded edges of this tile.
When I increased the pressure, this tile turned out even, all the way to the edge.
Sublimation Transfer is Blurry
I haven’t had too much blurring occur (though I’ve experienced ghosting, as mentioned below), but here are a few things that can cause a blurry image:
Too Much Heat or Time
If your image looks blurry when you pull the transfer paper off, you may have applied too much heat and/or time to your transfer causing your image to bleed out a bit. Often, reducing your time will resolve the issue.
Uneven Pressure
If you find little bits of your image are blurred, you may have uneven heat press pressure. If there are any gaps in your pressure, your image may “gas out,” which means the ink is sort of sucked into the gap as it turns into a gas. This can cause blurring in your images. To fix this, use a pressing pad or pillow and make sure that the platen of your heat press or mug press has even pressure across your whole image.
Moisture
Finally, you may have an issue with moisture. Trust, me, living in the PNW, it’s *always* damp around here. If possible let your substrate sit under your heat press (with it open, just hovering over your image, not clamped down) for 30 seconds or so. This will help dry your substrate so you’ll have a cleaner press.
You may also find moisture in your sublimation paper itself. Keep your paper in a dark cabinet, in the box it came in, until you go to use it. Then print my image and transfer it right away, so it doesn’t have time to absorb any moisture from the air.
Sublimation Transfer Ghosted
If you notice a “ghosted” double image of your transfer or your image, you are probably dealing with a:
Shifting Transfer
Sometimes your image may shift while you’re pressing it. This primarily happens when you open or close your heat press. Try opening and closing your heat press slowly, and use heat-resistant tape or heat-resistant adhesive spray to adhere your printed image to your blank.
Sublimation Transfer has Spots
Sometimes you’ll notice tiny dots, spots, or squiggles on your project. Annoying!
Dust and Lint
Most likely, dots and spots are due to dust or lint that made its way onto your substrate or printed transfer image. The high heat of your press can transfer the color of the lint onto your substrate! For soft fabrics, use a lint roller before you press. For hard surfaces, wipe clean with a lint-free cloth.
Sublimation Transfer Color is Off
This is a big one and I know it’s a huge headache for a lot of new sublimation crafters. You have this beautiful image you’ve designed on your computer, but when you transfer it to your substrate, your color is TERRIBLE. There are a few culprits:
No ICC Profile
The main problem is that you probably do not have an ICC profile installed in your image software. This can be super important for getting the correct color in your images if you are using a converted printer like an Epson.
Sublimation printers, however, will do their color correction within the printer, so you shouldn’t have to worry about installing an ICC profile for sublimation-specific printers.
For example, this is the SAME donut file. The one on the left is printed through Photoshop with an ICC profile and the colors are true to life. The one on the right was printed through Cricut Design Space which has no color profile. I was hoping to use the Print then Cut feature to cut around my donut instead of having to do it by hand but instead… HELLO ORANGE.
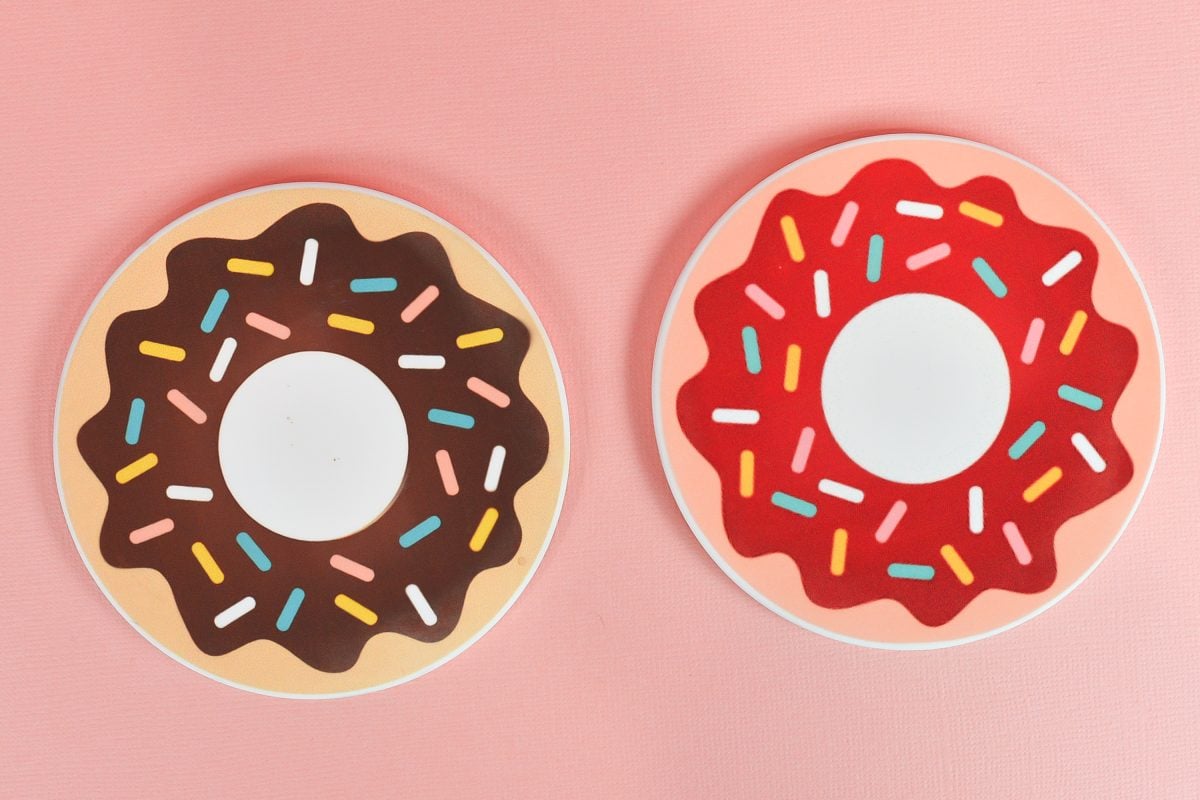
It’s hard to believe those are made with the same PNG! Learn more about installing ICC profiles here.
Monitor Color vs. Printer Color
Your printer may have trouble rendering some images exactly like you see them on your computer screen. This is because the colors on your screen are made up of three colors of pixels made of light (RGB) while your printer uses four inks (CMYK). There are just some colors that your printer can’t render properly using ink, like neon colors.
Overcooked or Undercooked
Does your black ink look brown? That could mean you overheated your tumbler and “cooked” it too long. Does it look dull or faded or green? You may have undercooked it. Try adjusting your time settings to see if you can get your blanks to be true to color.
The Sublimation Transfer is Reversed
Mirror Your Image (Once)
Okay, this one seems obvious—you need to reverse your image before printing so it will appear the right way when you transfer it to your substrate. That being said, I wasn’t paying attention and I had my image DOUBLE reversed. There are two places in Photoshop to reverse an image. The first is in the Photoshop printer settings and is labeled “Emulsion Down.”
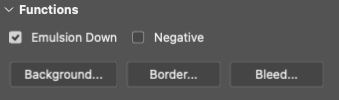
The second is in the printer settings, and is labeled “Mirror Image.”
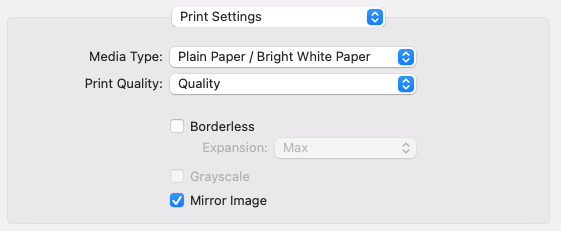
Because I had BOTH of these settings checked, the basically canceled each other out. And because I was printing an image that had sort of a loopy script, I didn’t notice until it was too late. Whoops!

So the answer here is to check only ONE of those boxes and to confirm that your image looks backward when you print it out. If it’s readable, go back and mirror your image and print again.
Shrink Wrap has Stuck to Your Project
Your Project Cooled
It’s so much easier to remove shrink wrap from a project while it’s still warm. Wear heat-resistant gloves and peel back the shrink wrap right after your project has come out of the oven. If needed, you can re-heat your shrink wrap with a heat gun but don’t make it so hot that it may sublimate your image again.
Low-Quality Shrink Wrap
There’s also a chance you’re using a lower quality shrink wrap. If possible, purchase your shrink wrap from a sublimation distributor (see a list in the Resources section of the book) instead of an online marketplace like Amazon. Yes, quality shrink wrap may cost a bit more but it won’t ruin your blank like cheap shrink wrap can.
Okay, I know that’s a lot of stuff that can go wrong! But I hope you found these tips helpful. If you are having a sublimation problem that’s not listed here, let me know in the comments! I’ll be happy to troubleshoot for you, and you never know—someone else could be having the same issue as well!


Comments & Reviews
Gabina says
I print colors look good but my picture doesn’t come out on what ever I’m trying to transfer the picture to.
Help please ?!?!?
Crystal Summers says
Hi Gabina,
It sounds like you may need more time, temperature or pressure. You also want to be sure you are using sublimation paper and ink. You also need to make sure you are using a sublimation blank. It seems like you are either not using the correct ink or perhaps your blank is not meant for sublimation. I would start there, if possible.
Happy crafting,
Crystal, HLMS Community Manager
Susie says
Hi. So I’ve been using an Epson printer with sublimation ink and its been great. But now after a year, the color is off!. What happened?
Teresa Santiago says
The blue doesn’t show up it turns everything pink that’s supposed to be blue.
Narelle Macaulay says
I’m having the same issue. Did you ever get an answer?
Julie Rivera says
Three years ago I converted my epson ET-2720 to a sublimation printer. I’ve never had any issues until just recently where my colors are not coming out correctly. I’m not sure what has caused this as I haven’t changed any settings from what I had set prior. Where there should be corals and purples, all that comes up are light blue, greens and yellows. I have a small business so this is very frustrating for me and I’m unable to find any answers….help
Jen says
Hi when I press the image it not working at all I can just see a faded image on the tumbler
I can email
You the pic
lydia says
my printer was printing correctly now the prints are coming out pink
Crystal Summers says
Hi,
It sounds like your red may be clogged. Are you able to print just red? I would double check that your red ink isn’t completely blocked. Once you’ve confirmed that it’s not blocked, maybe try unistalling and reinstalling your driver.
I hope this helps!
Happy crafting,
Crystal, HLMS Community Manager
Celine says
Hi Cori. Thank you for sharing. I have recently come across a problem that I can’t seem to figure out. I managed to successfully heat transfer the design I wanted onto some ceramic mugs and it looked great but it has come to my attention that some blue ink (I’m not sure where it originates from) appeared around my design after I added hot water into the mugs. It isn’t part of the design so, I’m not quite sure where the ink is coming from but it makes it seem as if the design on my mugs are coming off. Have you ever encountered that before? It was only for that particular batch of mugs as the subsequent ones seem fine so far.
Crystal Summers says
Hi Celine,
Oh wow, that’s interesting. It’s only when you add hot water to those mugs? Sometimes blue specs or marks on mugs is from lint/dust, but if it’s when you add water that’s likely something different. I would reach out to the mug manufacturer and let them know your experience. It sounds like it may be a defect of sorts.
Good luck!
Crystal, HLMS Community Manager
Celine says
Hi Crystal,
Unfortunately, my supplier couldn’t figure out why either. I hope it’s just the ink. I tried swapping out the old ink in my printer with some new ones. I hope its okay but it looks fine so far. Thank you for your help :).