Want to make a personalized Christmas gift for your mom or other favorite baker? This DIY baking set includes an oven mitt, a keepsake towel with a family recipe and customized baking spoon, all made with your Cricut and iron on vinyl!

This is a sponsored conversation written by me on behalf of Cricut. The opinions and text are all mine.
One of the things I love most about crafting is making handmade and personalized Christmas gifts. Some of my favorite gifts were made by the people I love and I will always treasure them.
Today I’m sharing a tutorial that I’ve wanted to make for a long time, and would make such a beautiful gift for your mom or other favorite baker in your life. This baking set includes three iron on projects: an oven mitt, a personalized baking spoon, and a hand towel with a family heirloom recipe, all made using my Cricut!

Plus the oven mitt is perfect for holding the other two projects!

These personalized Christmas gifts can be made on both a Cricut Explore Air 2 or Cricut Maker! Let’s get making.
DIY Oven Mitt
Is it just me, or are there never enough pot holders? This oven mitt is a cute addition to any kitchen. I’m using a Christmas file since the holidays are coming up, but Cricut Design Space is full of baking-themed images that are perfect for this project.
Supplies
- Cricut Explore Air 2 or Cricut Maker with regular fine point blade
- StandardGrip or LightGrip mat
- Oven mitt
- Iron on vinyl in contrasting color
- Weeding tool
- Cricut EasyPress Mini
- EasyPress Mat
- Design Space File (Image #M8B36D7E)
Instructions
Start by choosing a file in Cricut Design Space. I knew I wanted a Baking Spirits Bright file, and Cricut Access didn’t disappoint! Then resize the image in Cricut Design Space to fit your oven mitt. Mine was 4.5″ across.

Then click Make It in the upper right corner. In the Prepare Screen, make sure to mirror your image.

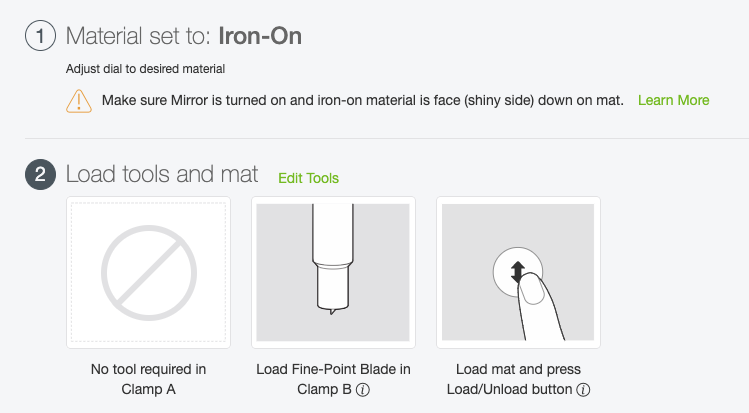
Then set your Cricut to the iron on setting, place your iron on vinyl onto the cutting mat with the shiny side down, and insert it into your machine.

Once everything is good to go, click the blinking C and your Cricut will cut your vinyl for you!
Weed your vinyl using a weeding hook. See my post Weeding Iron On Vinyl for all my best tips and tricks.

Set your Cricut EasyPress Mini to the medium setting and center your iron on vinyl on your oven mitt.

Once the EasyPress comes to temperature (it will beep and turn green), adhere the iron on vinyl your oven mitt. The EasyPress mini is great for moving around in all of the little dips and curves of the oven mitt. Check out my post all about the EasyPress Mini to learn more about it!

Peel back the plastic carrier sheet and you’re done! If you have places that didn’t adhere fully into the depths of the quilting, you can place a sheet of cotton fabric over your project and iron further.

Personalized Baking Spoon
This baking spoon project is SO easy, but the recipient doesn’t have to know that! This is an easy, inexpensive personalized Christmas gift for anyone on your list who loves to bake or cool.
Supplies
- Cricut Explore Air 2 or Cricut Maker with regular fine point blade
- StandardGrip or LightGrip mat
- Wooden spoon
- Iron on vinyl in contrasting color
- Weeding tool
- Cricut EasyPress Mini
- EasyPress Mat
Instructions
We’re going to use the text tool for the spoon. Type out your text and choose a font that you like. I’m using Close to My Heart — You Are Here as my font. Because we’re cutting this fairly small, a smooth simple font works best.

Follow the same directions above to reverse your image and cut your iron on vinyl.

Then weed out the negative space.

Then use the EasyPress Mini to apply the vinyl. I love how the Mini works around curved edges like this—it would have been difficult or impossible with most other heating tools.

Then peel off the plastic carrier sheet and you’re done!

Heirloom Recipe Hand Towel
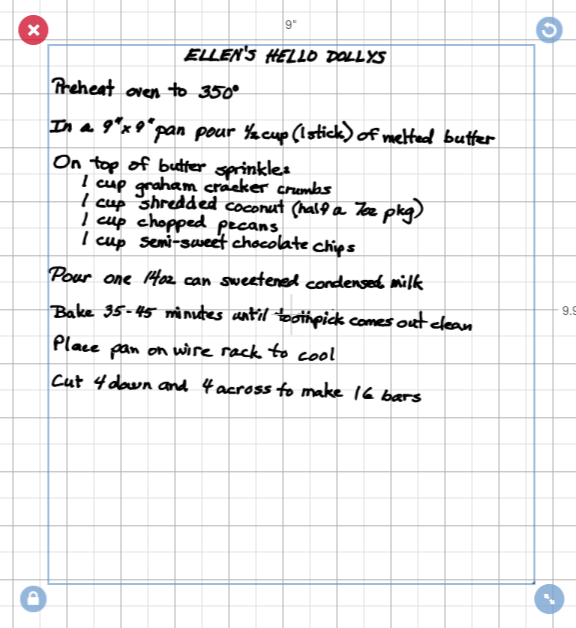
The third and final project for this personalized Christmas gift post is a heirloom towel, made with a family recipe. We’re going to be taking a photo of the recipe and uploading it to Design Space to create a cuttable file. What a sweet way to turn a recipe that you love into a keepsake.
Supplies
- Cricut Explore Air 2 or Cricut Maker with regular fine point blade
- StandardGrip or LightGrip mat
- Handwritten recipe
- Camera or smart phone with camera
- Hand towel
- Iron on vinyl in contrasting color
- Weeding tool
- Cricut EasyPress Mini
- EasyPress Mat
Instructions
Take a photo of the recipe using your camera or phone. Then save the photo to your computer (note, if you are using a newer iPhone, you may need to convert your HEIC file into a JPG—you can do that here).

Then click Upload in the Design Panel on the left and select your file. Because it is a JPG and not a cut file, Design Space will prompt you to choose the type of image it is. I chose simple, because it’s really just two colors—black and white. (Notice that my image came in rotated—we’ll be able to fix that once we get the file imported.)

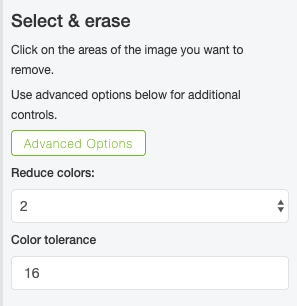
Next, you’ll use a series of tools to clean up your image. Start by clicking “Advanced Options” and reducing the colors to 2—this will make the next steps easier.

Use the Select and Erase tool to click the background and make it transparent.

Then zoom in using the zoom tool in the upper right, and use that same Select and Erase tool to click the inside of each of the letters. Just go methodically and make sure to get them all.

Then click the little eraser in the upper left next to the magic wand. This will give you the Erase tool. Use this to clean up any other part of your file you don’t want, like the shaded corners in my file.

You’ll also want to use this tool to clean up any spots and specks. This can be a bit tedious, but it really does help with a cleaner final project.
You can use the Preview button at the bottom, which helps make the spots and specks easier to see and erase.

Once you think you have a fairly clean file (be sure about this…there’s no going back!), click Continue.

Save your file as a cut image, and import it into Design Space. From here, you can rotate and resize your file to cut on your Cricut!

Follow the instructions above to cut the file out of iron on vinyl. Files like this will take a long time to cut—it’s a lot! But I’ve always been impressed with how well it’s worked.
Then weed your file (again, this one will be tougher than your usual file!).
Then lay out your weeded image on your hand towel on top of the EasyPress mat.

You can use your larger EasyPress if you wish, but I had the small one out already, and found it adhered this project quickly and easily!

Peel back the liner and you’re done!


You can give these three personalized gift ideas together, split them up, or even add more—like some measuring spoons, an apron, and some baking basics.

I hope you found these personalized Christmas gift ideas inspiring and helpful! If you have any questions about any of these projects, as always I’m happy to answer them in the comments! Happy making and baking! And if you are in need of some more kitchen action check out my blog for this Funny Kitchen SVG Bundle or for some more personalized gift ideas check out these Personalized Gifts for Her!


Comments & Reviews
Chris says
do you have ayoutube channel?? you said if we like the video subscribe to your channel.
But I do not ee where to do that here.
Chris
Cori says
Hi Chris,
Yes! Here’s the link: https://www.youtube.com/channel/UCnS8r33_sRpWqiKyb0WtKIg
Antoinette Chimner says
Hi can you please tell me the fonts you used for the oven mitt?
Crystal Summers says
Hi Antoinette,
The oven mitt design is a Cricut Design Space design, so I’m not sure the fonts they used. Cori didn’t create it. Sorry this isn’t more helpful!
Crystal, HLMS Community Manager
NYC001 says
I love your ideas. Thanks for sharing. How does the iron on vinyl hold up to washing? I was more so thinking the spoon; if they choose to use it rather than hanging it in the kitchen.
Amy Motroni says
Hi there,
I would just keep the spoon decorative, and not wash it.
Amy, HLMS Reader Support