Using Flatten in Cricut Design Space makes it possible to turn any cut file into a printable image for Cricut Print then Cut. Here’s how to use Cricut Flatten, plus a few tips and tricks for making the most of this tool.
If you want to use Cricut Print then Cut, you’ll need to know how to Flatten your images!
Visit my Amazon shopping list for everything you need to get started using your Cricut!
Flatten in Cricut Design Space Video
What is Flatten?
Flattening turns a cut image into a printable image to use with your Cricut.
Cricut Flatten is one of the five tools at the bottom of the Layers Panel on the left. You can read the other tutorials here:
- Using Attach in Cricut Design Space
- Using Weld in Cricut Design Space
- Using Slice in Cricut Design Space
- Using Flatten in Cricut Design Space
- Using Contour in Cricut Design Space
The Flatten tool is used in projects with the larger current Cricut machines, including Cricut Maker and Cricut Explore. It will NOT work with Cricut Joy because Cricut Joy does not have Print then Cut capabilities.
- Changing images from standard shapes to Print then Cut images.
Where is the Flatten Tool in Cricut Design Space?
On desktop (Mac and PC), the Flatten tool is found at the bottom of the Layers Panel on the left. It’s the icon that is second from the right, the two squares being flattened with an arrow.
On mobile (iOS and Android), the Flatten icon is under the Actions menu. It is also two squares being flattened by an arrow. You need to scroll a bit to the right to see it.
Print then Cut Basics
Print then Cut is a really great feature of the Cricut cutting machine. It allows you to print an image on your home printer, and then your Cricut will cut around the edge of the shape. You can make printable stickers, banners, gift tags, artwork, and more! You can use print then cut on many things you can run through your home printer, including paper, cardstock, printable vinyl, printable iron on vinyl, printable sticker paper, and more.
It’s a very robust feature of Cricut Design Space and you can learn more about it in my Ultimate Guide to Cricut Print then Cut!
There are three primary ways to go about creating a Print Then Cut image.
- First, you can upload a JPG or PNG and the software will automatically turn it into a Print Then Cut image. Learn more about uploading files to Cricut Design Space.
- Second, you can open up the layers panel for the image and change the operation from cut to print using the dropdown in the edit menu at the top.
- And third, you can use Flatten to create a single print layer.
Rules & Guidelines for Using Flatten
There a few things to know about using the Flatten button, so double check you understand these rules:
- Two or More Layers: To Flatten, you’ll need two or more selected layers. You can’t flatten a single layer.
- Flattening a Single Layer: If you have a single layer that you want to turn into a Print then Cut image, you can select it and choose Print then Cut from the Operation dropdown in the Edit toolbar at the top of Cricut Design Space.
- Operation Type: You can flatten images that are set to cut, wavy cut, or draw (pen). You cannot flatten images that are set to perforate cut, foil, score, deboss, or engrave. You can also flatten a flattened layer with another layer, like a cut layer or another layer that’s already been flattened.
- Images & Text: Flatten works with both images and text.
- Uploaded Files: JPGs and PNGs you upload will automatically be turned into a flattened Print then Cut file. If you upload SVG cut files, you’ll have the option to turn them into cut files or printable files when you’re uploading.
- Unflattening: In many cases, you can unflatten two flattened images. The Flatten tool will turn into an unflatten tool. You may lose this ability if you close Cricut Design Space, however.
How to Select Images to Contour
If you’re unfamiliar with selecting a single image in Design Space, you have a few options. In the Design Space Canvas screen:
- Click the item you want to select.
- Put your mouse near the item you want to select and then click and drag your mouse over the item to select it.
- Click the layer that you want to select in the Layers Panel.
Using Flatten to Create a Print Then Cut Image
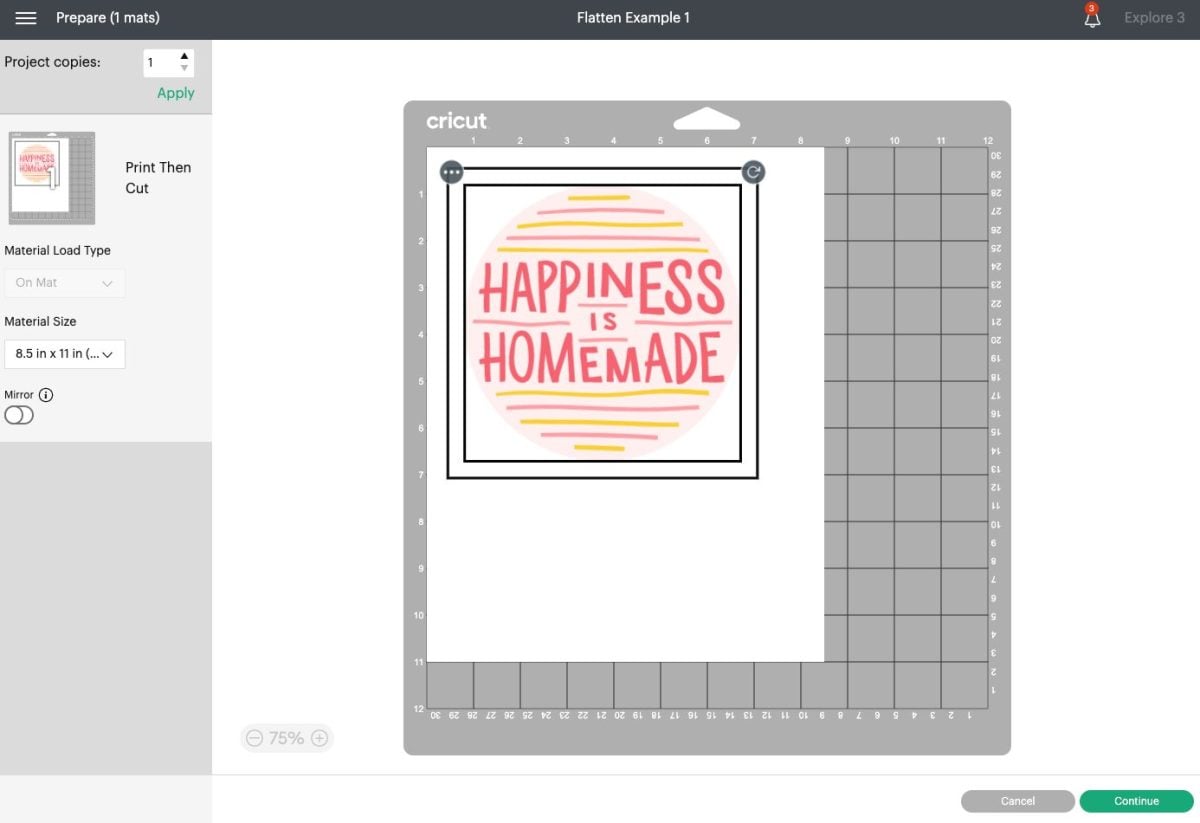
Let’s take a look at an example. Say I want to make a gift tag. I have a circle from the Shapes menu and this cute Happiness is Homemade image (#M1B4DB126).
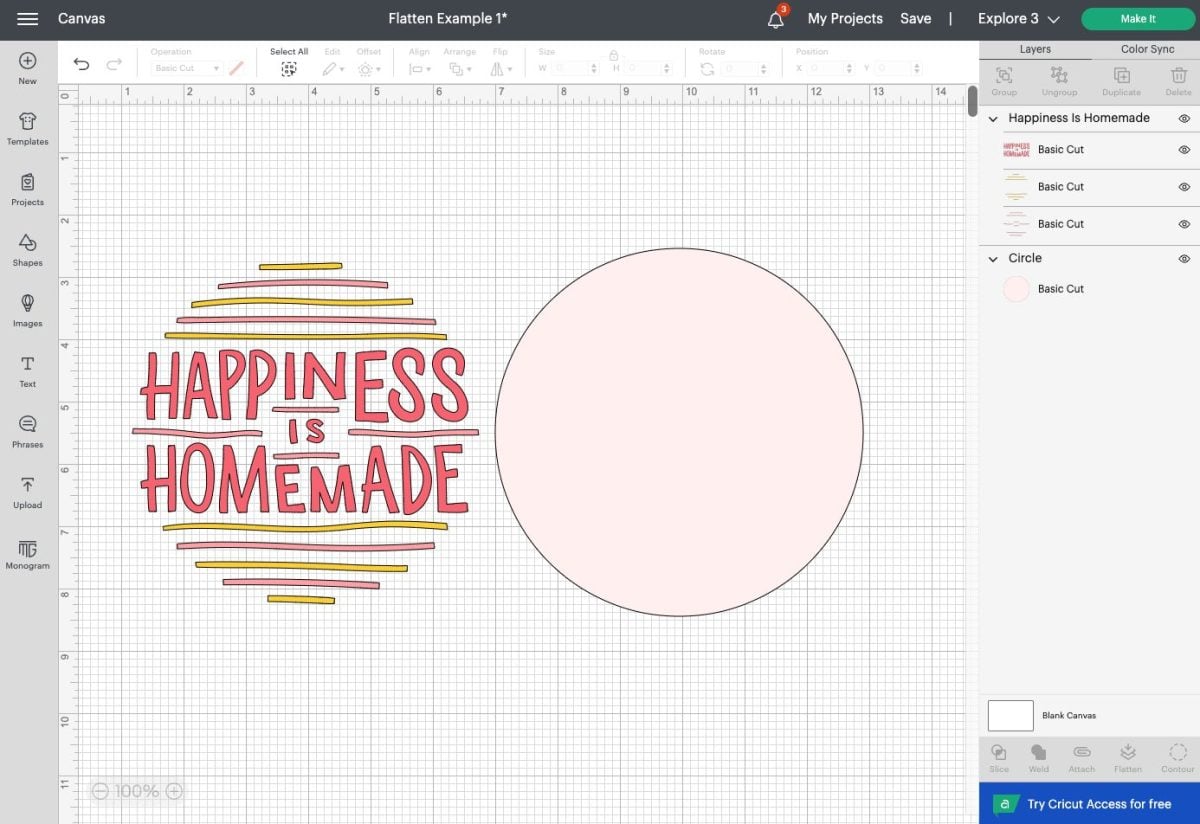
I could cut out the Happiness is Homemade from iron on vinyl or adhesive vinyl, and spend far too long trying to get all those pieces transfer to the oval. Or, I could just flatten and print the gift tag using Print then Cut!
Place the text image over the oval and select both. Then click Flatten in the lower right menu. The black outlines around the text image and oval will disappear, and you will notice that in the layers panel you now have a Print then Cut layer under the heading “Flatten.” They will hold their size and position when you Print then Cut.
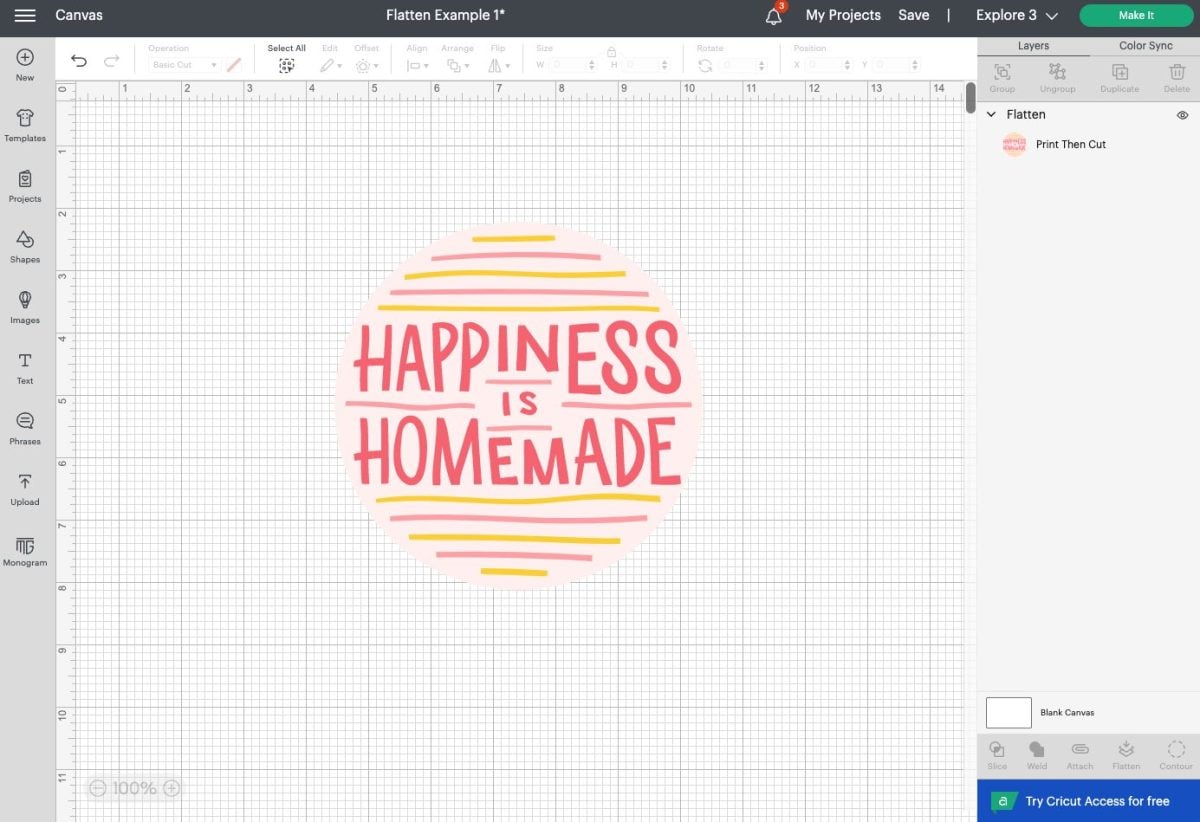
When you hit Make It in the upper right corner, instead of your normal cutting screen, you’ll see a Print then Cut screen with your image shown on a cutting mat. Design Space will direct you to print your image on your home printer. It will have a black registration border around it when it prints. Then when you go to cut it, the Cricut Design Space will use that registration line to know exactly how to cut around the edge of the circle perfectly!
Frequently Asked Questions about the Flatten Tool
Flatten creates a printable Print then Cut image, whereas Attach keeps the same layout of your images on the mat as they are on the Canvas.
Flatten creates a printable Print then Cut image, whereas Weld turns multiple cut images into a single cut image.
If you can’t click the Flatten button, you may have one of the following problems. First, you may only have one image selected—you can only flatten two or more images. Second, your image may be an operation type that can’t be flattened, like scoring or foiling.
Hope you learned a little more about the Flatten tool today! Have questions? I’d be happy to answer them in the comments!


Comments & Reviews
Rosa says
I am so excited to learn everything I can
Cori says
Yay! So thrilled you are finding the tutorials helpful! :)
Roxy says
I’m new at this. Is it normal for the project to take long to load project in order to print. It takes about 1/2 hr to load the next screen!! It does give me a message saying “Loading project. Wow! That’s a big project. This may take a moment.”
Crystal Summers says
Hi Roxy,
WHOA! So large projects do sometimes take a while to load. However, depending on your computer speed, it can be affected as well. If you’d like it to load quicker, I would try making the design smaller. If that’s not possible, then unfortunately you will have to wait. 30 minutes seems really long though!
I hope that helps!
Crystal, HLMS Community Manager