Cricut Design Space allows you to upload your own files! Here’s how to upload JPG/PNG images to Cricut Design Space for cutting on your Cricut Explore, Cricut Maker, or Cricut Joy—and get troubleshooting help, too!
Want to save this post to reference in the future? Enter your email below and we’ll send it right to your inbox!
Looking to cut an SVG or DXF vector file on your Cricut? Check out my How to Upload an Vector file to Cricut Design Space post!
Did you know you can upload your own images to the Cricut Design Space? As exhaustive as the Cricut Library is, there may be files that you want to cut that don’t exist in their system. You can buy files on shops like Etsy (or my shop!) or you can design them yourself using Illustrator or Photoshop!
Did I mention uploading files to Cricut Design Space is FREE?
Stop pulling your hair out and start creating confidently with your Cricut! Finally understand how to use your Cricut with my Learn Your Cricut eBooks!
Cricut Design Space’s powerful software converts images into cuttable shapes. For this post, we’re going to focus on pixel-based images. We’ll talk a bit about types of files, then upload a simple JPG file, and then we’ll talk about some issues you might run into when using pixel-based files.
Cricut Design Space File Types
Pixel-Based Images
Basic pixel-based images are JPG, BMP, PNG, and GIF files. These files are uploaded as a single layer, and you can edit them during the upload process. These are generally created in programs that work in pixels, like Adobe Photoshop or Microsoft Paint.
Vector Images
Vector images are SVG and DXF file types. These file will be automatically separated into layers after uploading and saving. These are generally created in programs that work in vectors, like Adobe Illustrator. I always tell Cricut users to try and find a vector image! They create much cleaner cut files than a JPG or PNG. Find out more about uploading vector files here.
That being said, it’s totally possible to upload a JPG or PNG to Cricut Design Space. Let’s try it!
Download the Camping Hair Don’t Care Image
Enter your email address below to get this free file! If you’re having trouble, make sure your pop-up blocker is turned off. Still having problems? Check out our Downloads FAQ.
Uploading a JPG or PNG to the Cricut Design Space
Start by clicking “Upload Image” on the left-hand Design Panel, and navigate to the file you want to open.
Then select it from the list of uploaded images and click “Insert Images.”
Cricut Design Space will then ask you what type of image you are cutting. For simple images like this, choose “Simple.”
In the next screen, you’ll select any part of the design that is negative space—meaning it does not get cut. You want to select any white parts so they become transparent (checked). Make sure you zoom in and select the small areas of your project. In this case, I had to zoom in to click on the little design on the tent and the inside parts of the letters.
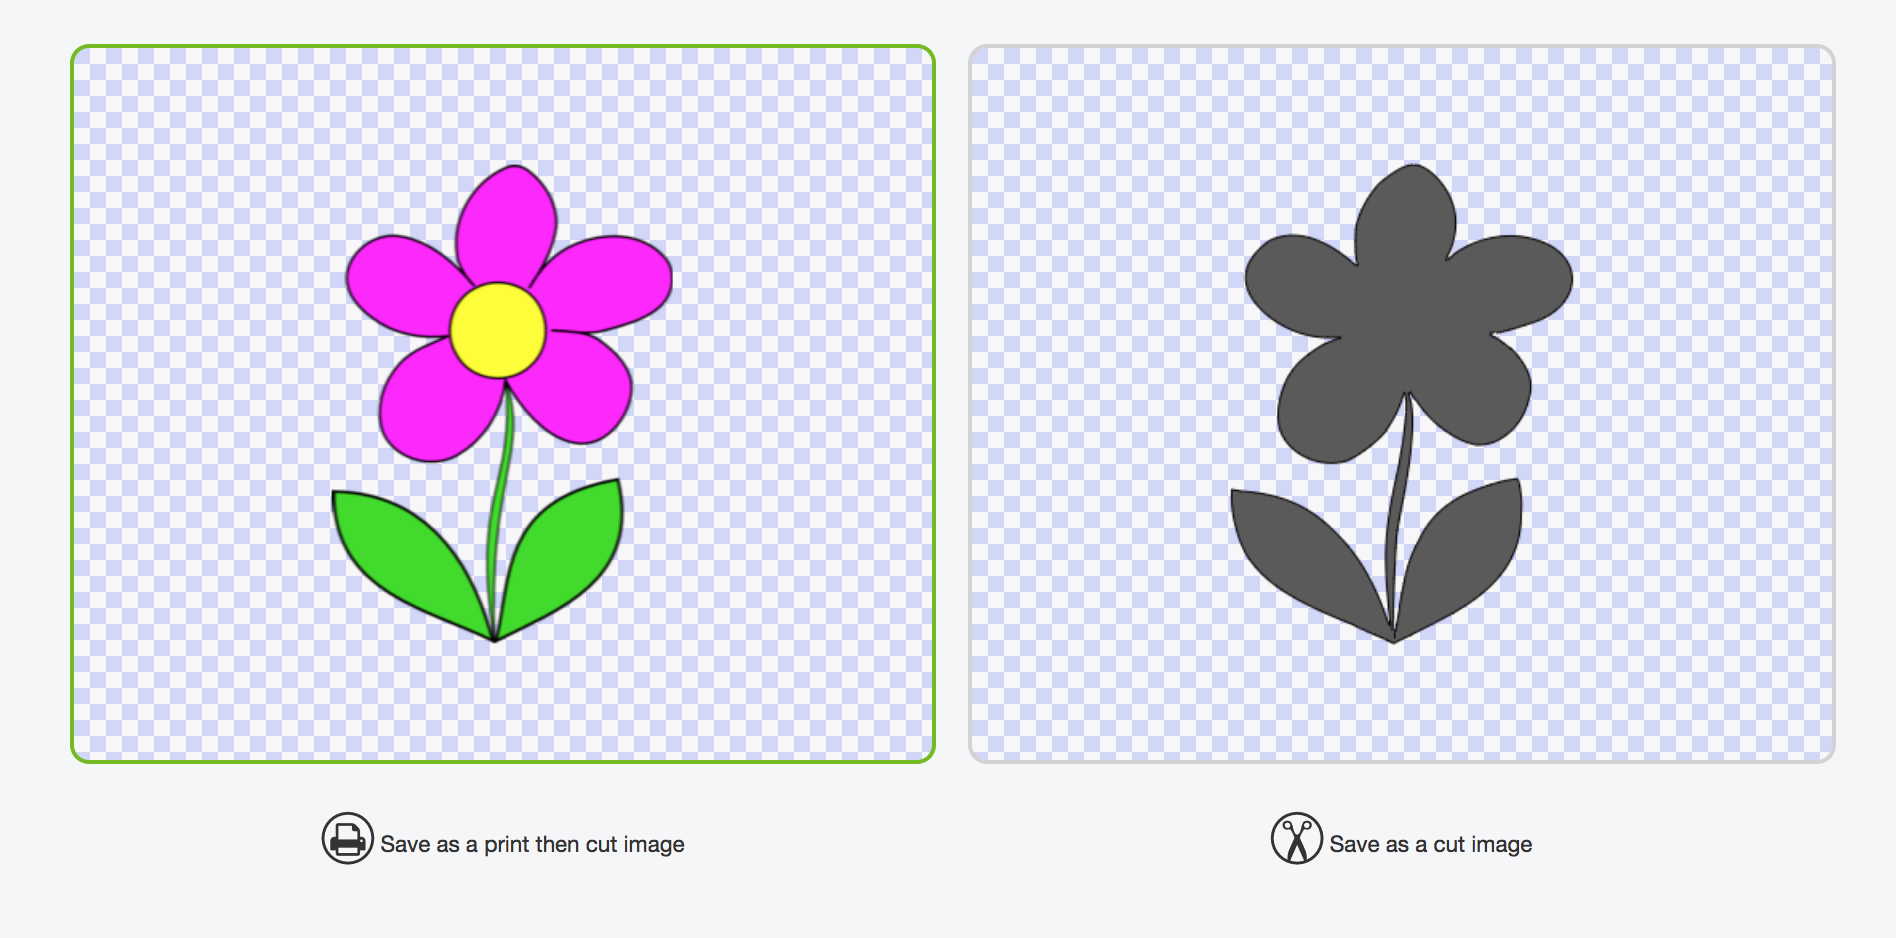
The final screen has you select whether this is a print-then-cut image or a regular cut image. In this case, it’s just a Cut Image—no printing involved in this project. (here’s an example of a print-then-cut project).
Click Save and then click the image to insert it onto your Canvas.
You’ll notice that the file looks good, but it’s a little less crisp than the vector version (particularly at the top of the tent). Here’s the cleaner SVG version:
This is why I always suggest finding the vector version if possible (and you don’t have to do the Select and Erase portion of the process!).
Troubleshooting JPG and PNG Uploads
Here are a few things you might run across when trying to upload pixel-based files.
Single Layer: Pixel-based files upload as a single layer, meaning whatever you’re cutting will be only one color. My image above was only black, so it was easy. If you upload, for instance, a flower with pink petals, a yellow center, and green leaves…you’re just going to get it all in one outlined flower shape.
This is probably the biggest thing you need to remember about uploading pixel files. One color in one layer is all you’re going to get. So if you’re trying to cut, for example, a two-color company logo or a multi-color clip art image, it’s just not going to work.
Contrast: The flower example above had a lot of contrast between the flower and the background. The more contrast you have in your image, the better. I often get emails from readers who want to cut, for instance, a photo of their dog.
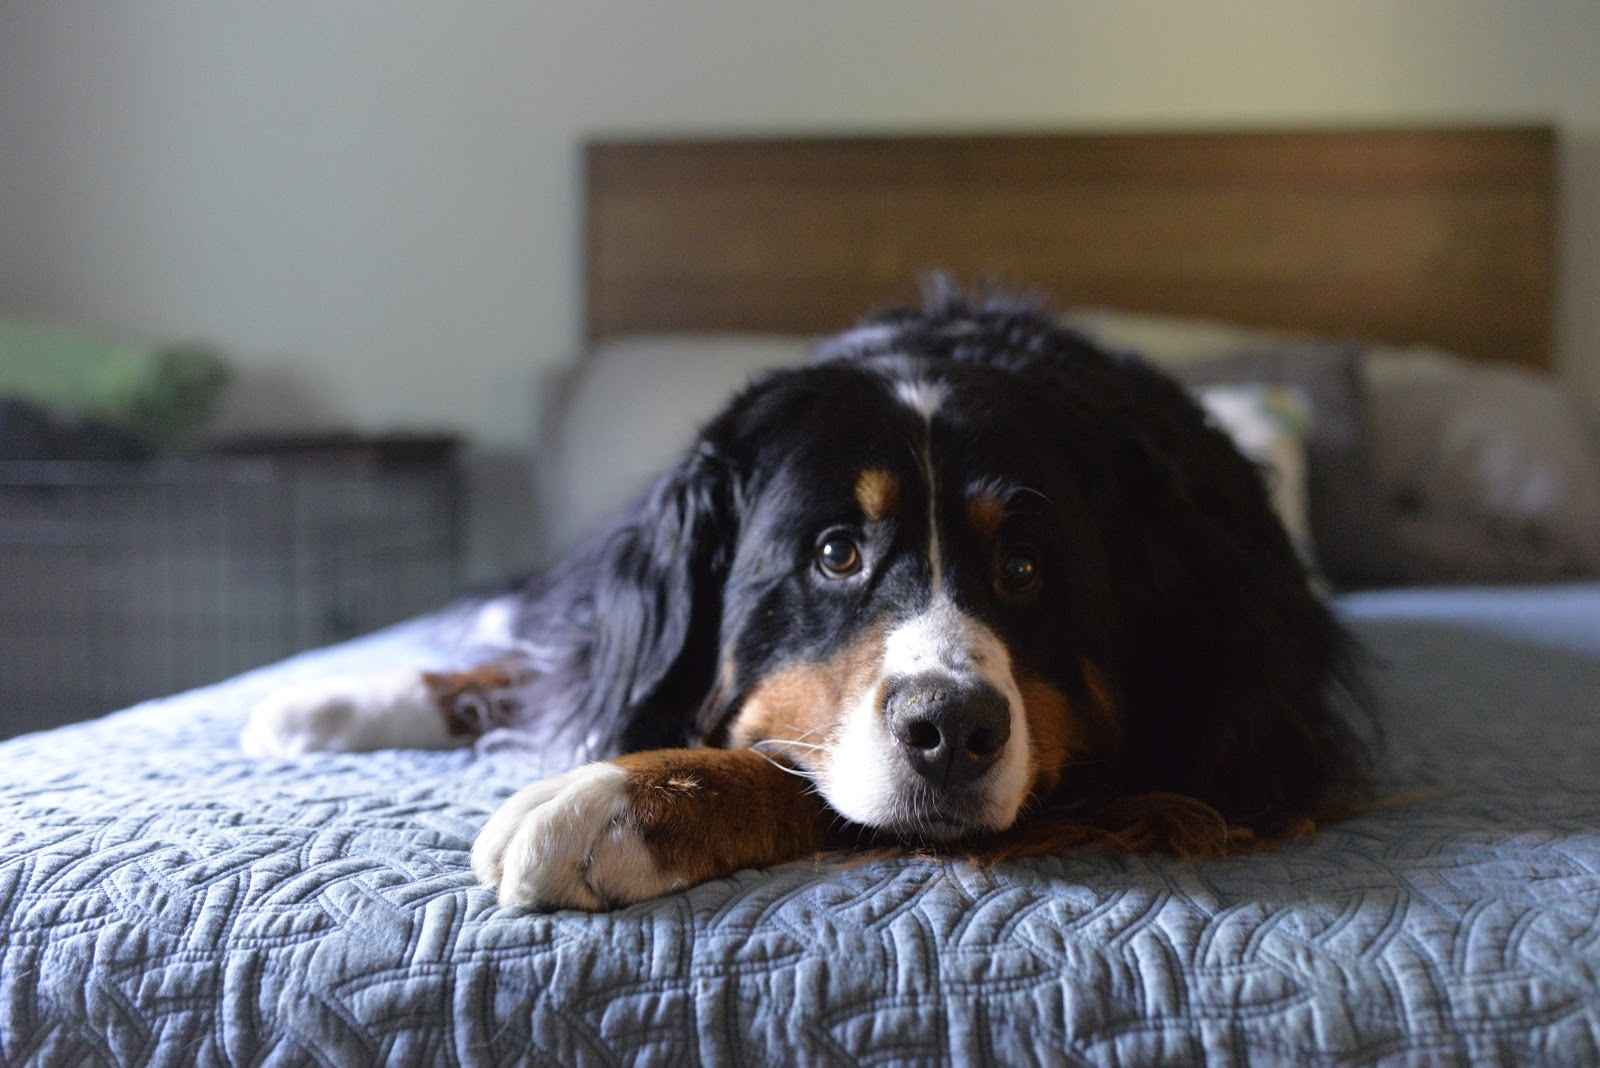
This is my dog, Gunnar. He is a big fat love. And he’s impossible to cut out from this photo. Cricut Design Space doesn’t know what is dog and what isn’t. And does it cut out his black parts? Brown parts? White parts? There is absolutely no contrast in this photo for Cricut Design Space to read.
Here’s what happens when I try and cut this file. Following the instructions above, I uploaded this photo into Cricut Design Space.
If I choose Simple Image, Cricut Design Space tries to narrow down the number of colors in my design.
Then when I try to select and erase the “not dog” parts of this image, I run into trouble. The black on the headboard is the same as his face and half of his face ends up getting deleted. Not going to work!
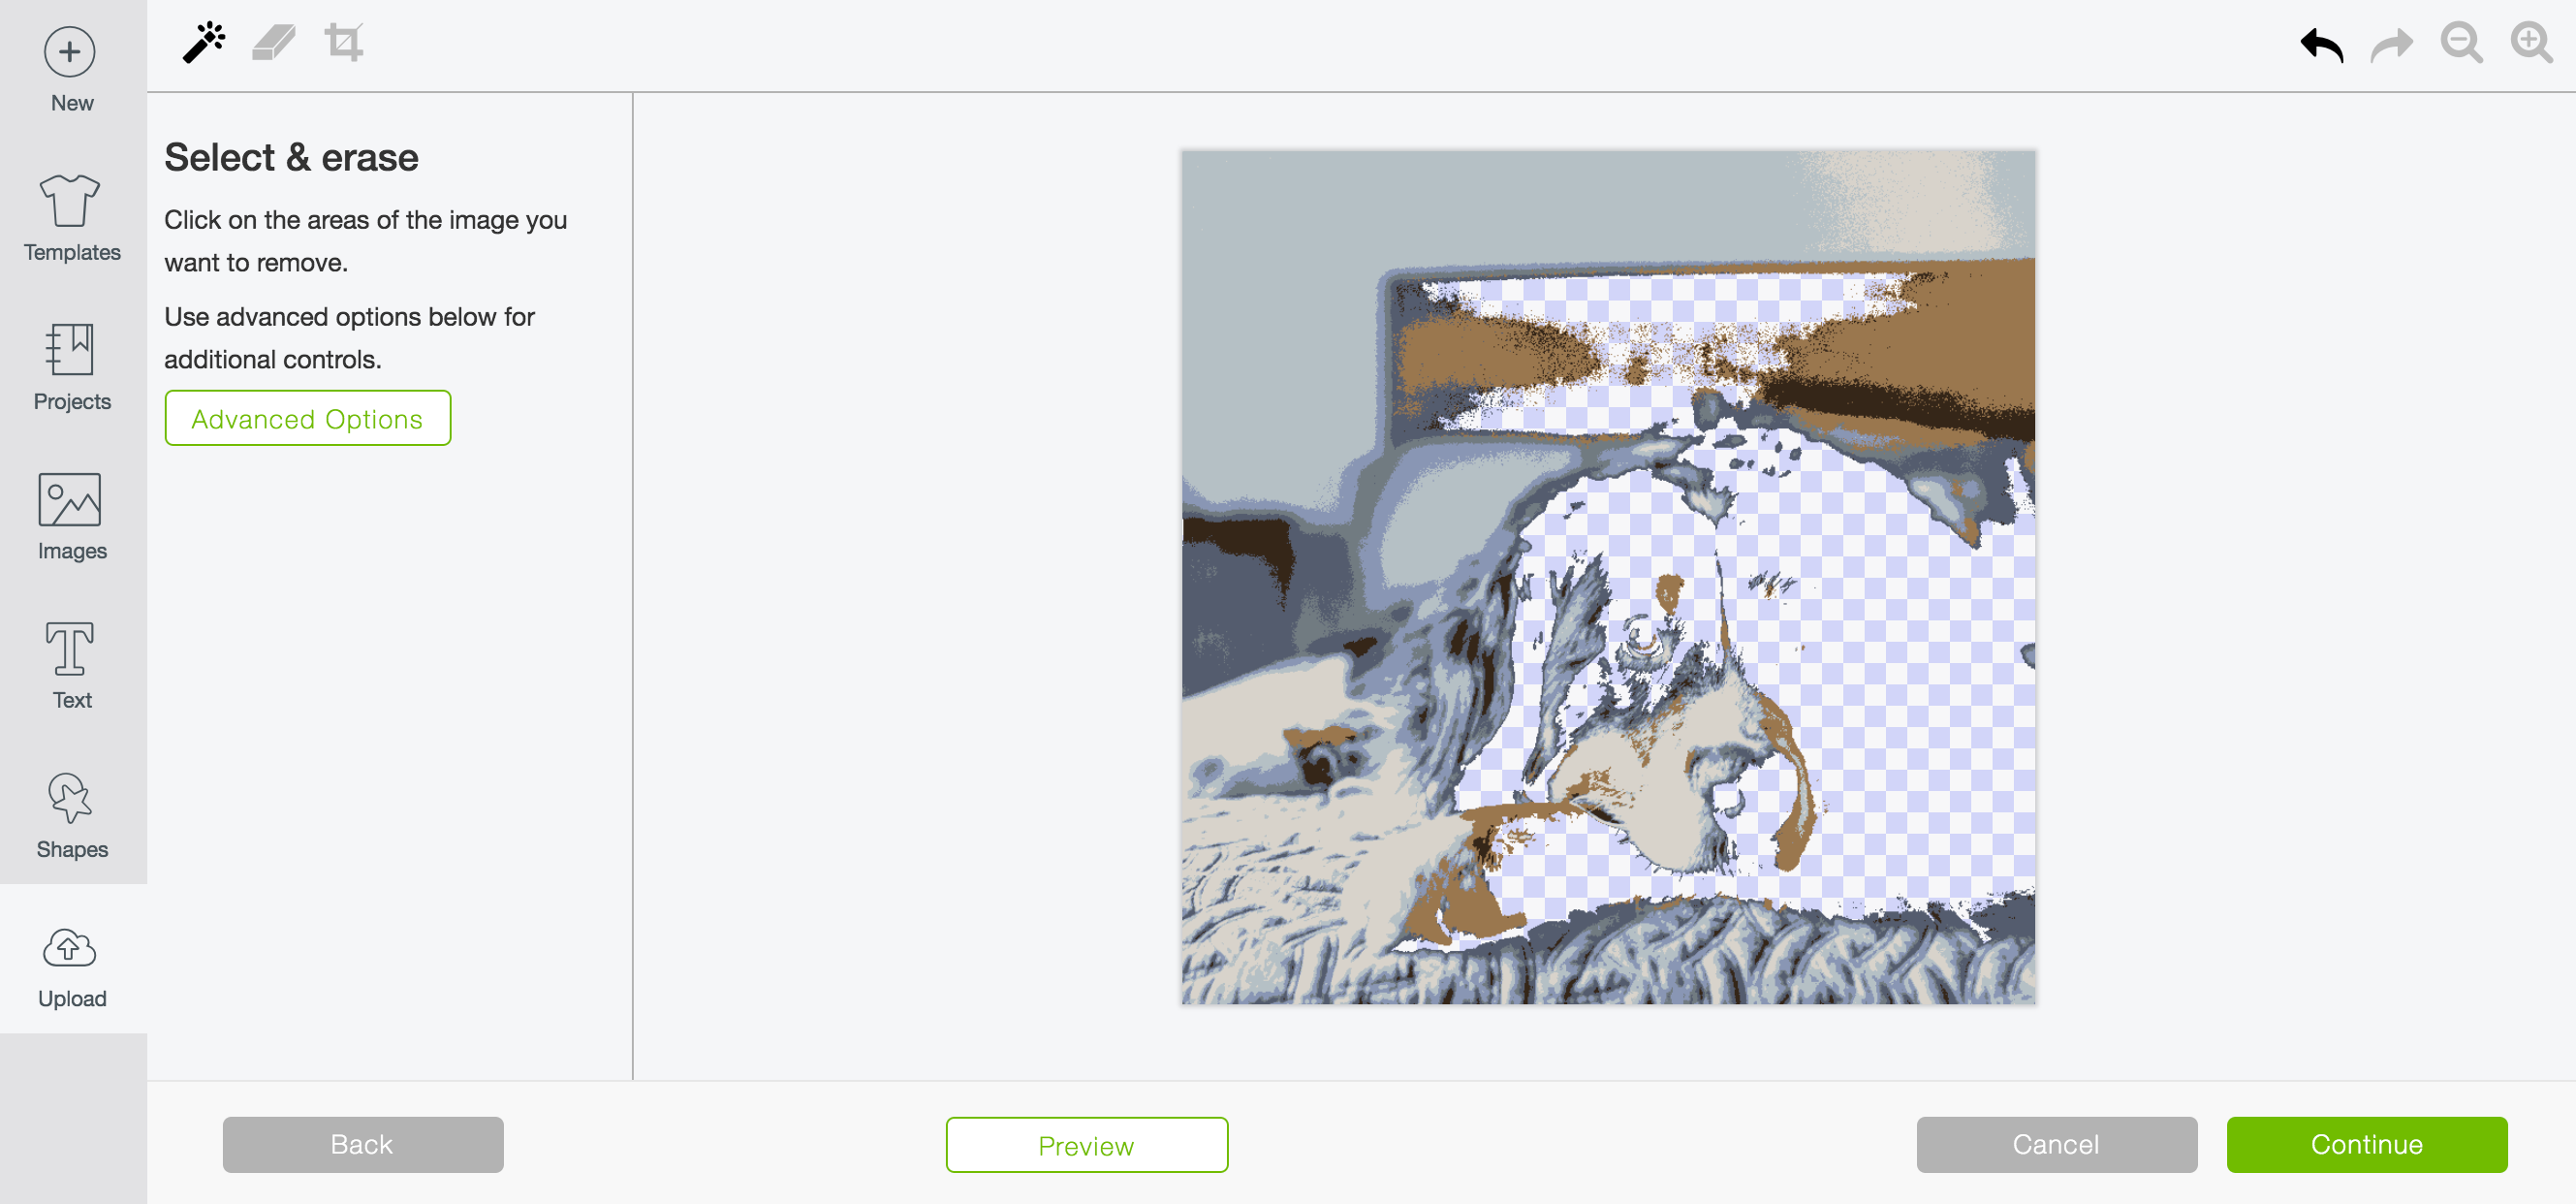
Let’s try Complex Image instead. Once you start selecting and erasing you’ll see that it’s hard to delete all of the different parts of not-dog in this photo since all the pixels are slightly different colors so it’s not really deleting them in chunks very well.
Let’s try using the eraser instead. I can delete everything around my dog more easily this way.
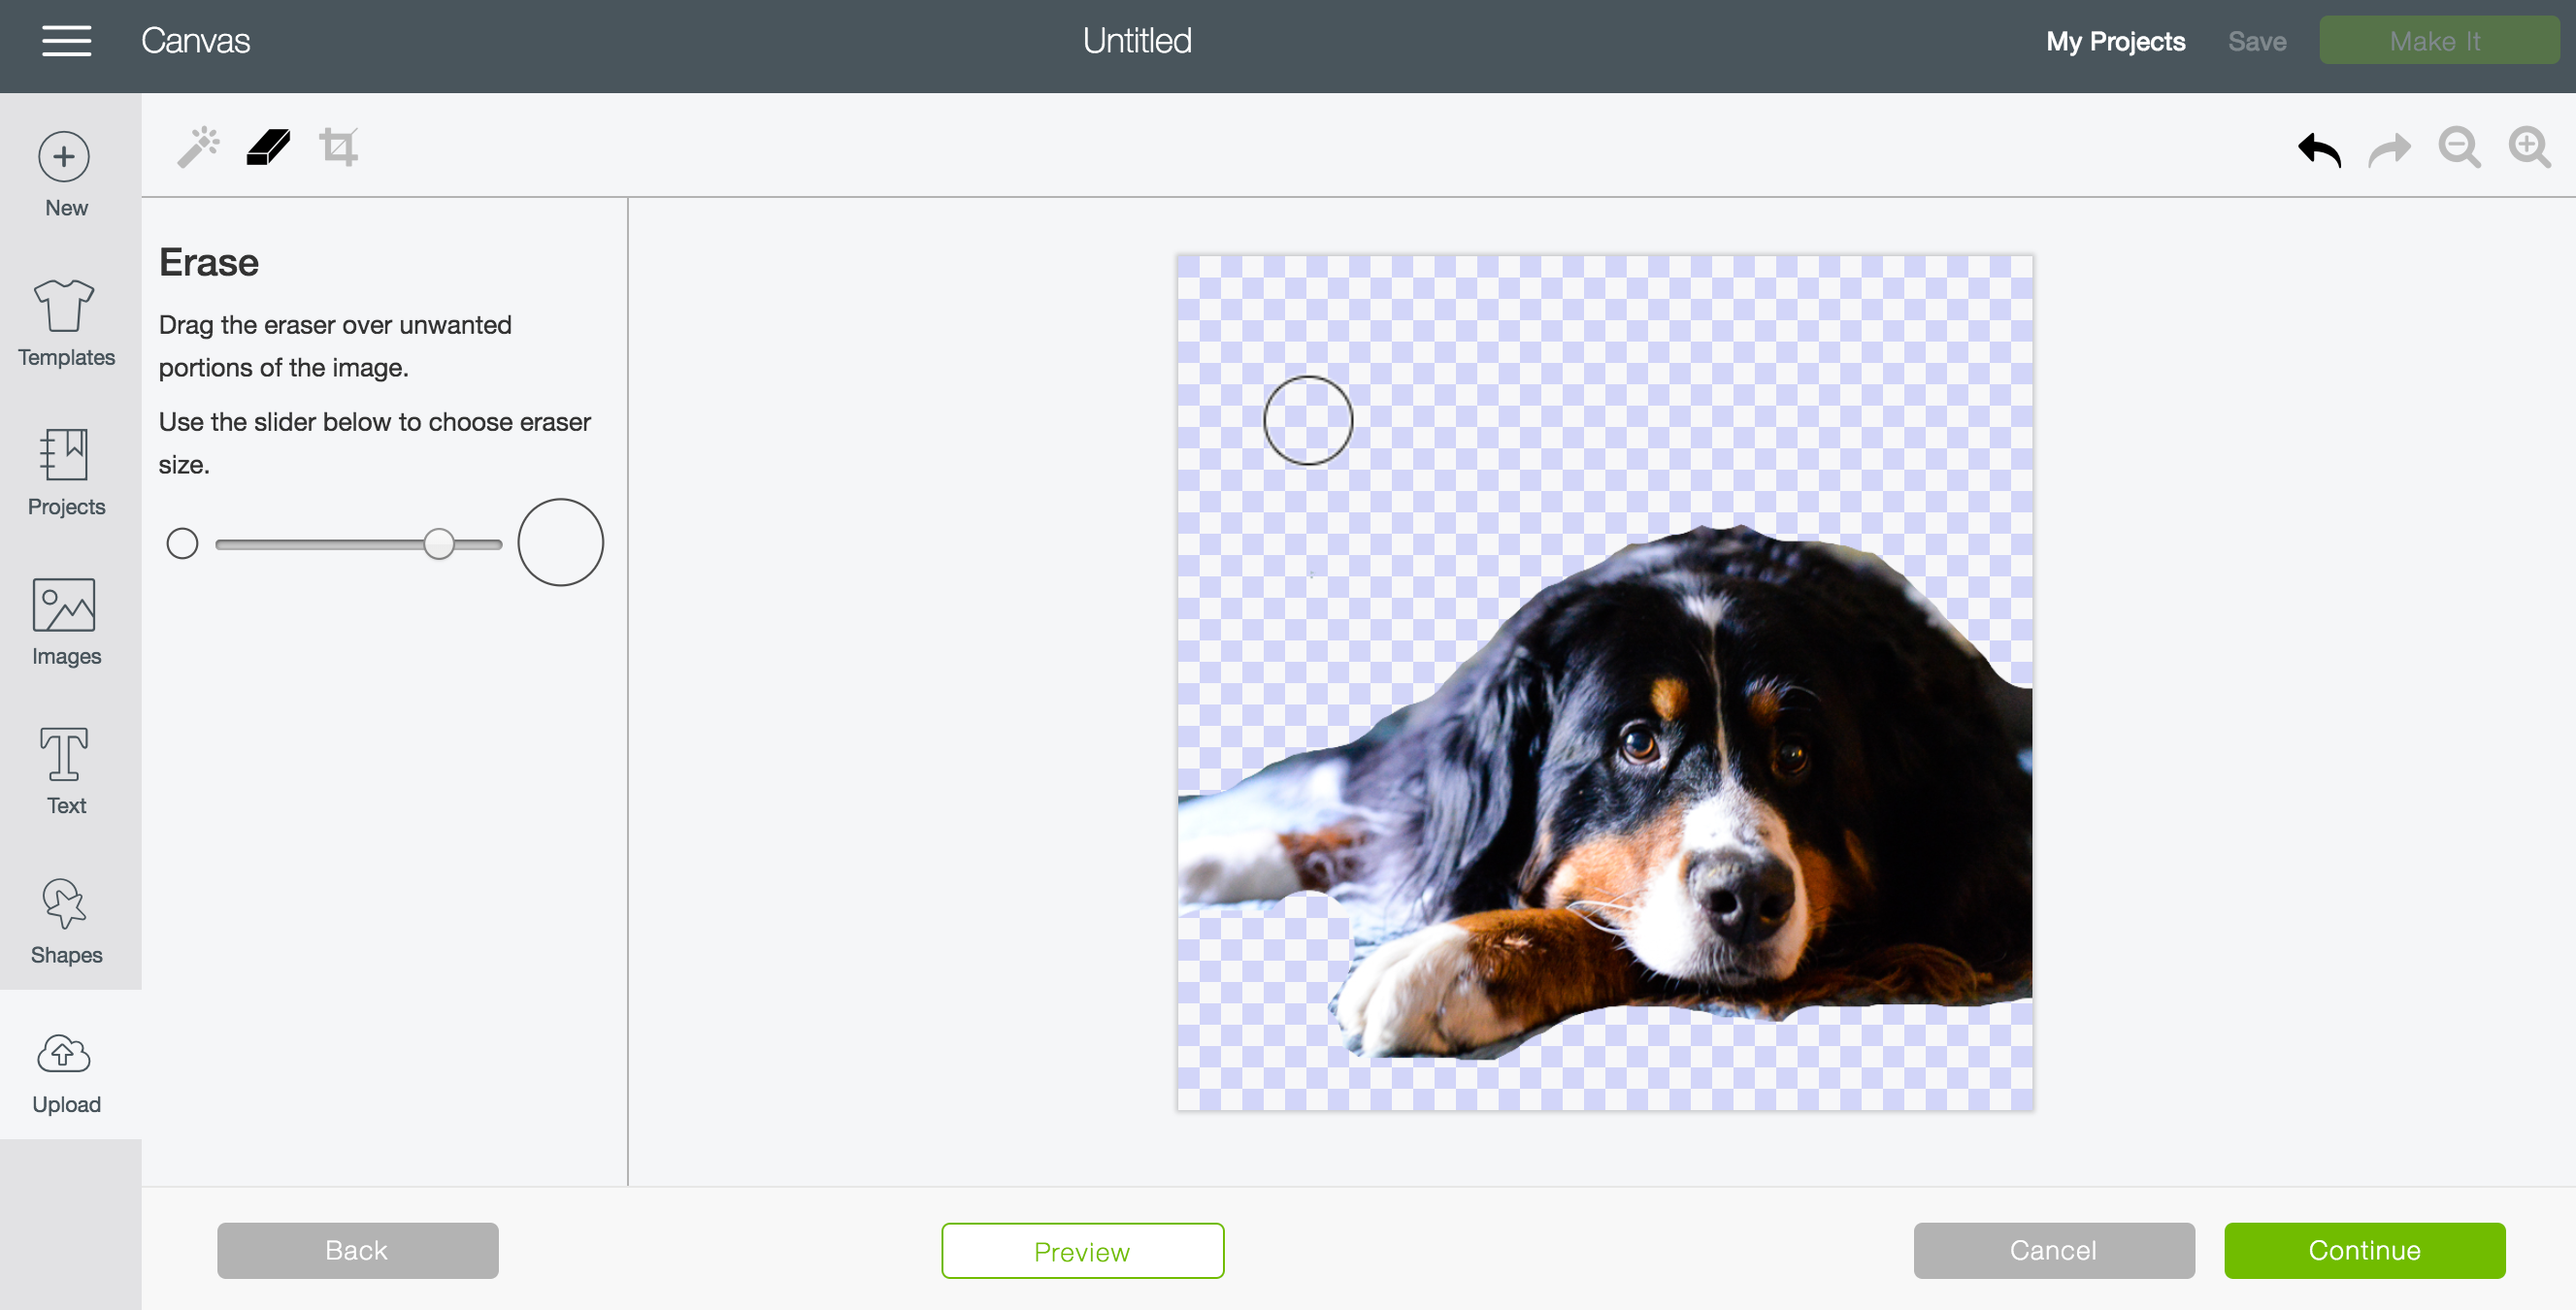
Okay, cool. Now we have a dog. Let’s click Continue.
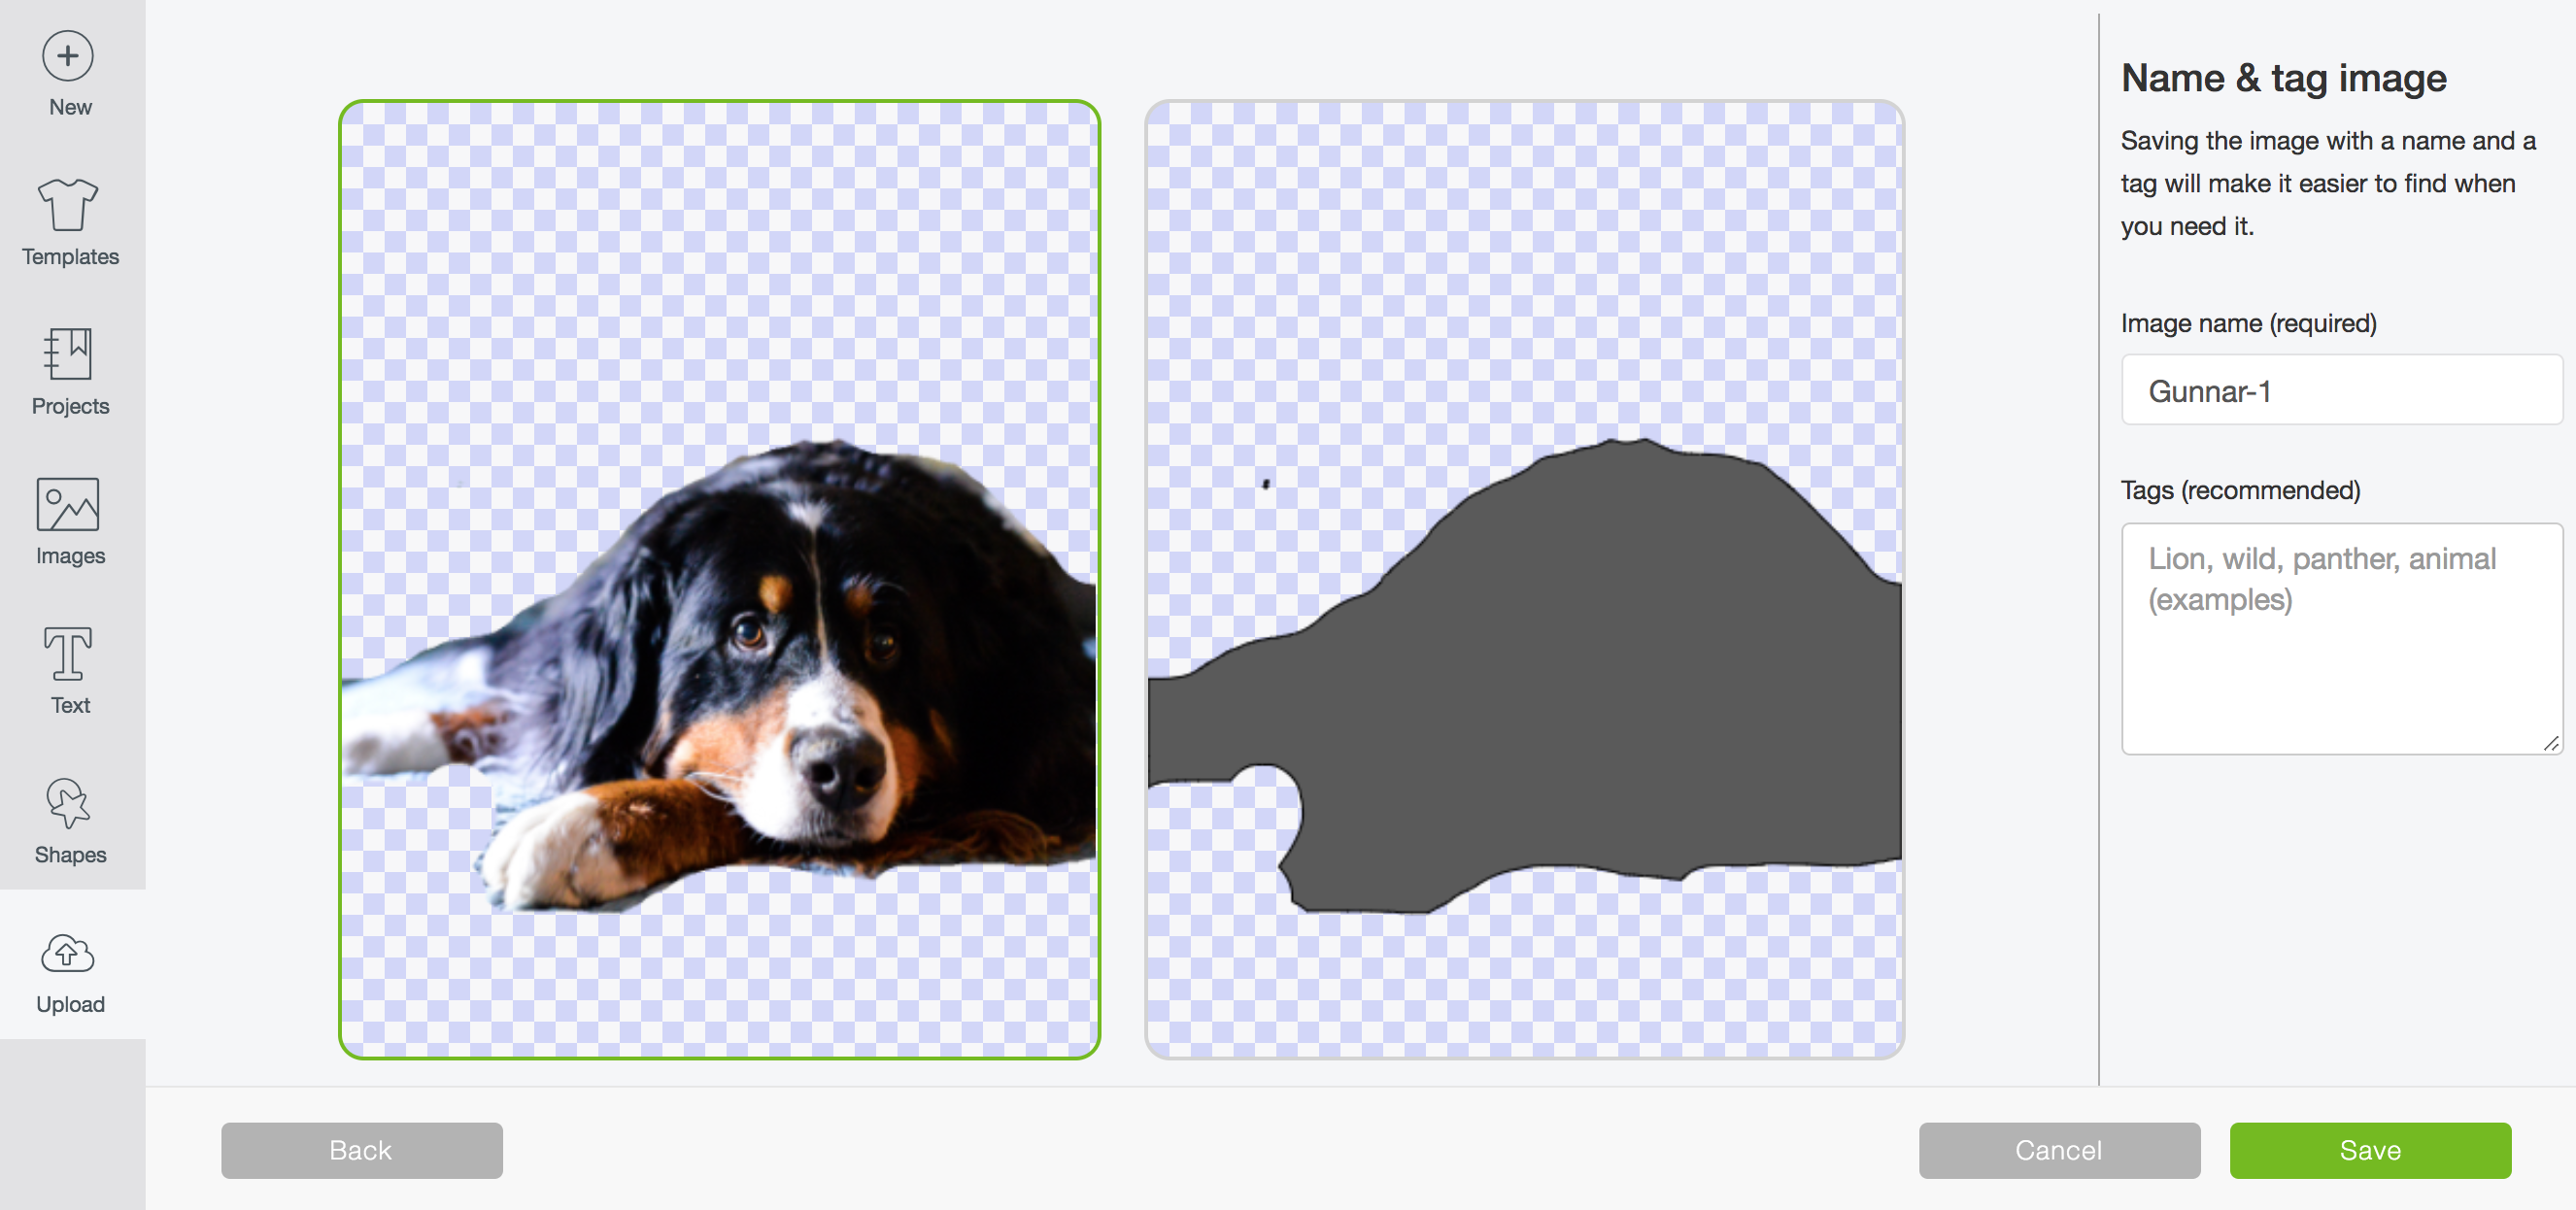
And…nope. That’s just basically a dog lump because again, it turns all pixel files into a single layer. So you can see how it is pretty much impossible to cut those low-contrast photos! You’ll have more luck with two color (black and white, generally) images than you ever will with a photo like this.
Print Then Cut
Really, if you want to cut out photos, you want to use Cricut’s Print Then Cut feature. You can print the image on your home computer, and then use your Cricut to cut around the outside of the image! I’m working on a detailed Print then Cut lesson—stay tuned!
Comments & Reviews
Sheri valenca says
Do I have to pay for cricut design space
Cori George says
There is no fee to use the CDS, but there is a fee to use the images in Cricut Access — either a monthly fee that covers all the images, or you can pay per image. Thanks!
Crystal Mcmurray says
Someone told me when you get the monthly way they take out the whole year and not month to month
Cori George says
You can pay per image. Some levels of access are only billed annually, but their standard membership has a month-to-month option.
Elisabeth Rufino says
I just got Cricut explore air 2 and my design space doesn’t give me an option to upload images.
Janie says
I dont have button either on my cricut maker on pc
Justin says
Open design space and click on + new project, then it’ll take you to the 2nd/middle page of the 3. Then in the bottom left corner you’ll see I believe shapes or something, well right there click upload then click where you’re uploading the image from. If it’s your camera roll then click camera roll lol. Then you’ll be able to scroll through and pick whatever your little heart desires, next you get rid of anything you don’t want cut…. you should be able to figure it out from there on…. hope this helps, sorry for how long it took for someone to respond
Amanda says
I’m having trouble with trying to use the print and cut feature with images I upload. I’m using an Apple device, I get my image to upload but from there I’m lost, I’m not very tech savvy so I’m sure it’s something simple and I just don’t know what I’m doing lol. It’s only with my uploaded images that I’m having trouble, I print and cut all of the images in the cricut library perfectly fine. Any help you could give would be oh so very appreciated. Thanks
Amanda says
Oh and I’m using the cricut explore one
Kristi says
Did you ever get a answer to your question cause I’m the exact same explorer one and Apple phone, not tech savvy! I feel yay
Liz, HLMS Reader Support says
Did you happen to try the print then cut calibration?
This should fix any issues you’re having.
Hope this helps!!
Liz, HLMS Reader Support
Cori George says
Hi Amanda — what type of file are you trying to upload to print then cut?
April Kay Messer says
I have a pc & my design space looks nothing like yours. I have layers tab but it’s grayed out & won’t work. I have an image I up loaded & trying to get where the edit part is to get the white out, can’t find it anywhere. Plus my cricut just some ant to print then cut! I want to love this but it’s making me crazy! My hubby bought it for Christmas so I really want to use it, thanks, April Messer
Cori George says
Hi April — can you email me the jpg you’re trying to cut to hello@heyletsmakestuff.com? I can see what the problem might be. Thanks!
Janice says
I upload a picture and before it gets to the part where it cuts it out the picture turns to a black square. Also the layer panel is grayed out at the bottom of the page like April said. I have a hp computer not a Mac.
Cori George says
What type of file are you using? Can you send me a screenshot? If there is not a lot of definition between colors in a PNG, the system can’t recognize the different colors.
Janielle Landry says
I’m having the same issue! Ugh! It used to work fine now it’s not working at all.
Norbert says
Hi!
How many own design can I upload or use?
Thanks
Cori George says
You can upload as many as you like! There is no limit :)
Corrine says
I CANT FIND MY CRICUT UNDER PRINTERS?
Cori George says
Hi Corrine — the Cricut is not a printer. You access all of the cutting software through Cricut Design Space and cut from there.
Karen Hunter says
I’m trying to upload an SVG so that I can cut fabric. It only wants to let me choose the print and cut option. Is there any way you can help me?
Cori George says
Hi Karen — SVGs should automatically upload…I’m not sure why it’s coming up as print then cut. Did you get it to work?
M'Kala says
OK My daughter and I are working on this. We have Android phones and she has been successful at using her cricut access/design space to do some baseball shirts for my granddaughters. My issue is:
Can you take a design, save it on the PC (I have figured out how to do that) and somehow be able to access it on our shared cricut design space? I have saved several images on my pc but she is not seeing them on her app. HELP?? PLEASE!
Dove Thiselton says
I just bought my first maker to cut stickers with. I am trying to cut a 8.5×11 printed sticker sheet that was done in photoshop and turned into a png. It uploads fine, and I am able to save it as a CUT file fine, It shows the grayed out shapes of the stickers. When I load it into designspace, it loads really big (12×16) even though it is saved as an 8.5 x11. I try to then use the image shrinker contriol at the bottom right of the picture to get it to fit within a 8.5 x 11 grid in design space. It then cuts it in the wrong places. I have tried calibrating, made sure my “fit to page” printer feature is off, and even measured the margins on my sticker sheet and adjusted the placement in the design space grid. It still cuts it incorrectly. I have spent the day looking on forums trying to see what other people have done with png uploads, and no one mentions that their png pulls in bigger than its supposed to be. Any ideas? thank you so kindly!
Cori George says
Hi Dove — what a strange problem? Have you found a solution? I honestly have no idea why it might be doing that. You can send the file to hello@heyletsmakestuff.com and I can try taking a look for you. Thanks!
Jessica Robison says
Thank you so much! I wasn’t scrolling down to select it save as a cut image. This was an amazing tutorial! Thank you!
windy says
have the issues with the print and cut problem been solved. everything I save and try to cut tells me I have to print and it never works so really frustrated,
Liz, HLMS Reader Support says
Hi Windy –
What specific problems are you encountering?
If you’d like to email hello@heyletsmakestuff.com directly with your questions, I can help you one on one.
Liz, HLMS Reader Support
Kiandra harvey says
I’m having this same problem!How can I fix it
Sarah says
Is there a work around to allow you to utilize the cut & print function from an Android device? As far as I can tell it works on Pc, Mac & Apple products; basically everything but Android. I don’t own a pc, & don’t plan on purchasing one. I feel like I’ve wasted my money on a cricut if I can’t access all features offered.
Liz, HLMS Reader Support says
I can totally understand your frustration here!
Unfortunately, we are at the mercy of Cricut updating their apps in order to utilize certain functions.
I do know that Cricut is continuously updating their apps, so it may already be in the works – you can also call Cricut to give them feedback.
There are still so many other functions within the Android app – I wouldn’t give up yet!!
Keep Crafting!
Liz, HLMS Reader Support
georgie may says
Help! All my uploaded images turn to black squares only allowing “print and cut” option wont allow me to cut even a silhouette image. Im tired of having to buy all my images from cricut.
Liz, HLMS Reader Support says
It sounds like you need to clean up the image you are trying to cut. There is a great tutorial on how to do this at this blogposts below:
https://heyletsmakestuff.com/gem-diy-sticker-valentines/
https://heyletsmakestuff.com/upload-svg-files-to-cricut-design-space/
If you’d like a more hands on tutorial on this and everything else Design Space has to offer, you can sign up for that at the link below:
https://heyletsmakestuff.thinkific.com/bundles/academy
Hope this helps – let me know if you have any questions!!
Liz, HLMS Reader Support
JPG4PNG says
Thank you for sharing this helpful article. I will share this with my friends.
Jenny says
I’m trying to upload an image for my friend’s website to create t-shirts for her business. When I upload the image into design space, it gives me the choice to print, then cut (colors are included) but if I just want to just cut the image, it’s gray and impossible to ungroup. How do I get the image to keep the original colors to just cut? Instead of print and cut?
Yolanda B Tann says
Hello, I have a circuit expressions. Will I need to get a more current machine in order to print out my own images?
Crystal Summers says
Hi Yolanda,
Unfortunately, the Expression machine is no longer supported by Cricut, and HLMS focuses on the Explore, Joy, and Maker machines. We don’t have much experience with the Expression.
Please let us know if you have any other questions.
Happy crafting!
Crystal, HLMS Community Manager
Crystal Summers says
Hi Kiandra,
Can you tell us what specific issue you are having? Did you upload your image as a cut file? Please feel free to email hello@heyletsmakestuff.com so we can help you with your specific problem.
Thanks!
Crystal, HLMS Community Manager
Mary Dex says
Thank you for all this great info.