
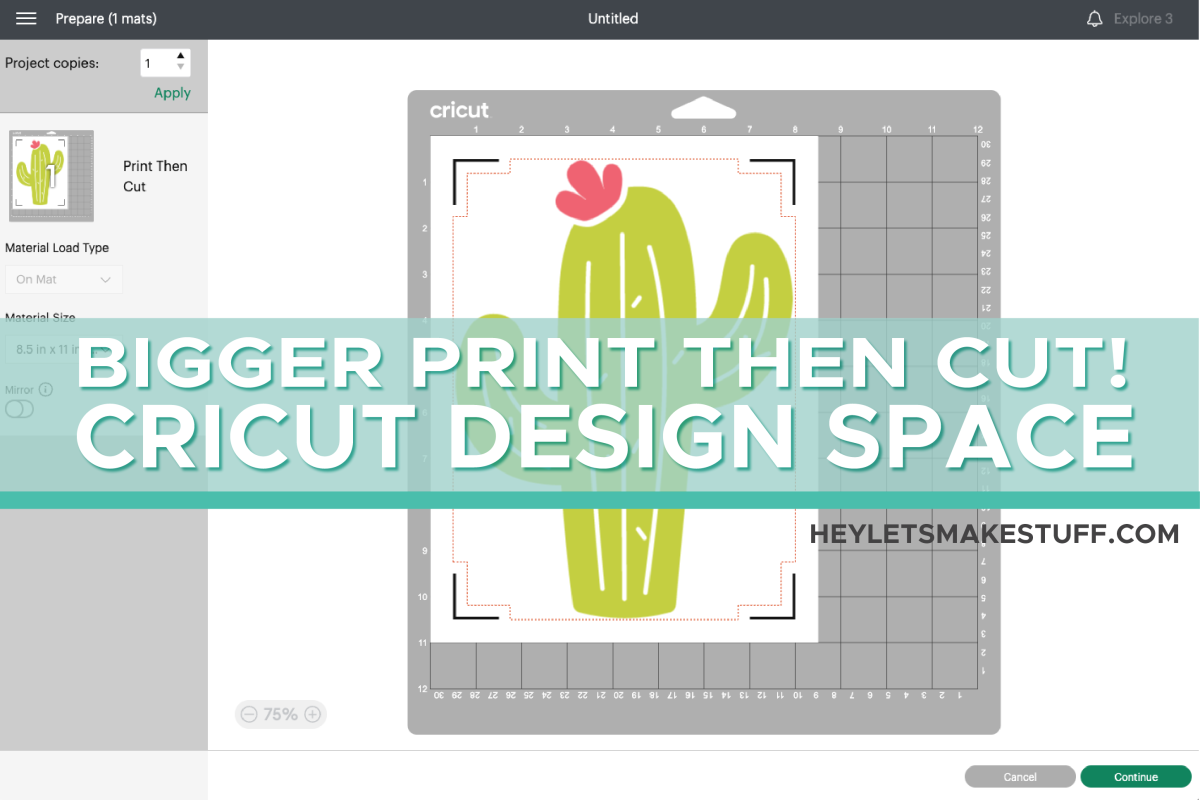
Cricut users have been asking for years for a larger Print then Cut size and it’s finally here! Here are the new Print then Cut maximum size measurements, plus tips and tricks for getting the largest Print then Cut sizes available.
If you’re not familiar with Cricut Print then Cut, it’s basically a feature of the Cricut Maker and Cricut Explore machines that allows you to print out an image on your home inkjet printer and then your Cricut will use its sensors and cut around the edges of your project. You can use it to make all sorts of projects like labels, stickers, magnets, and even sublimation projects.
You can read my full tutorial for Cricut Print then Cut here if this is your first time learning about this feature! Note that Cricut Joy does not support Print then Cut.
Print then Cut has always been a bit of a sore spot with some Cricut users. Compared to competitors, the print area size was the big issue. Over the years, they’ve increased it in small increments, but up until recently it was still smaller than most other Print then Cut competitors. Crafters have tried to find ways to hack the Print then Cut size, but a lot of them are fussy and often they don’t work well.
But I’ve got good news! The Cricut Print then Cut feature has gotten a redesign and they’ve increased the size of Print then Cut, including the ability to cut on larger page sizes. This post will go over all the new sizing details and how to maximize cut space, but refer to my full Cricut Print then Cut post for the nitty gritty on using Print then Cut in a variety of ways.
Visit my Amazon shopping list for everything you need to get started using your Cricut!
Watch the Print then Cut Video
Want to skip the blog post and get all the information in a video instead? Watch it here!
Print then Cut Images
As always, you’ll need a printable image for Print then Cut. You can upload a JPG or PNG, use a printable image from the Cricut Image Library, or you can flatten the layers of an SVG file or Cricut cut image.
Get the Free File
Want access to this free file? Join my FREE craft library! All you need is the password to get in, which you can get by filling out the form below. The file number is: C462.
How to Access the New Larger Cricut Print then Cut
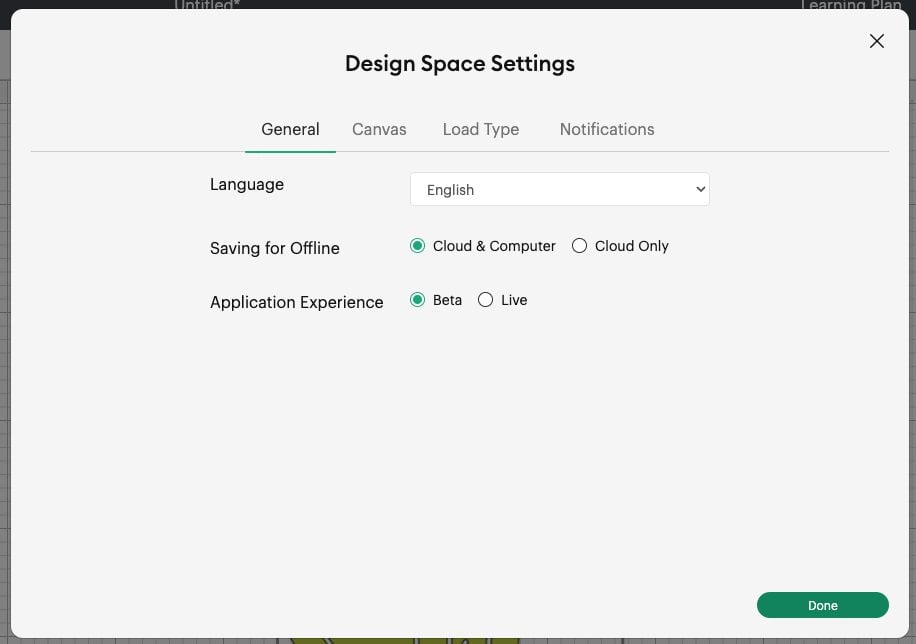
The increased Print then Cut size is currently in the Beta version of Cricut Design Space, but anyone can access it. Just go to the hamburger menu in the top left and in the dropdown, click Settings. From there, you can change from Live to Beta. Note that it WILL restart Cricut Design Space, so make sure you have all your work saved.
Calibrating Print then Cut
To use the new feature, you will be prompted to recalibrate Print then Cut. If you’re not prompted, I would manually recalibrate. To do so, you’ll go to the hamburger menu in the top left and click Calibration. Then follow the on-screen steps to calibrate Print then Cut. You’ll print out a test sheet, place it on a mat, and then your Cricut will make a series of cuts. You can follow the instructions until your Cricut is calibrated and your Cricut machine is perfectly cutting around the edge of your project. See my full tutorial for Print then Cut Calibration.
Cricut Print then Cut New Registration Marks
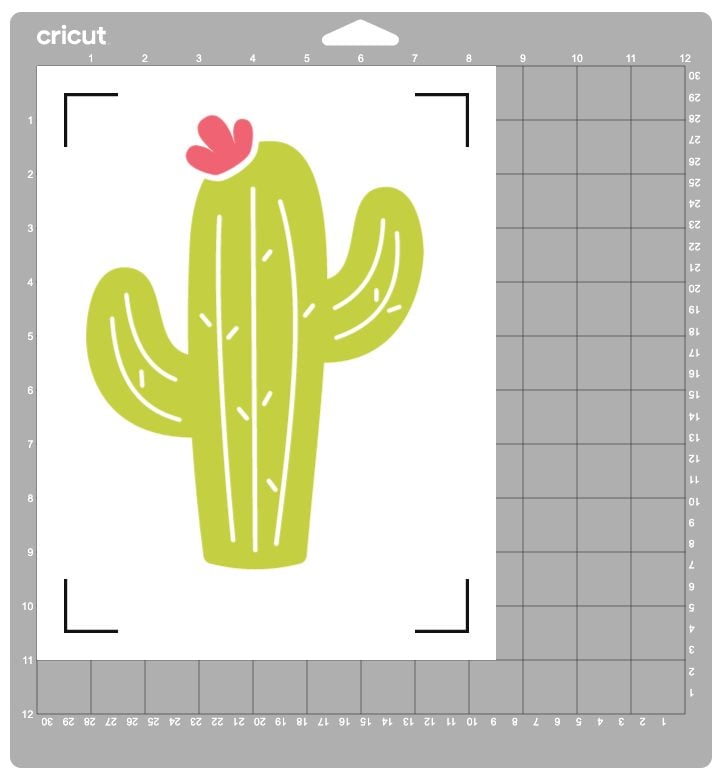
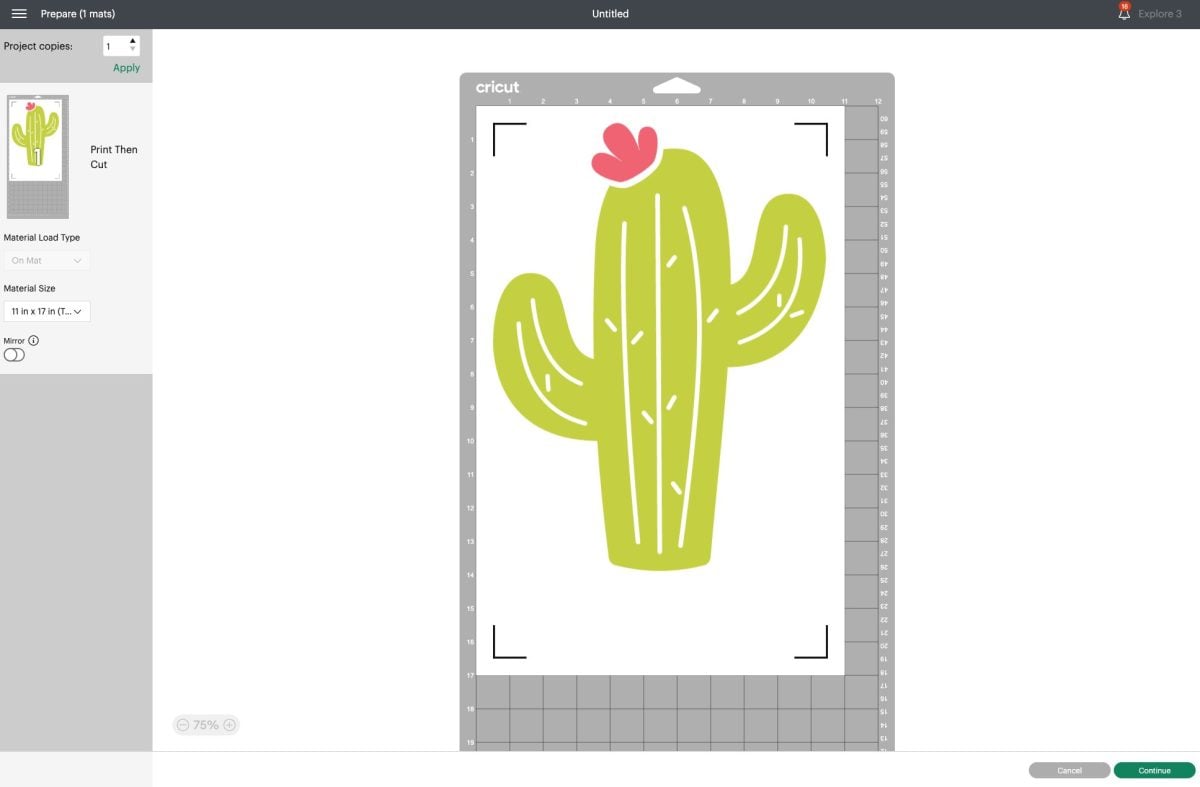
With this new release, the way that Cricut uses registration marks has changed. Before, they got in the way of the size of the image. But now they’ve changed things a bit so that the registration marks are only in the way a small bit. There’s more room at the top and bottom between the registration marks for your image, allowing the images to be a bit larger.
You can see these as red dotted lines in the Prepare Screen on the image preview. There are basically “tolerances” around the registration marks. So if your image fits within those tolerances, you’re good to go. If you have something like a square image with corners, it will have to be slightly smaller because the corners will get too close to the registration marks.
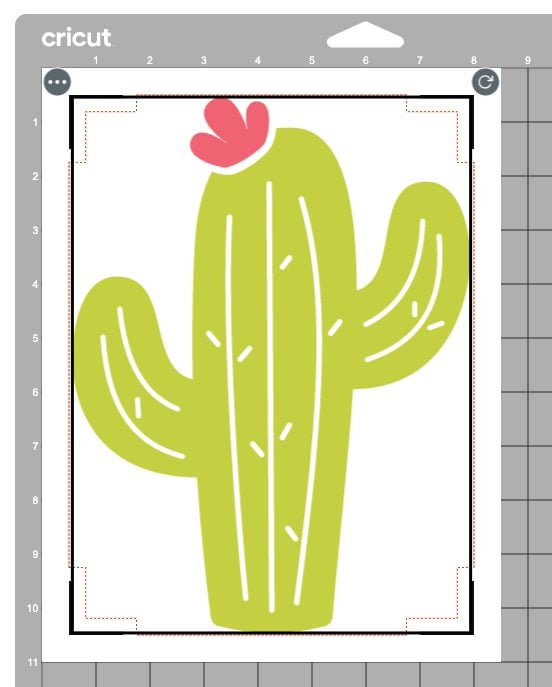
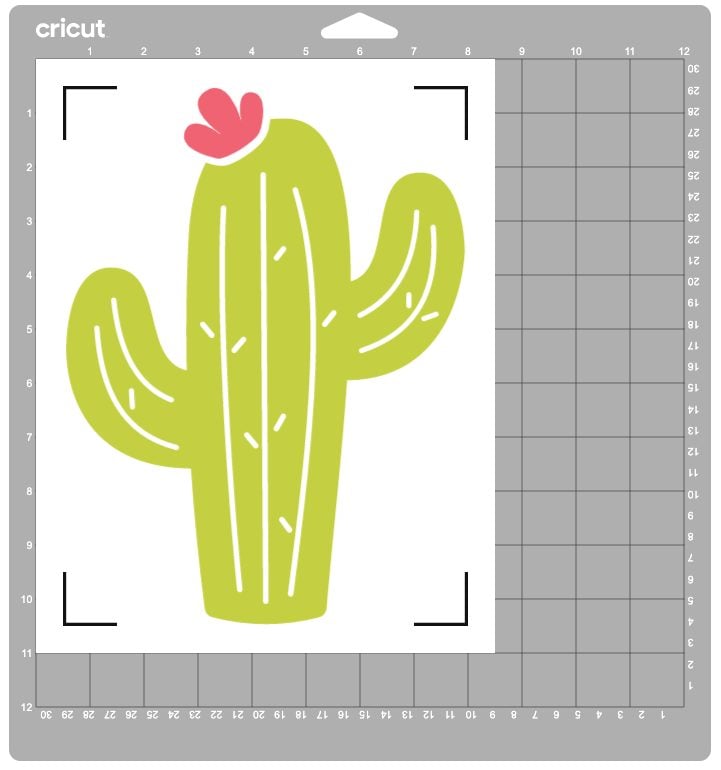
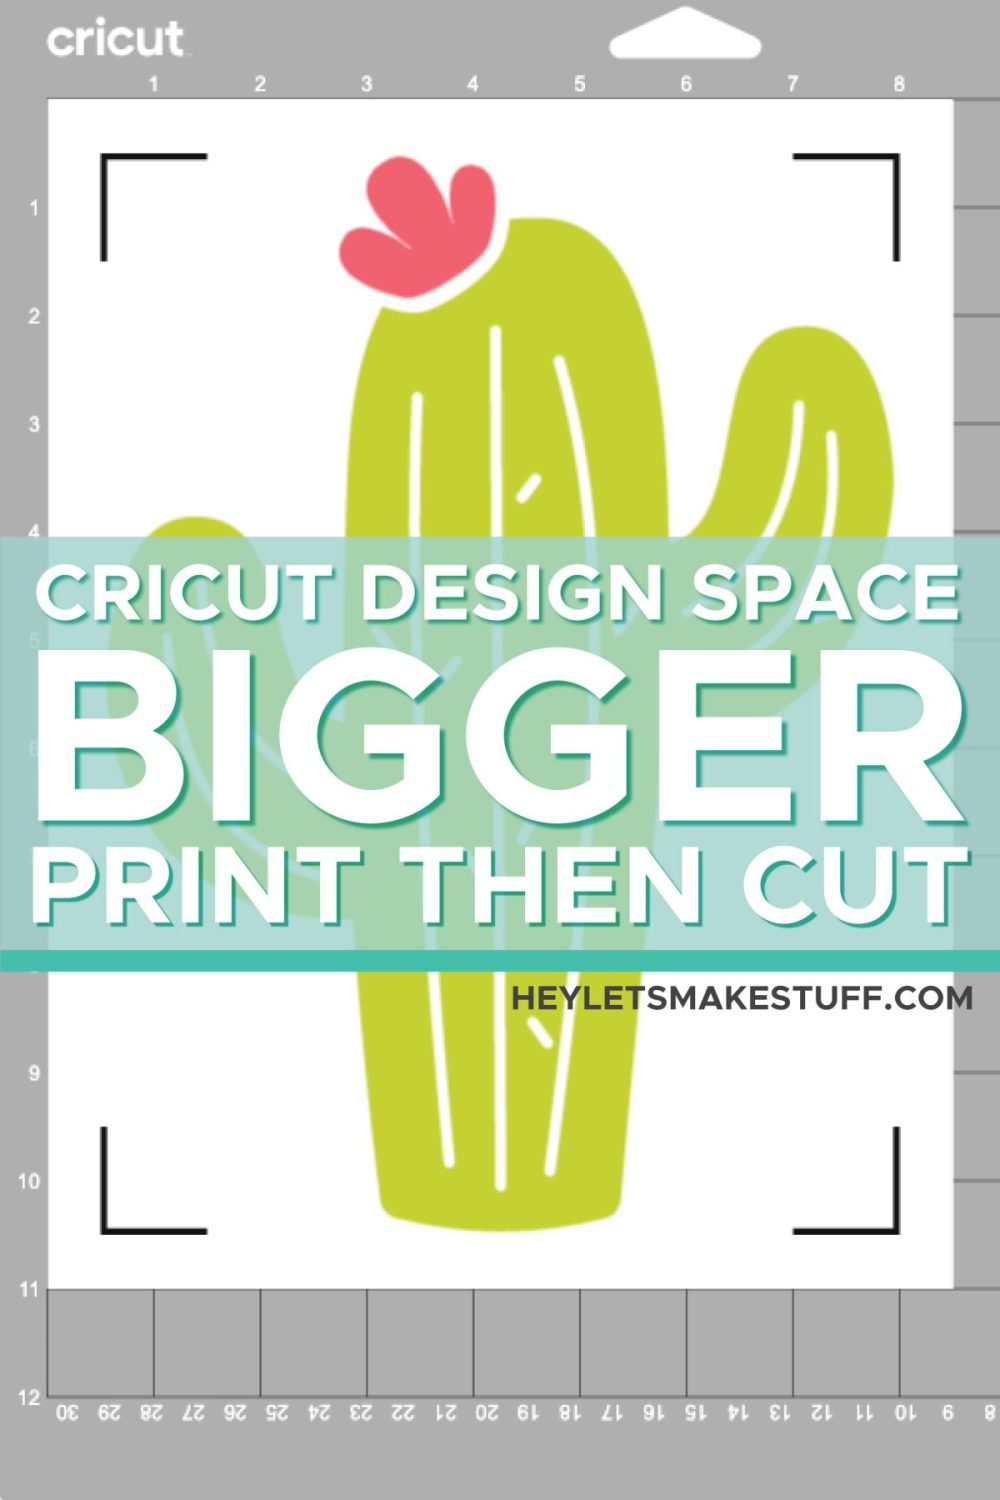
But an image like this cactus easily shows how much more space at the top and bottom we have to work with. In these two images, the one on the left has the previous cut size of 6.75″ x 9.25″, but on the right you can see the new print area is significantly bigger!
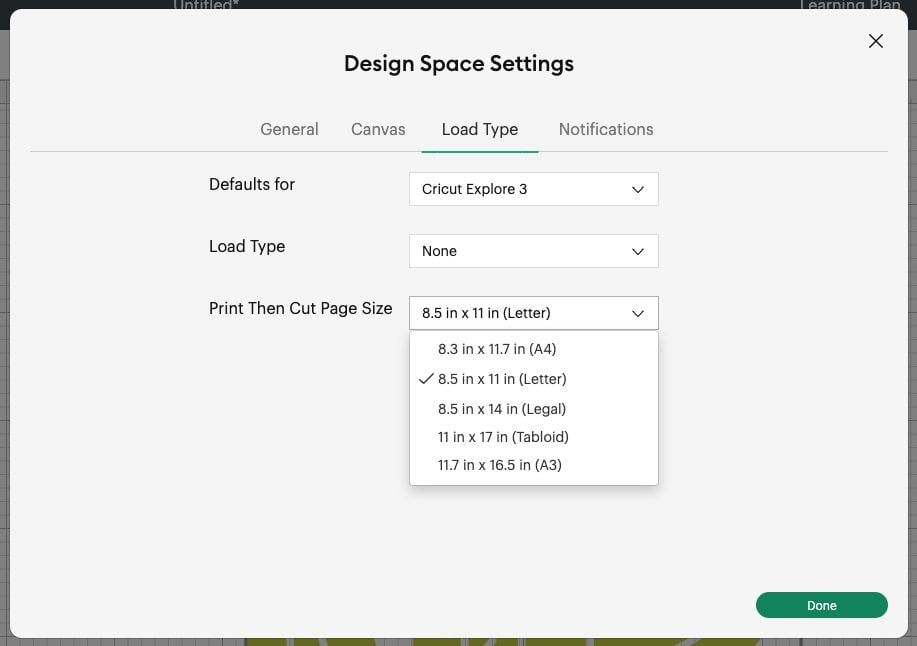
Cricut Print then Cut New Paper Sizes
Until now, I believe there was only one size of paper supported for Print then Cut: 8.5″ x 11″. This is the standard paper size in the US, but not everywhere. With this update, there are FIVE different paper sizes supported:
- A4: 8.3″ x 11.7″
- Letter: 8.5″ x 11″
- Legal: 8.5″ x 14″
- Tabloid: 11″ x 17″
- A3: 11.7″ x 16.5″
You can change the paper size in the Settings. Go to the hamburger menu in the upper left, then Settings, and then Load Type. There you will see all the options.
Note that you WILL need a home printer that can print these bigger sizes! Many printers in the US can also do legal paper, but you’ll need a specialty printer to use the large tabloid size. I currently do not have a large format printer, so unfortunately I can’t actually test these larger sizes.
Additionally, I hope Cricut will add a 12″ x 12″ size, since I do have a Canon TS9521C 12×12 Printer, which prints that large scrapbook paper size. Fingers crossed!
Cricut Print then Cut New File Sizes
Now let’s talk about the Print then Cut print area for these different paper sizes. Cricut hasn’t published the exact sizes for each paper size yet, but after some testing, I think these measurements are pretty close:
- A4: 7.19″ x 10.06″
- Letter: 7.44″ x 9.94″
- Legal: 7.44″ x 12.93″
- Tabloid: 9.94″ x 15.94″
- A3: 10.63″ x 15.49″
Hopefully Cricut will release the maximum print sizes so we can be more precise, but in the meantime these numbers should get you close.
Auto-Resize in Cricut Print then Cut
Because each image is different and those tolerances are now rendered differently, it may be hard to know just how big an image can be. This is where the Auto-Resize feature comes in. I find this a bit tricky to work with (I think it could be more easily accessible, if you’re listening Cricut engineers), but it’s not too bad. First, you need to resize your image LARGER than your final project. That is the only way you’ll be able to access the Auto-Resize.
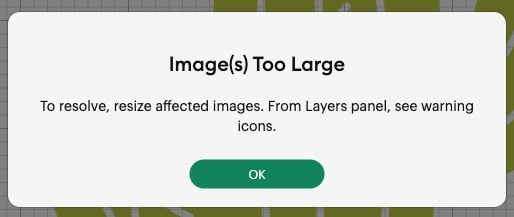
When you go to make it, you’ll get a warning that says your image is too big and you need to resolve the issue:
In the Layers Panel on the left, you’ll see a warning symbol on that layer—a little red exclamation point in a circle. Click on it and you’ll see options!
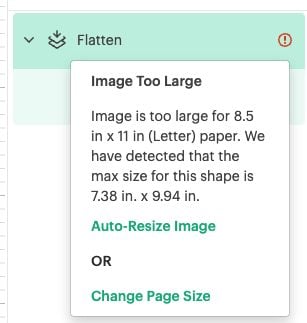
From here, you’ll see that Cricut Design Space has detected a maximum size for your project. You can go and plug in those numbers into the Edit toolbar at the top, OR you can use the Auto-Resize feature! This will make your image the maximum size allowed within the Print then Cut boundaries. Easy!
You can also change your paper size here—it will just take you to that Load Type settings screen mentioned earlier in this post.
You can use the Auto-Resize with any paper size, meaning you can make HUGE print then cut crafts on that larger paper with a large-format printer and a large Cricut mat. I think this is fantastic in particular for larger sublimation Print then Cut projects (yes you can get tabloid sized sublimation paper on places like Amazon!), since many things like sticker paper or printable vinyl don’t easily come in these larger formats.
Frequently Asked Questions about Larger Cricut Print then Cut
With the newest update, you can print and cut up to 9.94″ x 15.94″ on a Tabloid sheet of paper.
If your image is larger than the maximum print then cut area, you’ll get this warning. You can resize your image to fit within the bounds of Print then Cut by clicking the warning symbol and choosing “Auto-Resize.”
If you don’t mind piecing your project together after it’s printed, you can use the Slice tool to separate your image into different pieces to be printed separately.
No, to use Print then Cut, you’ll need a home printer in addition to your Cricut cutting machine.
You can use any of the Explore or Maker machines for Print then Cut. Cricut Joy does not support Print then Cut.


Comments & Reviews
Holmes says
Working with the larger Print Then Cut size really opens up more creative possibilities, especially for stickers and full-page designs, but understanding the cuttable area and those sensor margins is key to getting clean results without constant resizing. Even with bigger formats, the machine still limits usable space depending on page size and layout, so planning designs carefully makes a big difference. Lighting and image clarity also play a role in how accurate the cuts turn out, which is something that often gets overlooked in tutorials. Learning a bit more about image settings, like exposure and depth, can actually help when preparing designs before printing—guides like https://skylum.com/blog/what-is-aperture-in-photography explain how those basics affect final output. Combining good design prep with the new size options makes the whole workflow much smoother.
Alice says
I’m trying to print-cut an image (in Beta version) that is well under the max image size for letter. I cannot “auto resize” as exact size is crucial. My image is 7.357 x 8.423. What is wrong?
Hannah says
I’ve had the hardest time attempting to print and cut a large image that I’ve sliced down. Can’t seem to get the sizes right. Even 7.44×8.44 is getting an “Image Too Large” error. I’ve recalibrated and triple checked my paper size. Any tips?
Crystal Summers says
Hi Hannah,
Wow, that’s very frustrating! Have you double checked which machine you’ve selected in Design Space? If you have a Joy machine selected, you may get this error. You should be able to print at that size (even larger, really). If it continues, I would reach out to Cricut support. It may be a software issue and they would need to help you troubleshoot.
Happy crafting,
Crystal, HLMS Community Manager
Jenna Hines says
I am excited to use this feature, but I am running into a problem. When I switch to Beta mode, it still has the same size constraints. I have restarted DS a few times as well. I even started a new project to see if that was the issue. Any ideas?
Kristal says
I am having the same issue.
Carmen says
Thank you for this overview! I have used the print and cut feature in the past and had no issues. But now, with the new update, I have not been able to get my Cricut to cut on any of the sticker paper brands (none of them were the Cricut brand). Each time I try, it says it can’t read the sensor lines. I literally printed the same project (using the older version) with the off-brand sticker paper two months ago with no issues. I’ve calibrated my machine. No luck. Oddly enough, I can print my designs on regular copy paper, and the Cricut machine will cut it just fine. I called tech support and they said the new update limits you to use the Cricut brand sticker paper. Have you experienced this?
Crystal Summers says
Hi Carmen!
Hmm I haven’t experience or heard of this. HOWEVER, I have heard of print then cut not reading the lines. Have you tried to be sure you have good lighting when performing print then cut? In the past, I found adding a little desk lamp or overhead light by my Cricut machine helped. It sounds like it’s being really finicky! Maybe try the Cricut sticker paper, just to test their theory. I’m sorry you have to do so much torubleshooting. Hopefully you find a solution soon!
Happy crafting,
Crystal, HLMS Community Manager
Katthi says
No matter what I do I can no longer use the print, then cut because my cricket air two will not read this new type of registration mark. I’m in the middle of a large project for a customer, and suddenly I can no longer detect the registration mark and get my cricket to cut the stickers for a customer.
Cori George says
That’s frustrating! Have you re-calibrated print then cut for the new sizes?
Carmen says
I am having the save issue. I was told by Cricut tech support that I needed to use Cricut brand sticker paper which is more expensive.
Deb says
Is there a way to export to a file so that we can take it somewhere like staples to print and then bring back and cut.
Cori says
Unfortunately, Cricut Design Space does not have an export option :(
Katie says
when you chose the option to send it to a printer, choose the “print to pdf” option. then you have a file you can send to staples or wherever :)
Kia says
this is brilliant! never thought of that. thank you!
keith webb says
yes, on your printer options.
once you reach the “print” option in Cricut design space, make sure you select the “use system dialog”.
When the dialog pops up (your printing options), simply choose “print to pdf” where you would select what printer to use.
This will save your image in pdf format that you can then take with you to print.