Fonts often come with extras—glyphs, special characters, various letterforms, flourishes, ligatures, stylistic alternatives, and more! Here’s how to use these glyphs in Cricut Design Space to make your designs even more unique.

IMPORTANT UPDATE: 1/27/20: It looks like copying glyphs from the character map is not working with the new Cricut Design Space desktop app, though it sounds like a fix is in the works. If I get an update on when it might be working, I’ll share here.
I love working with fonts, particularly when I’m crafting with my Cricut. One of my favorite things about fonts is using “special characters”—these are the different glyphs, ligatures, and other stylistic alternatives that come with (most often paid) fonts.
What is a Glyph?
A glyph is a specific form of a letter or number. Think of a letter A with several different stylistic options, like in the font Cherryla:

This font, for instance, has more than 375 different letter and number glyphs! That means that it’s so much more customizable than a font with a more basic alphabet.
Today we’re going to talk about accessing all of those alternate characters in Cricut Design Space so you can make your designs even more unique! This post will cover how to use these different characters on both your Mac and PC!
Looking to do this in Silhouette Studio? My friend Alexis wrote about using glyphs in her big Silhouette Studio fonts post.
What Are These Things Called?
I could NOT figure out what non-designers might call these “fancy letters.” Technically they are glyphs, but I’m not sure the general user knows them by that name. You might call them:
- Glyphs
- Stylistic Alternatives
- Special Characters
- Letterforms
- Alternate or Alternative Characters
- Stylistic Options
- Swashes, swirls, or swooshes
- Flourishes or flounces
- Font Extras
- Ligatures (see the bottom of this post for more info)
- Those Fonts With the Swooshy Thingies
For this tutorial, I’ll be using the font Heartbeat Script, which has more than 630 alternates! Once you’ve uploaded your fonts to your Mac, you can access the base (not-so-fancy) font directly in Design Space using the dropdown menu.
Start by typing out your word in Design Space and selecting your font. Yes, the letter spacing in Design Space is terrible, but we’ll fix that later (you can also see this post, though you don’t want to fix your font until you have all the special characters inserted!).

Glyphs in Cricut Design Space—Mac
To access the special characters on your Mac, open up the FontBook application (this is standard on Mac computers—you will not need to download anything). Use the search bar at the top to search for the font you are using, in this case Heartbeat.

This will pull up the Heartbeat font. Select the second icon in the upper left corner and this will show you all the letterforms for the font.

You can adjust the size of the letters using the vertical slider on the right of the window.

From here, you can select the glyph you’d like to use and copy it using Cmd-+C or going to Edit > Copy in the menu bar at the top. Then go to Cricut Design Space and paste your glyph (Cmd-V or Edit > Paste).

Note that in the text box, your glyph will look like a little box, but you will see the actual glyph on your Canvas.

Continue until you’ve changed all the letters you want to change.

See the end of this post for how to make that nonsense look like an actual word!
I will be the first to admit that the FontBook is not particularly user-friendly (then again, I find it easier than the PC, as you’ll see below), but it works.
Glyphs in Cricut Design Space—PC
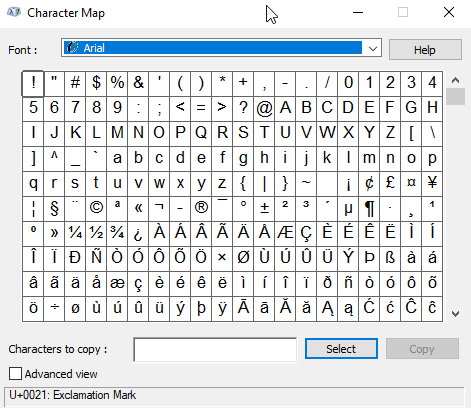
The process for finding glyphs on your PC is similar to a Mac. Start by opening the Character Map program on your PC. This comes with PCs running Windows software—you do not need to download anything.

Then use the dropdown to select the Heartbeat font.

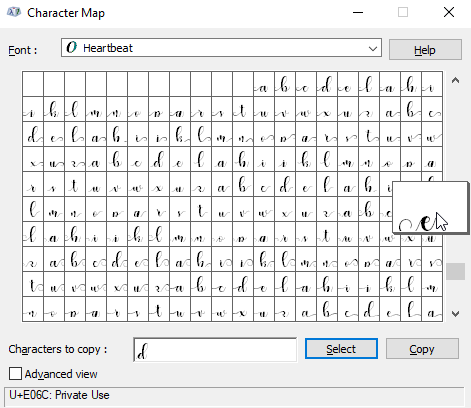
Now comes the trickier part. There are a lot of characters that show up in this character map in addition to the glyphs in the Heartbeat font. And I mean A LOT. Hundreds of letters, characters, and symbols from all sorts of languages. Finding the glyphs for this font took some scrolling—notice in the vertical scroller on the right of the window, above, that it’s nearly at the bottom. It took me a while to find them because there were SO many other characters.
Once you have found your glyphs, double click the letter, which will put it in the little “characters to copy” box at the bottom of the Character map. Then click “copy” and paste it into your text box in Design Space. Continue until you’ve replaced all your letters:

See the next section for how to rework the letters to be an actual word.
Making it Pretty
Then use the tips from my Working with Script Fonts post to get those letters exactly where they should be. I straight-up used the Ungroup to Letters function and placed all of the letters together myself—super easy!

Alternative to FontBook & Character Map—FontBase
Because I don’t find the FontBook (Mac) and the Character Map (PC) to be all that user-friendly, I went searching for a desktop app that would make using glyphs easier. I found FontBase, which works really well for accessing glyphs…for $3 a month. It’s definitely an option if you’re using a lot of glyphs.

It’s a cool program even outside the glyphs, though—you can sort and categorize all of your fonts, making it easy to find fonts to use in your Cricut projects, even if you’re like me and are sitting on more than 1000 fonts in your library.
Another option is to use Adobe Illustrator, my preferred design program. You can read my tutorial for Using Glyphs in Adobe Illustrator if that interests you!
More Cricut Design Space Font Tutorials
I’ve written about fonts in Cricut Design Space quite a few times. You might find some of these posts helpful:
- How to Upload Fonts to Cricut Design Space (read this before this post!)
- Font Basics in Cricut Design Space
- Working with Script Fonts in Cricut Design Space
- How to Curve Text in Cricut Design Space
- 101 Fonts for Cutting Machines
- Where to Find Cheap and Free Fonts for the Cricut


Comments & Reviews
Veronica says
Any updates to the Glyph problem? I’m having this same issue.
Olivia says
To those of you getting a box with a question mark, make sure in your text box in Cricut Design Space, you have the font selected that you are trying to use. If your text box in Cricut Design Space has Comic Sans selected and you try to paste a Magnolia Sky character into it, the question mark box will show. But if you select Magnolia Sky in Cricut Design Space and then paste a Magnolia Sky character into it, it will work properly. I hope this helps someone and isn’t to confusing. :)
Melanie Salgado says
Any updates on how to use these with the new cricut design space? I have tried using the copy/paste method but it doesn’t seem to work for me.