Want to make stickers using your Cricut? There’s a new tool that can help! This tutorial will teach you how to use all of the options in the Cricut Create Sticker Tool in Cricut Design Space.
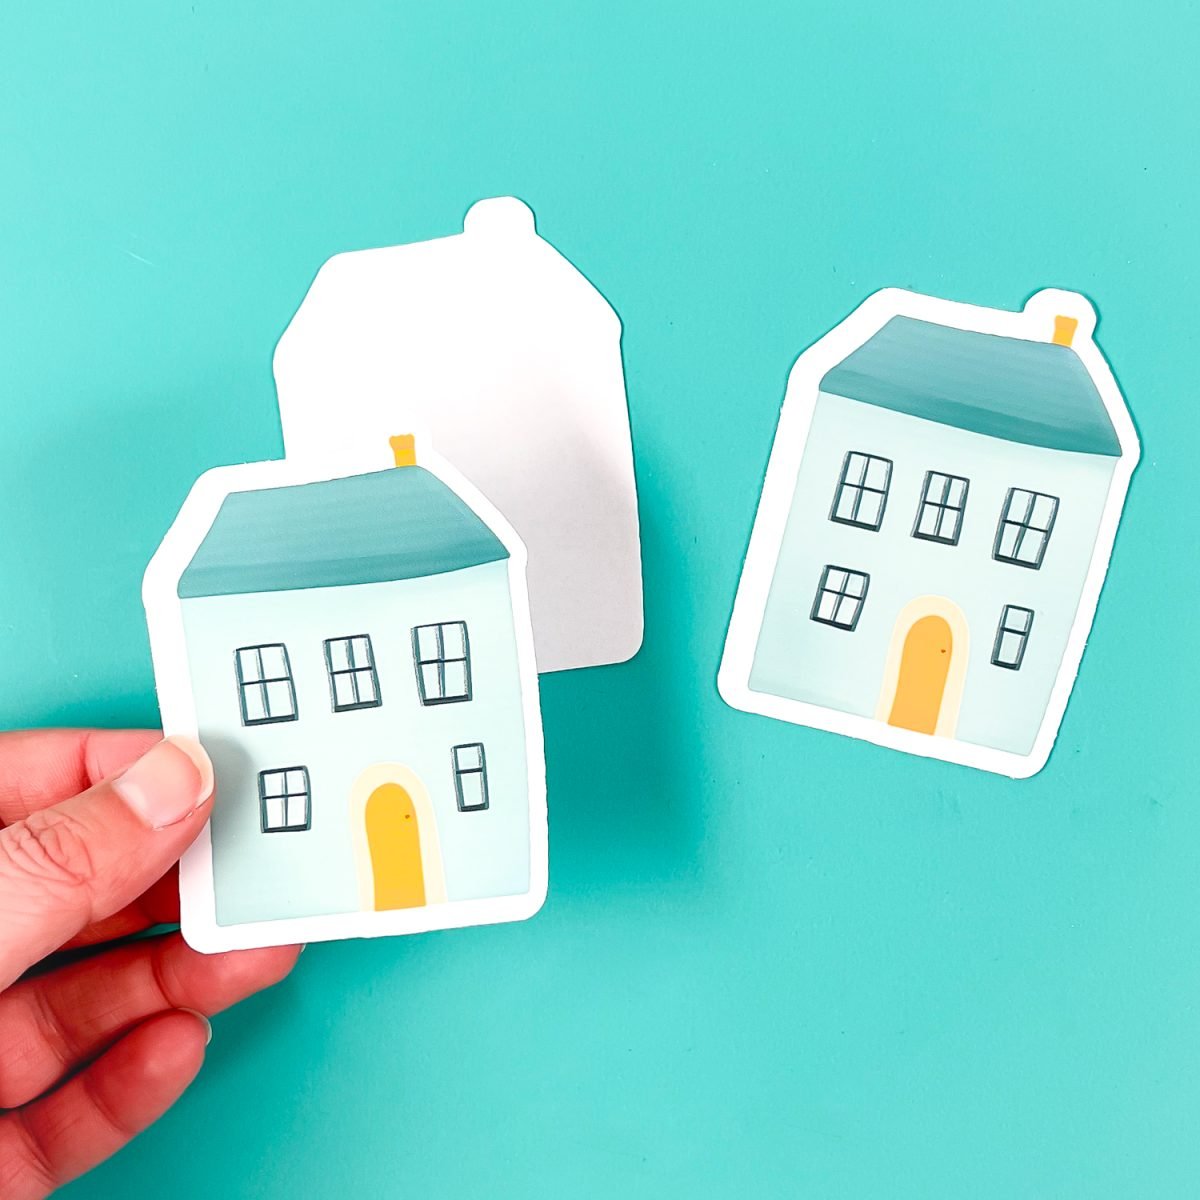
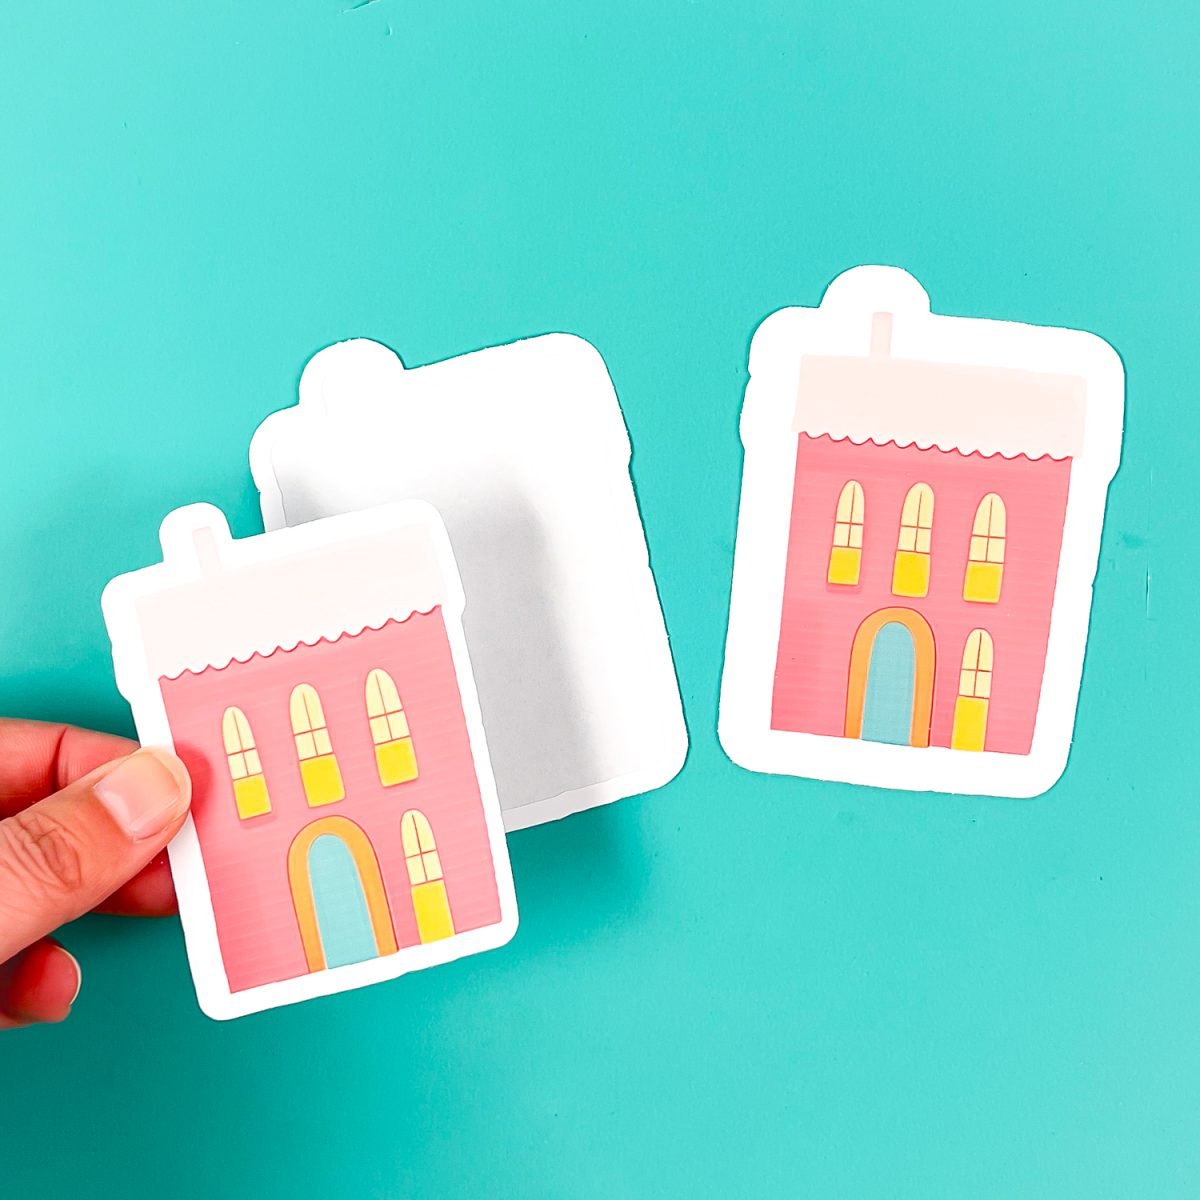
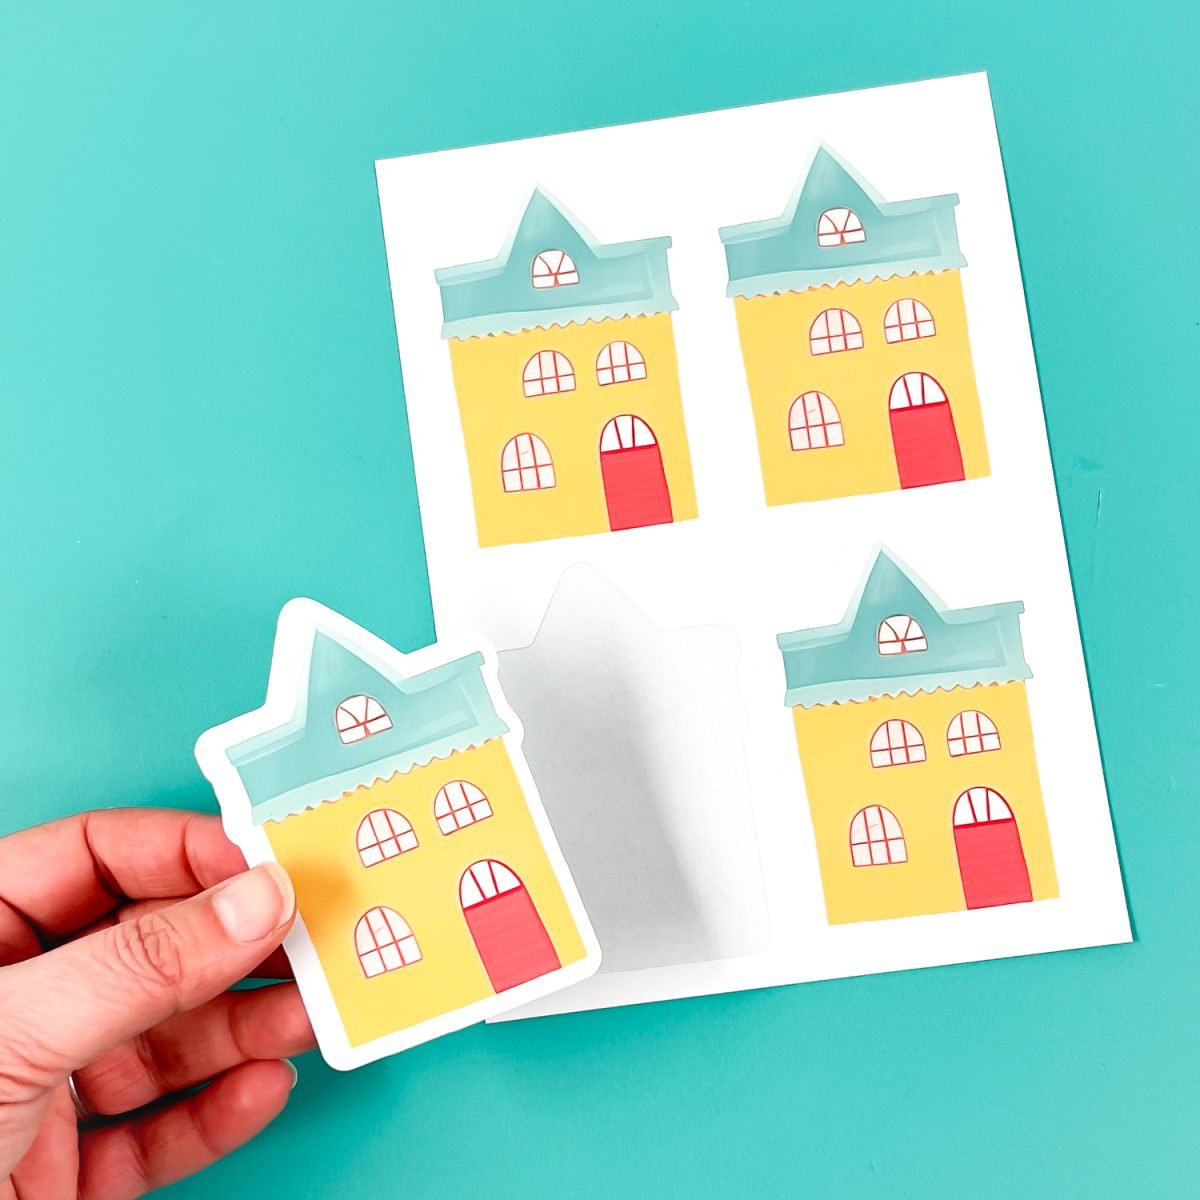
Cricut Design Space has gotten quite a few updates recently, and one of the bigger ones is the new Create Sticker tool. This tool allows you to easily make both die cut and kiss cut stickers using images from the Cricut Image Library or images you upload yourself. You’ll need an inkjet printer as well, since your Cricut doesn’t print!
You can also learn more about making other types of stickers in my post Make Cricut Stickers using Clip Art, SVGs, Photos, and More!
Get everything I use in this post in my Amazon shop!
But in today’s post, we’ll walk through using the Create Sticker tool!
Watch the Video
Want a video walkthrough of this new tool in Cricut Design Space? Just hit play below! Or keep reading for a written tutorial.
Get the Free File
Want access to this free file? Join my FREE craft library! All you need is the password to get in, which you can get by filling out the form below. The file number is: C478.
Accessing the Create Sticker Tool in Cricut Design Space
Using Cricut Design Space Beta
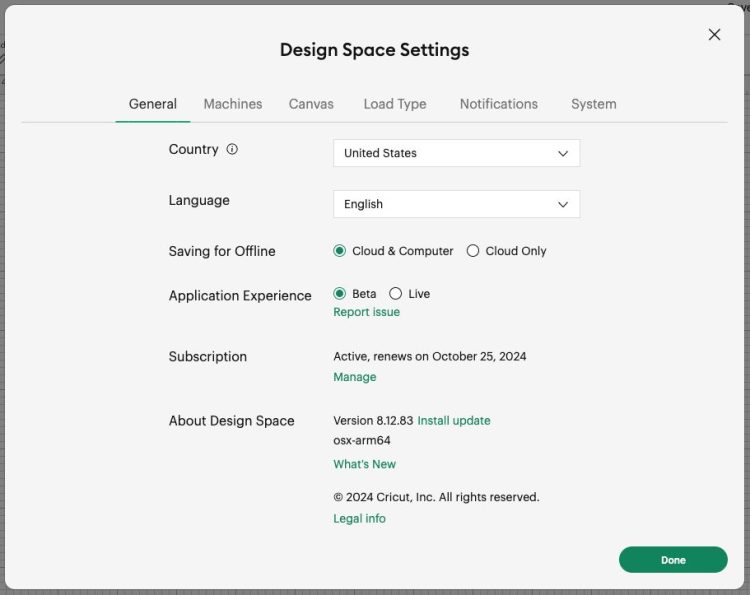
If you don’t see the Create Sticker tool in your version of Design Space, you may need to switch to the Beta version. To do so, go up to the menu on the right, click Settings, and ensure you have Beta checked under Application Experience. Design Space will restart after you choose Beta, so make sure you have anything you’re working on saved before switching.
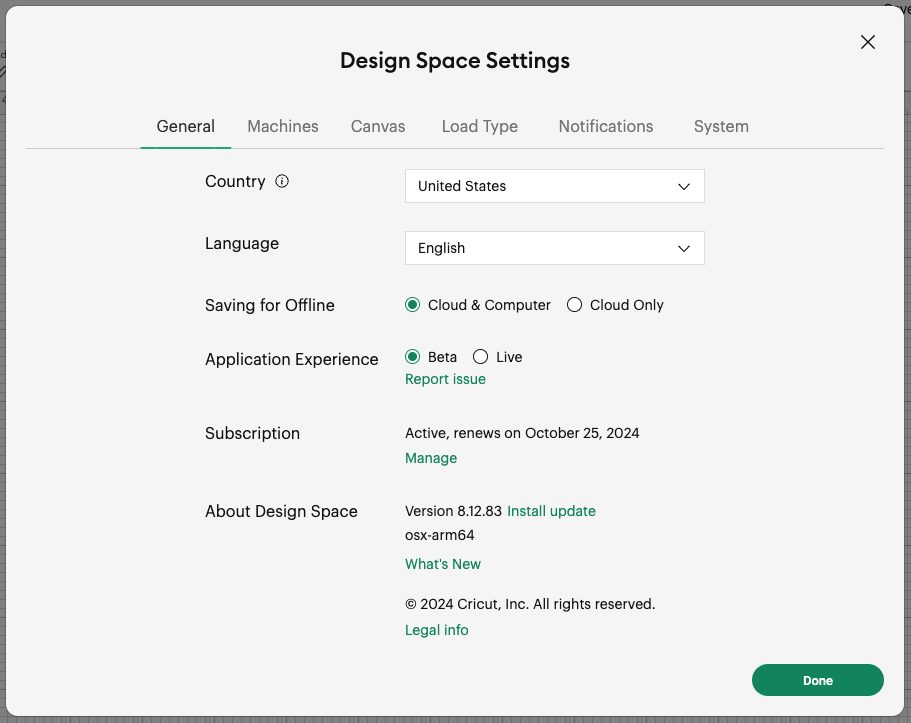
Note that Beta can be glitchy! This is where they are testing things out and finding bugs. So you’ll probably have to deal with some annoying glitches along with getting early access to new tools.
At some point this tool will be moved to the general feature set and you won’t need to have beta turned on to access it. That being said, I pretty much always run Design Space in beta because it allows me to see what’s new more quickly!
Cricut Access Members Only
Additionally, Cricut Create Sticker tool is only available for Cricut Access members. Cricut has been really pushing their Cricut Access subscription by adding more tools that are only available for Cricut Access members, like the Monogram Maker and the Warp Tool. Cricut Access members also have access to 300,000+ images, 700+ fonts, and other perks. At less than $10 a month, I do think Cricut Access is a good deal for most Cricut crafters.
If you don’t want to pay for Cricut Access, you can do a lot of this using the Offset Tool.
Which Machines Work?
You can use the Create Sticker tool on any Cricut Maker machine, any Cricut Explore machine, Cricut Venture, and Cricut Joy Xtra. You cannot use it with Cricut Joy because Cricut Joy does not support Print then Cut.
I’m using my Cricut Maker 3 for this project today.
Desktop Only…For Now!
This feature is currently only available in the desktop version of Cricut Design Space, but Cricut has it roadmapped to be included in the iOS and Android apps in the near future, so keep checking your app.
Print then Cut Calibration
Because creating stickers is a Print then Cut project, you may need to calibrate your Cricut. You can follow the steps in my post How to Use Cricut’s Print then Cut Calibration.
What is the Cricut Create Sticker Tool?
The Cricut Create Sticker tool is a feature in Design Space that gives you more options for designing stickers. While the Offset Tool allows you to create a border around any image, the Create Sticker tool takes it a few steps further, but allowing you to create certain types of stickers:
- Die cut stickers: Die cut stickers are cut all the way through the liner sheet so you have single stickers. Think of these like stickers you might buy one at a time to put on your water bottle or laptop.
- Kiss cut stickers: Kiss cut stickers are more like stickers you’ll find on a sheet, like those you may have had as a kid (or, let’s be real, as a grown up as well!). You can have multiple stickers on a kiss cut sheet and you’ll peel up the sticker from the liner, leaving the liner behind.
- Kiss cut stickers with a die cut edge: This adds a border to your kiss cut sticker that cuts all the way through the liner.
I’ll show you all three of these, plus there are also some other features in this tool that we’ll get into as we use it.
How is the Create Sticker Tool Different than the Offset Tool?
The Cricut Create Sticker tool is sort of like the Offset tool and the Flatten tool in one. When you create an Offset of a cut image, your layers remain cuttable. But when you create a sticker, your layers are automatically flattened into a Print then Cut image.
And, like I said above, there are other functions that are unique to sticker making that are not available in the Offset tool.
Where is the Create Sticker Tool in Cricut Design Space?
On desktop (Mac and PC), the Create Sticker tool is found at the top in the toolbar. It’s right in the middle next to Offset.

Using the Create Sticker Tool
You can use this tool on most images in Cricut Design Space, including images you upload yourself. I am going to show you three different sticker options, so I’m uploading three of the cute little houses I have as a free download for you above.
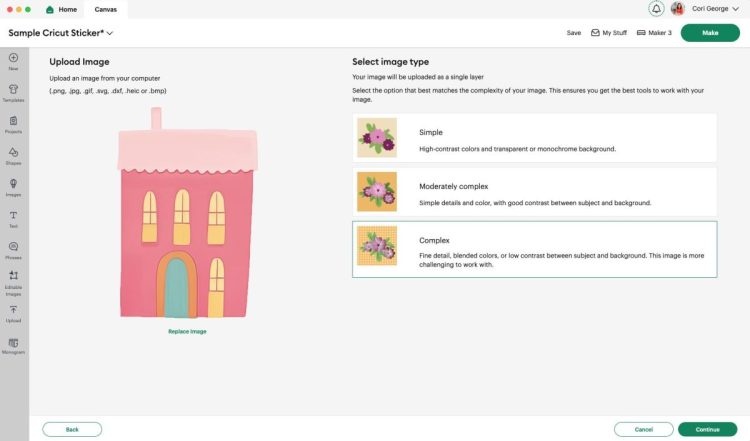
Go to Upload in the left-hand toolbar. From here, click upload file and navigate to the file you want to upload. Then you’ll see a Select Image Type screen. We’re using print then cut, so choose Complex and click continue.
Uploading Images
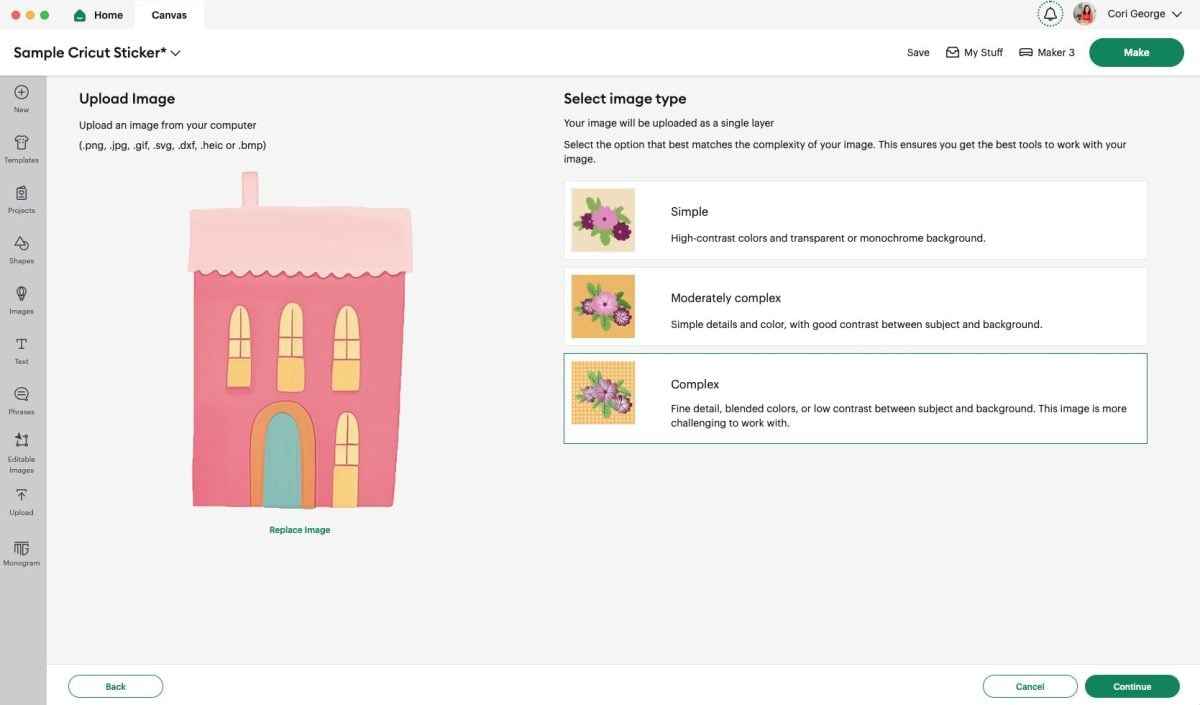
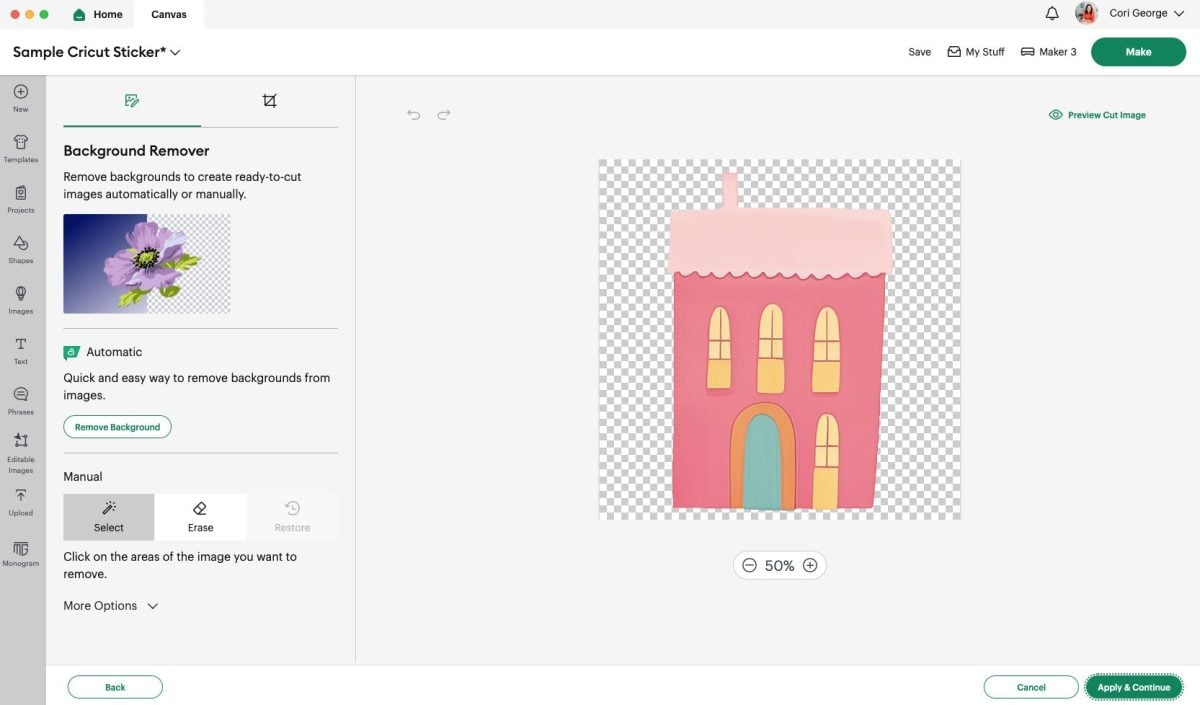
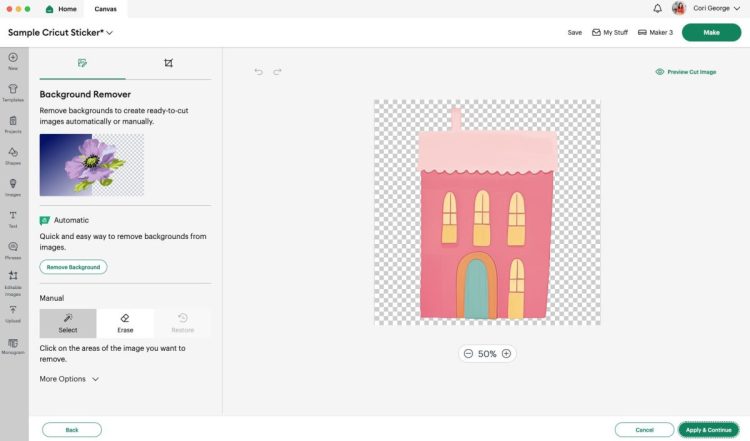
In the next screen, you’ll remove any background. My files have a transparent background (indicated by the gray checkerboard), so there’s nothing to remove. But if you have a file with a background, you’ll want to remove it here. Click Apply & Continue.
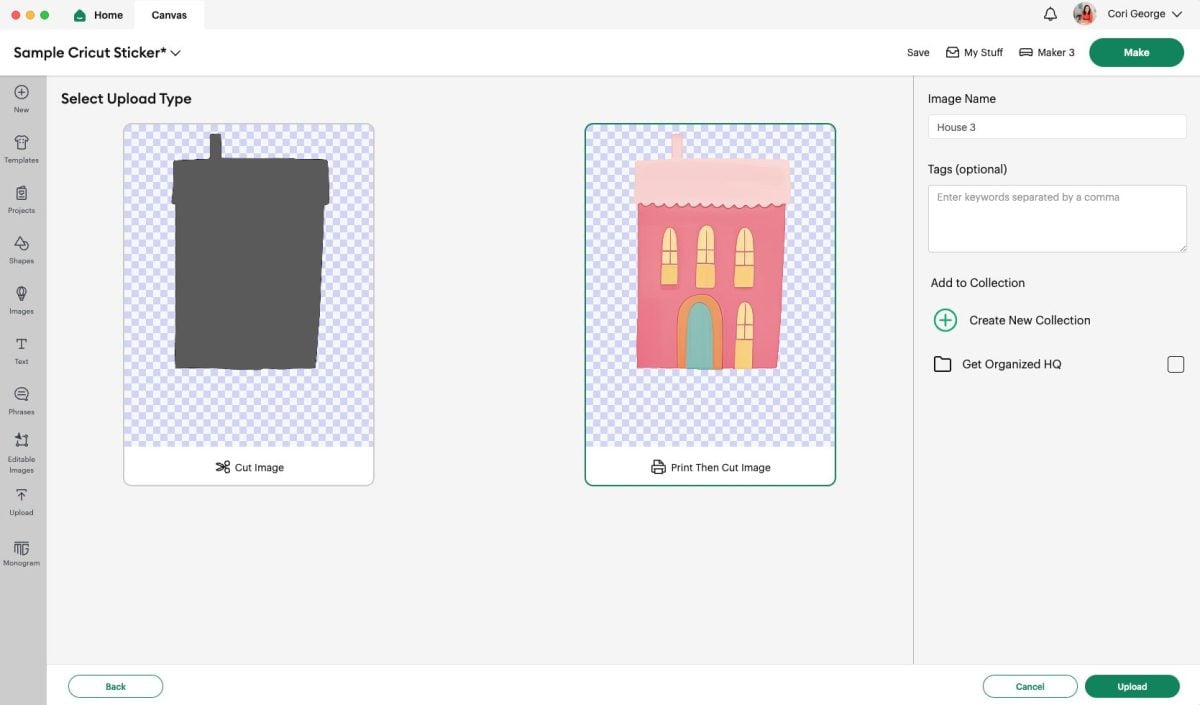
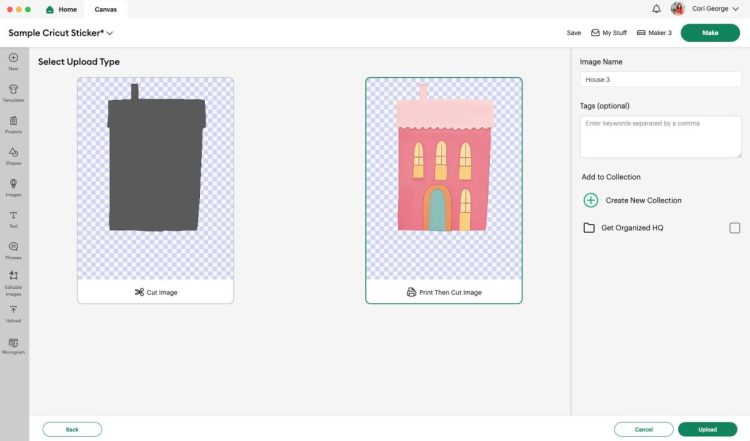
Then you’ll select your upload type as a Print then Cut Image and choose Upload.
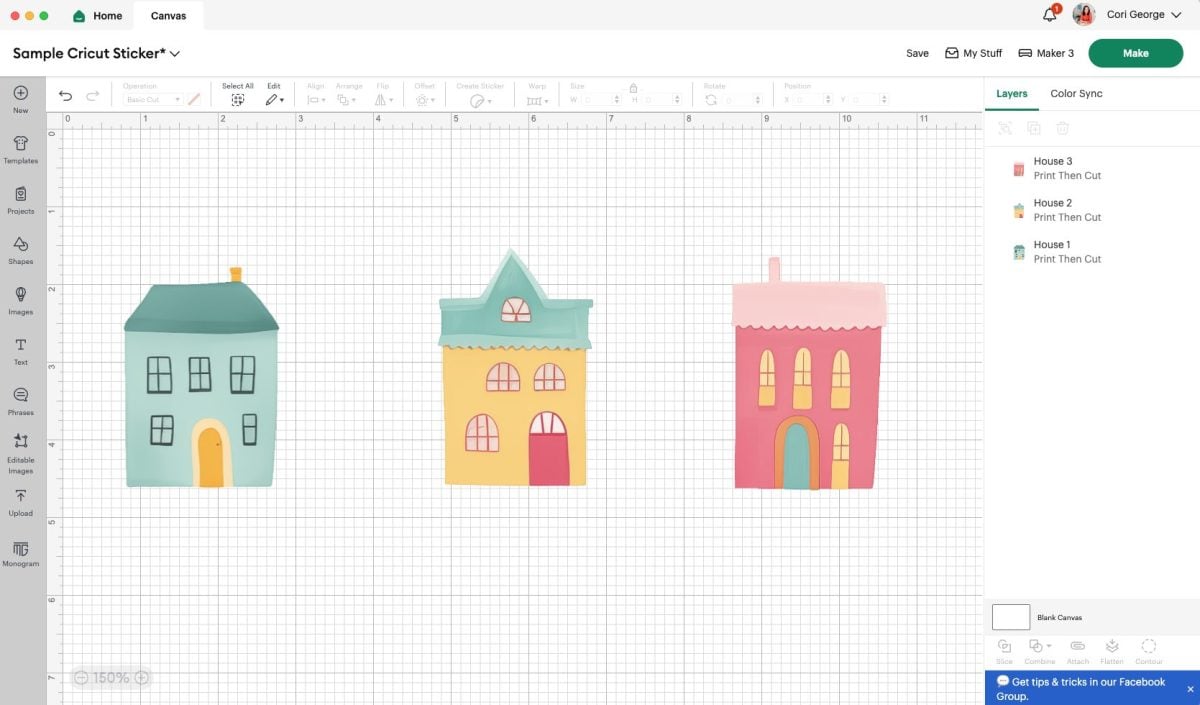
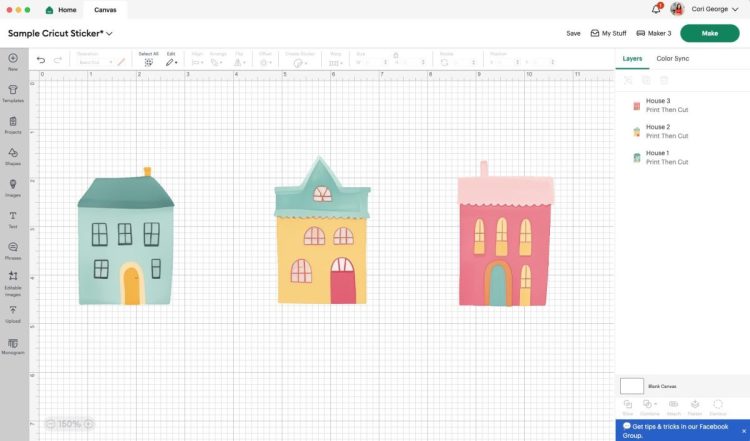
Then you can add your images to your Canvas. I have three images here to make three different types of stickers.
Creating a Kiss Cut Sticker in Cricut Design Space
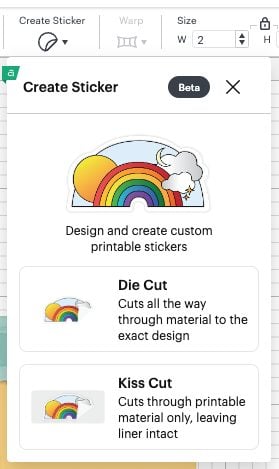
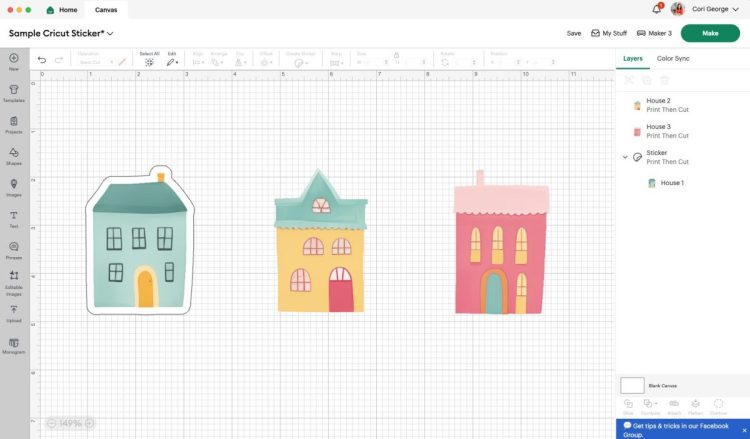
Select your first image and click the Create Sticker dropdown in the top toolbar. Here you’ll see two options: Die Cut and Kiss Cut. Choose Die Cut first.
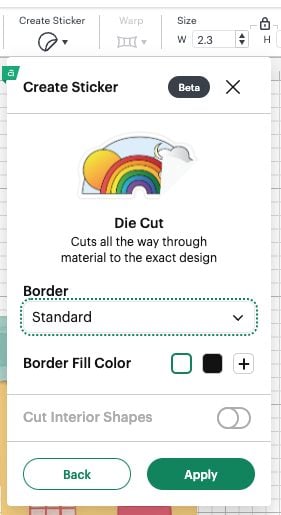
Then you’ll see some more options. You can choose to have a border around your image and there are several sizes here. I chose Standard. You can also change the color of your border fill if you’d like.
There’s also an option for Cut Interior Shapes. My images don’t have any interior shapes, but if you were, for example, cutting letters of the alphabet, you could have Design Space cut the insides of the letters A, B, etc.
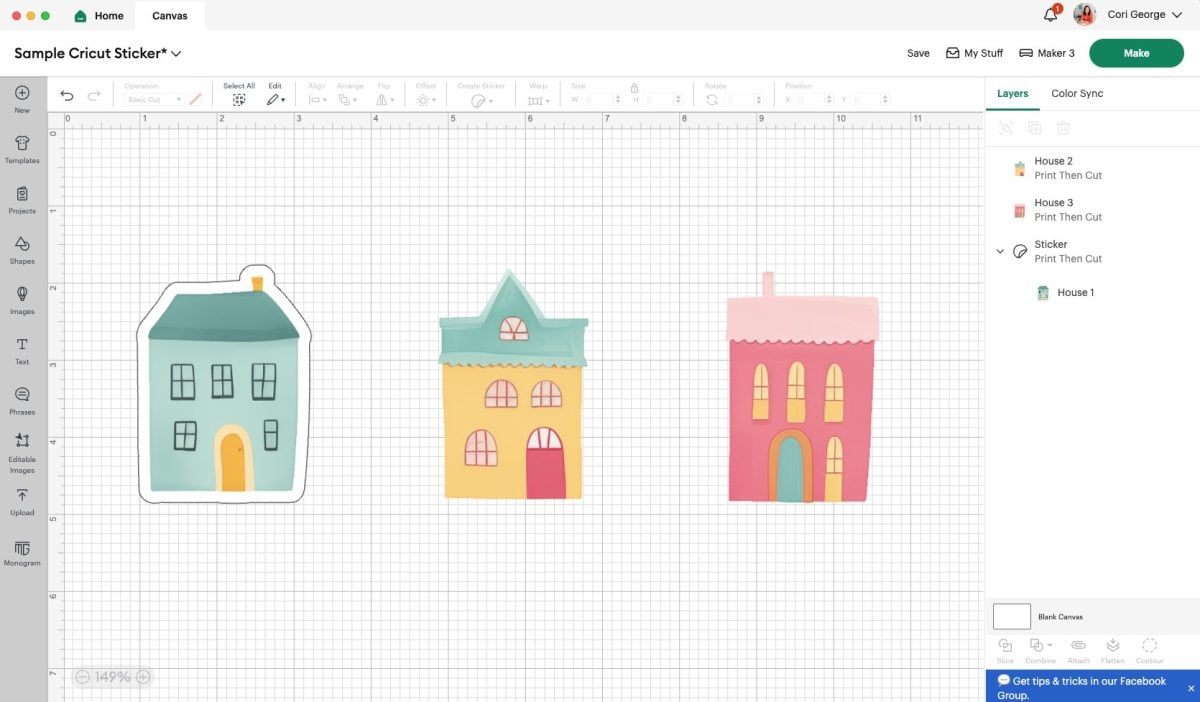
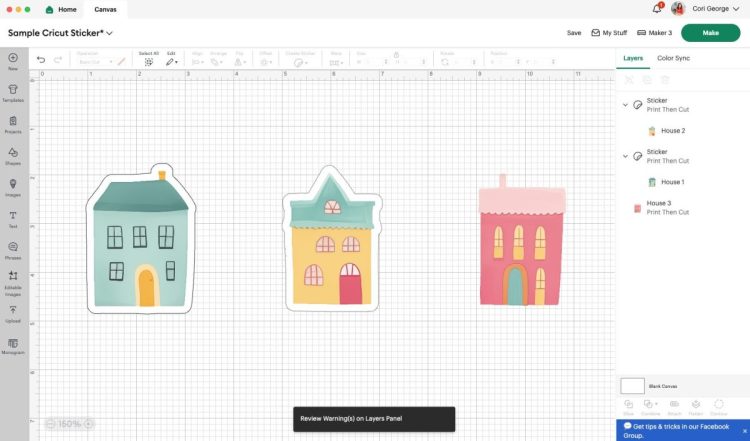
Click apply and you’ll see that your sticker is created. It has a dark gray line around the edge of the border you chose and your image is flattened if you started with a cut image. You’ll also see Sticker in the Layers Panel on the right.
Creating a Die Cut Sticker in Cricut Design Space
Next up, let’s do a Kiss Cut sticker. Choose Kiss Cut from the initial dropdown and again you’ll see similar options. I chose the same standard border and white border fill color. Don’t click Die Cut Edge…we’ll do that next. Again, you’ll also have the Cut Interior Shapes option if you’d like.
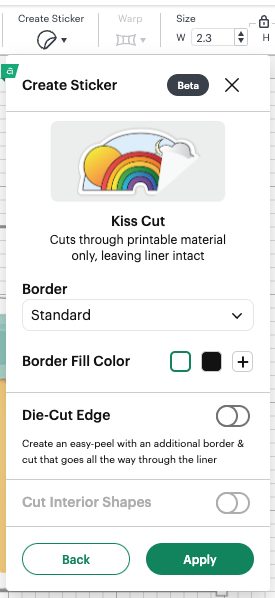
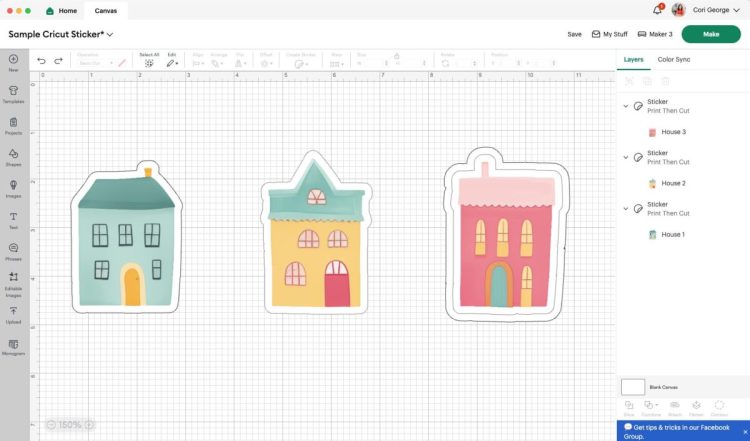
Click Apply and you’ll see your border around your Kiss Cut sticker. Notice that the Kiss Cut border is slightly lighter than the Die Cut border. This is so you can visually see that the darker border will cut all the way through the liner, whereas the lighter border will only cut through the sticker layer.
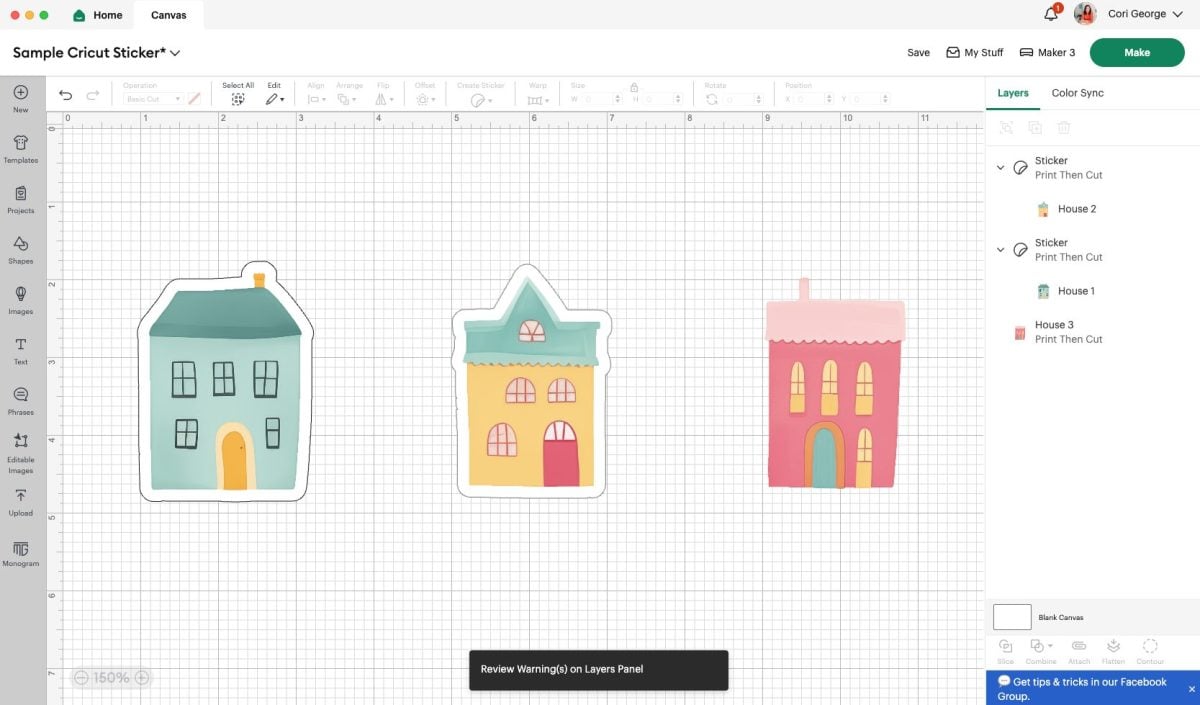
Note: you’ll see my error of “Review Warnings” at the bottom of my screen…but there are no warnings. This is a small example of how Beta can be a bit glitchy!
Creating a Kiss Cut / Die Cut Sticker in Cricut Design Space
For the final house, let’s do all those same Kiss Cut options, but this time choose a Die Cut Edge.
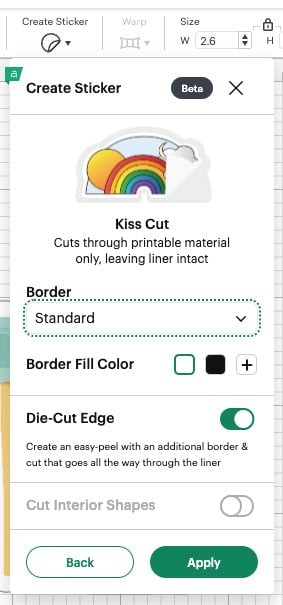
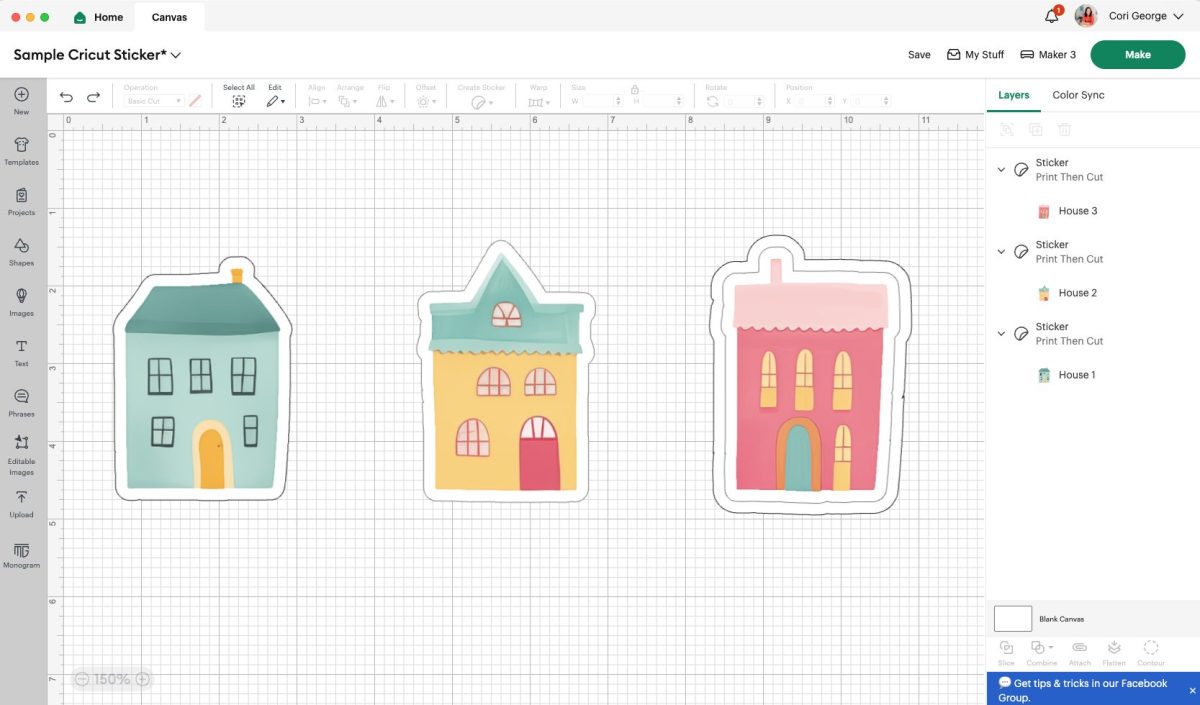
Click Apply and you’ll see there are TWO borders on your image. There’s a light gray border—this is your Kiss Cut sticker. And there is a darker gray border—this will be Die Cut all the way through the liner.
Printing and Cutting Your Stickers
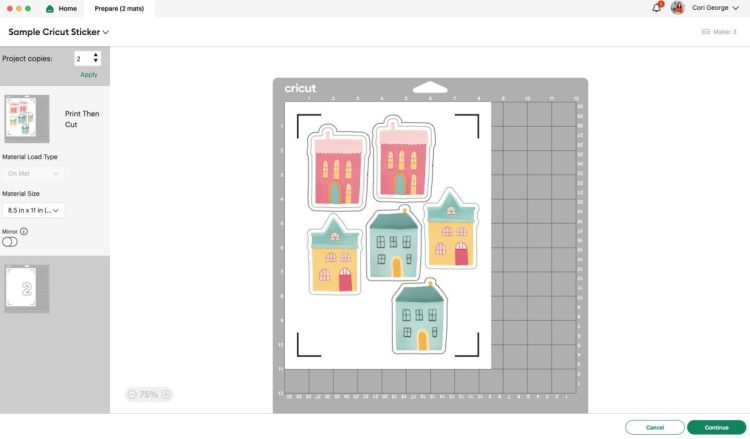
Once you have all of your stickers ready to go, click Make It in the upper right. You’ll be taken to the preview screen where you’ll see your stickers. I made two copies to make use of the piece of printable vinyl I have, and I also used the tips and tricks in my post How to Fit More on a Cricut Mat and Save Material!
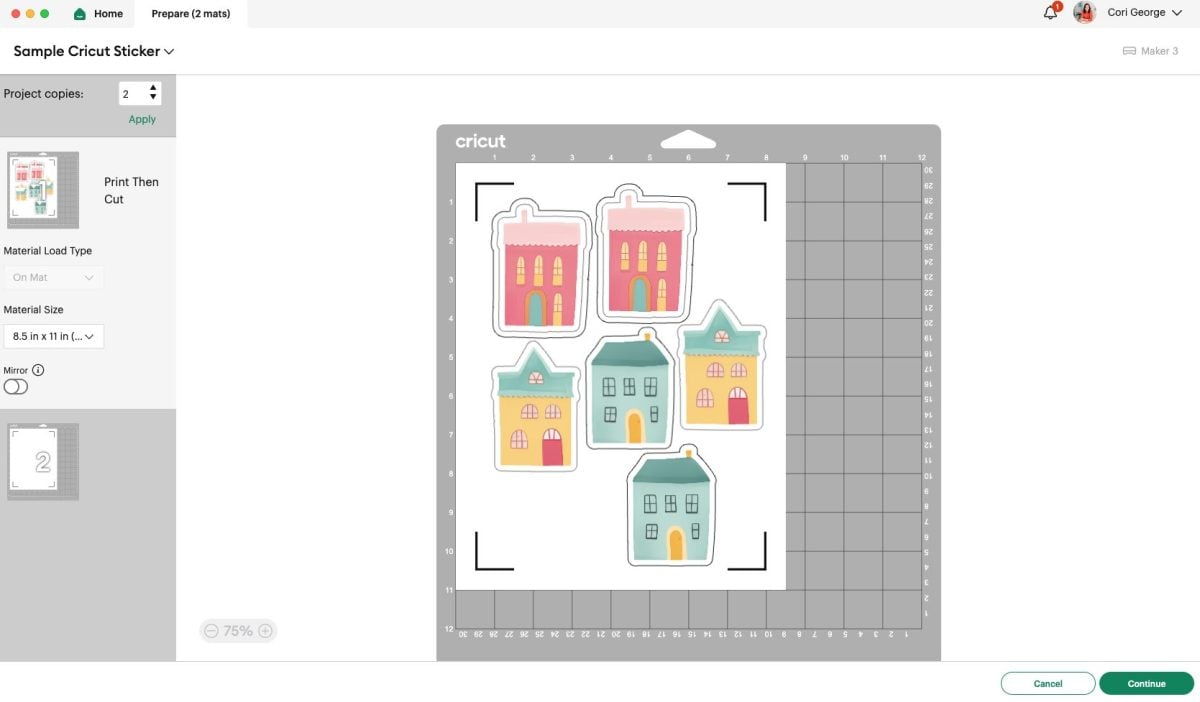
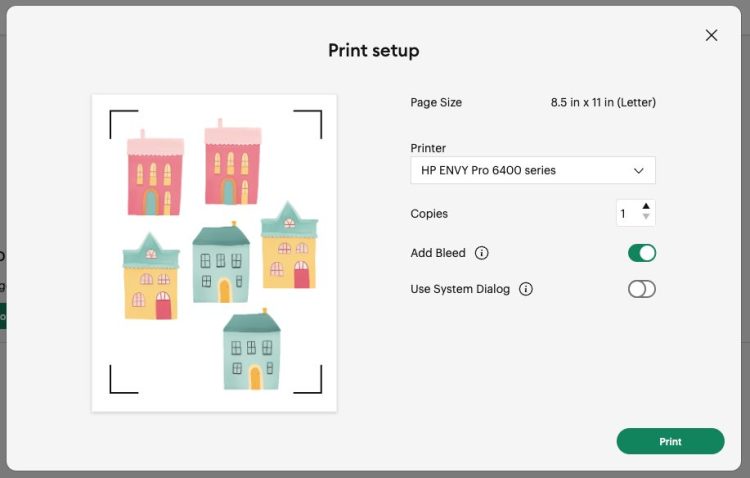
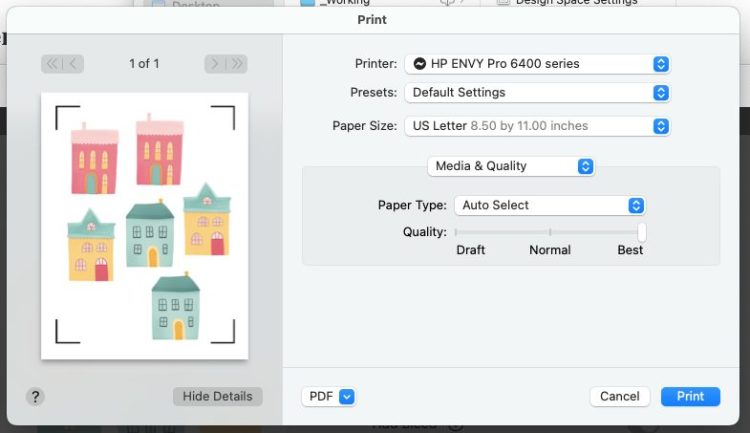
Click Continue to go to the Make Screen. Here you can print your image. I left the bleed on, but it doesn’t really matter since the bleed will be white because I have the border. If you have NO border, then definitely use the bleed option so you don’t end up with white edges where the image didn’t cut perfectly.
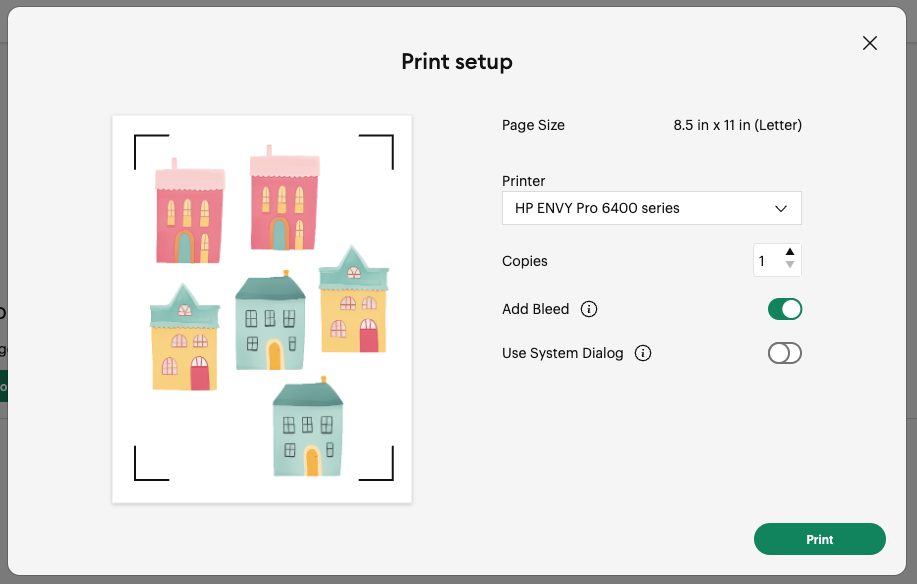
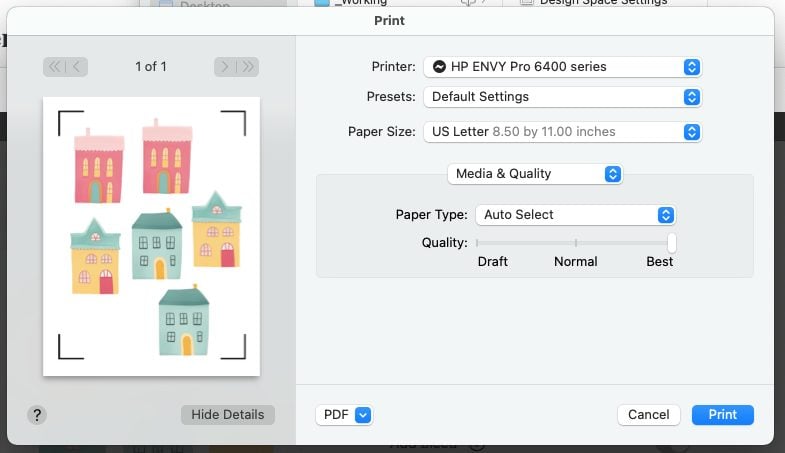
I also chose to print using the System Dialog box, so I could set my print quality to “Best.”
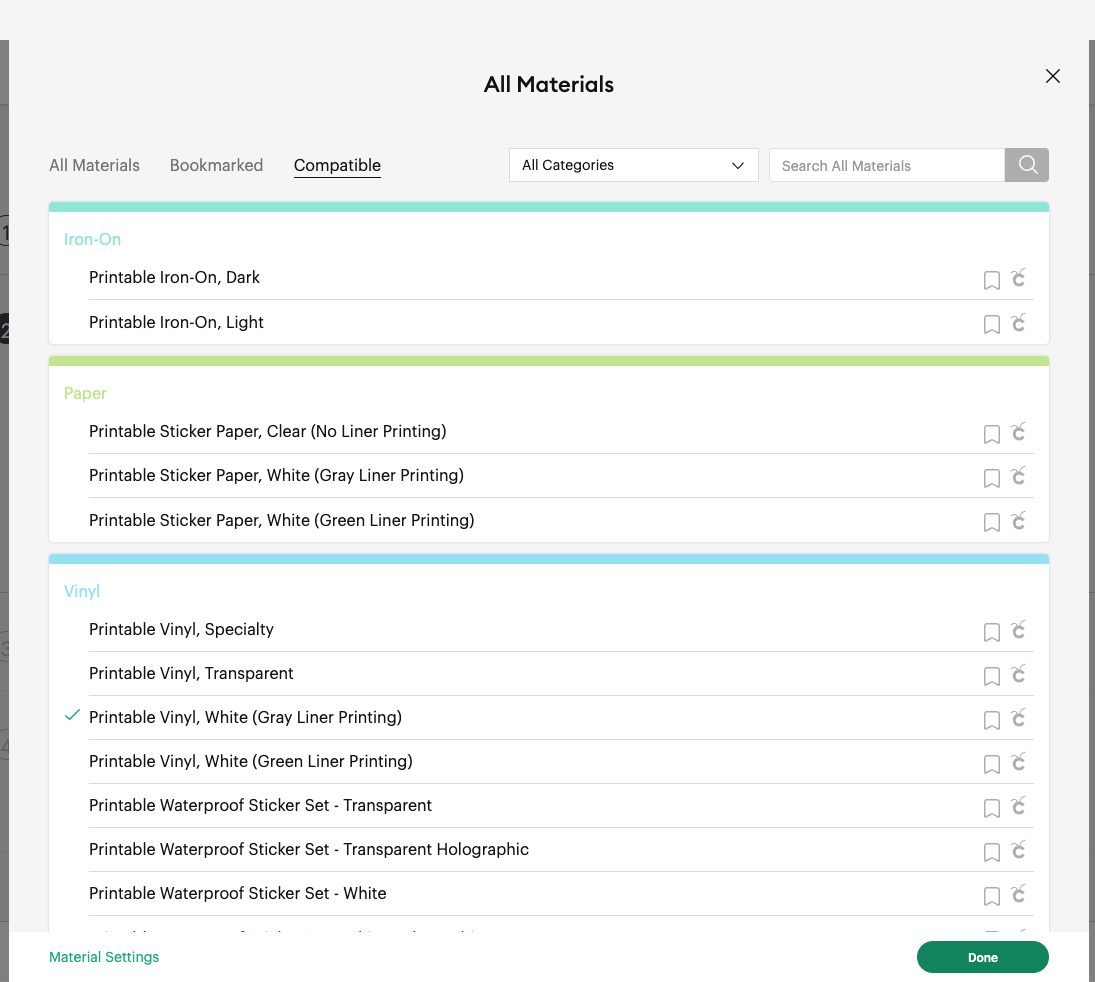
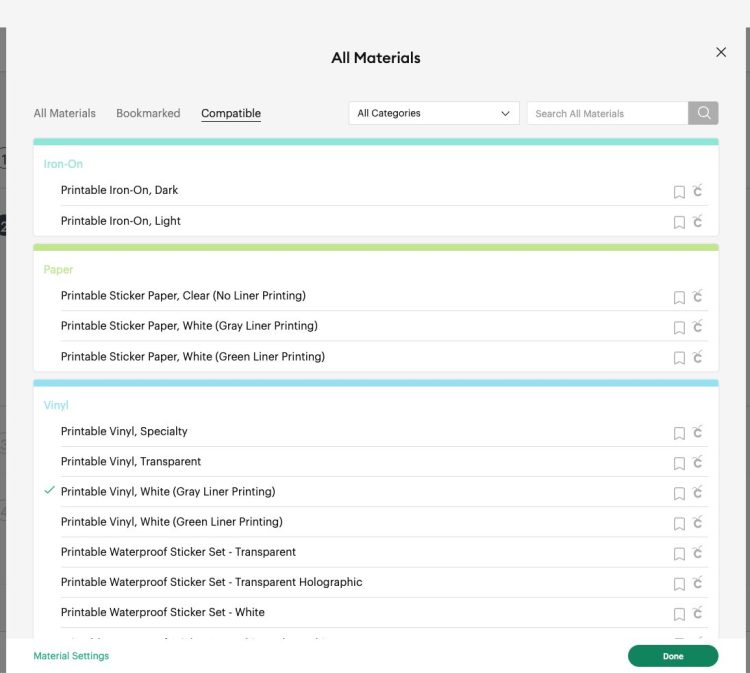
While your printer is printing your image, you can set the material for your project in Cricut Design Space. I’m using an older Printable Vinyl for these stickers so I chose the correct material.
Then place your sticker sheet on the Cricut mat and your Cricut will cut out your stickers! I was surprised that it cut all three types of stickers in one go—normally, you can only do one type of cutting on a single sheet, but here it did all three.
Results!
Now let’s look at how these three sets of stickers turned out! My registration on my stickers wasn’t perfect, even after calibrating my Print then Cut. So if you’re struggling with that, you’re not the only one!
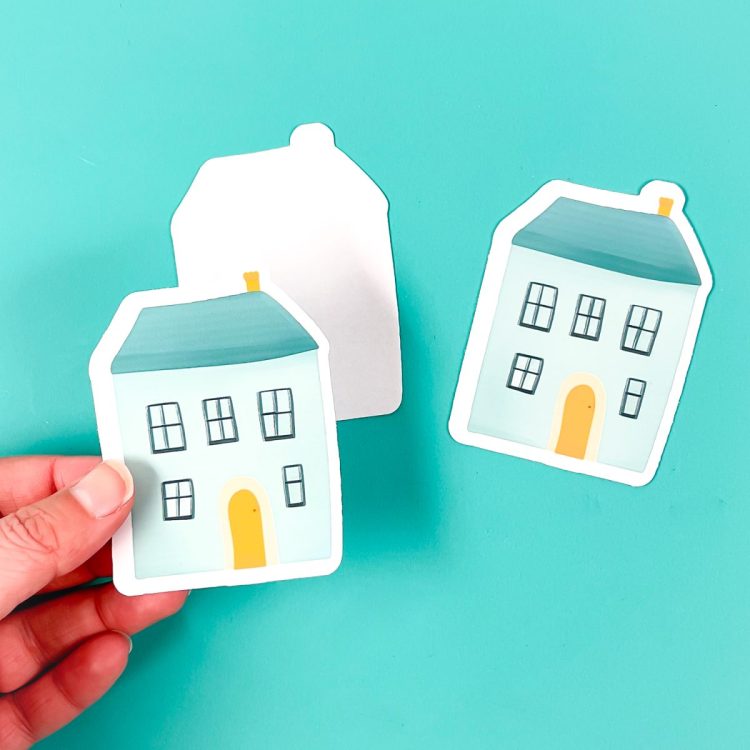
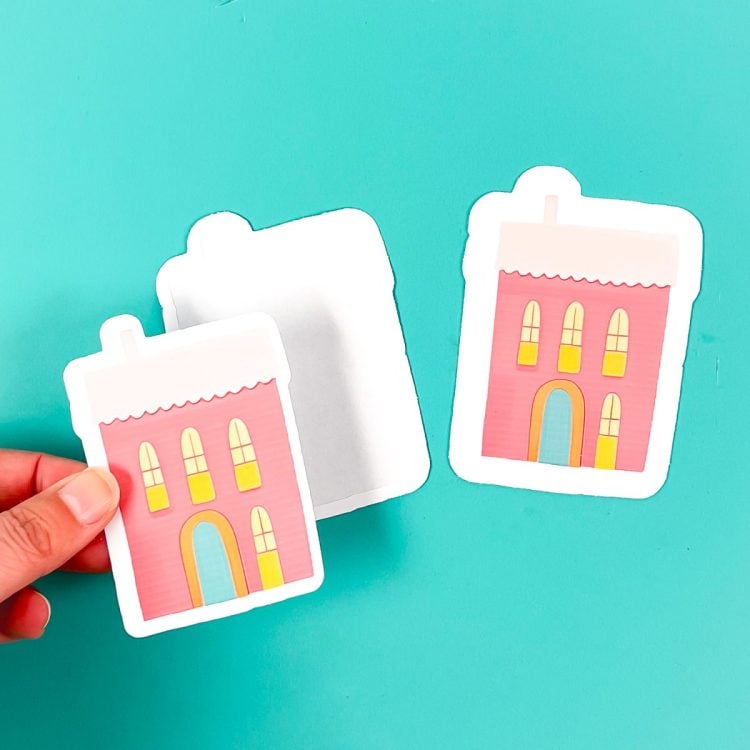
First up are the Die Cut stickers. These stickers cut all the way through the liner sheet. They worked well, though I don’t think Printable Vinyl is the best material for die cut stickers, only because it’s a little thin.

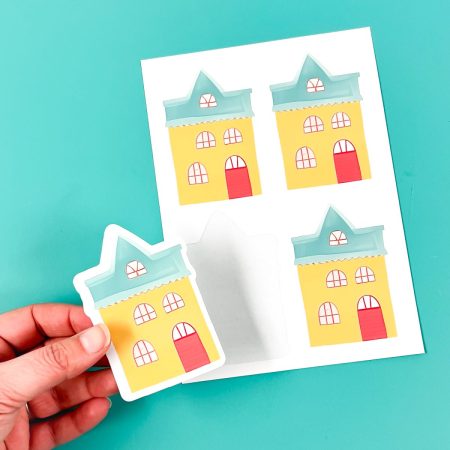
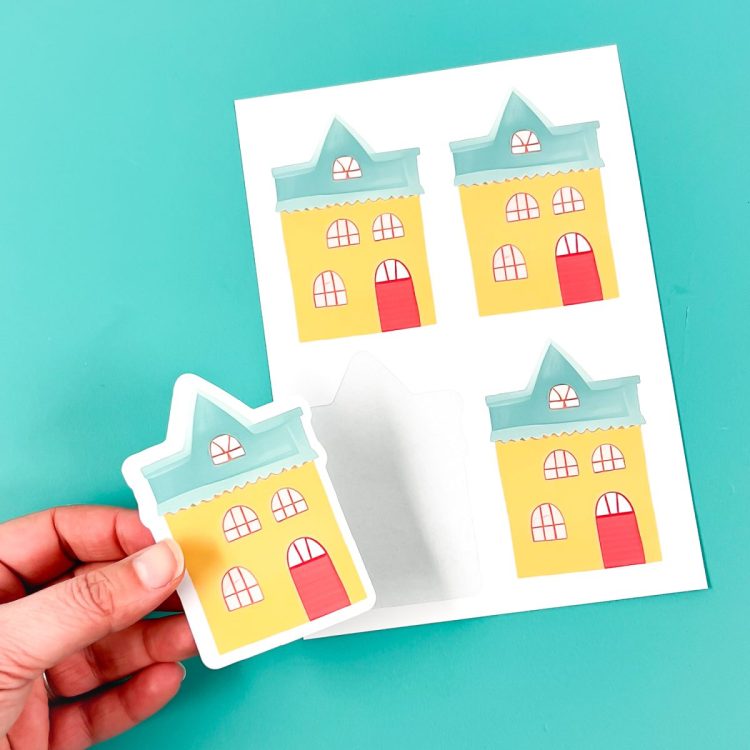
Next up are the Kiss Cut stickers. I actually printed out a different sheet of Kiss Cut stickers just because I could’t photograph the whole sheet of stickers well with so many of them die cut out of it! These worked perfectly and are a great use of the Cricut Printable Vinyl.

And then finally we have our Kiss Cut and Die Cut stickers. This is basically a combination of both methods above. You can just see that it left my white border on the liner. This is not my favorite way to make stickers, only because it feels like it uses more material than necessary.

Did you find this tutorial for using the new Cricut Create Sticker tool helpful? If so, let me know in the comments!
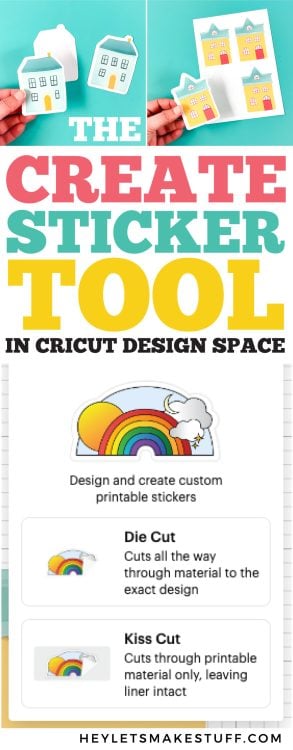
THE CREATE STICKER TOOL IN DESIGN SPACE
Equipment
Supplies
Instructions
- Accessing the Create Sticker Tool in Cricut Design Space Using Cricut Design Space BetaIf you don't see the Create Sticker tool in your version of Design Space, you may need to switch to the Beta version. To do so, go up to the menu on the right, click Settings, and ensure you have Beta checked under Application Experience. Design Space will restart after you choose Beta, so make sure you have anything you're working on saved before switching.Note that Beta can be glitchy! This is where they are testing things out and finding bugs. So you'll probably have to deal with some annoying glitches along with getting early access to new tools.At some point this tool will be moved to the general feature set and you won't need to have beta turned on to access it.

- Cricut Access Members OnlyAdditionally, Cricut Create Sticker tool is only available for Cricut Access members. Cricut has been really pushing their Cricut Access subscription by adding more tools that are only available for Cricut Access members, like the Monogram Maker and the Warp Tool. Cricut Access members also have access to 300,000+ images, 700+ fonts, and other perks. At less than $10 a month, Cricut Access is a good deal for most Cricut crafters.If you don't want to pay for Cricut Access, you can do a lot of this using the Offset Tool.
- Which Machines Work?You can use the Create Sticker tool on any Cricut Maker machine, any Cricut Explore machine, Cricut Venture, and Cricut Joy Xtra. You cannot use it with Cricut Joy because Cricut Joy does not support Print then Cut. The Cricut Maker 3 is being used for this project.
- Desktop Only…For Now!This feature is currently only available in the desktop version of Cricut Design Space, but Cricut has it roadmapped to be included in the iOS and Android apps in the near future, so keep checking your app.Print then Cut Calibration
- Print then Cut CalibrationBecause creating stickers is a Print then Cut project, you may need to calibrate your Cricut. You can follow the steps in this post How to Use Cricut’s Print then Cut Calibration.
- Where is the Create Sticker Tool in Cricut Design Space?On desktop (Mac and PC), the Create Sticker tool is found at the top in the toolbar. It's right in the middle next to Offset.

- Using the Create Sticker Tool & Uploading ImagesYou can use this tool on most images in Cricut Design Space, including images you upload yourself. These instructions will show you three different sticker options. This project is using the cute little houses shown above in the Supply List and it is a free download for you.Go to Upload in the left-hand toolbar. From here, click upload file and navigate to the file you want to upload. Then you'll see a Select Image Type screen. We're using print then cut, so choose Complex and click continue.

- In the next screen, you'll remove any background. The free house files have a transparent background (indicated by the gray checkerboard), so there's nothing to remove. But if you have a file with a background, you'll want to remove it here. Click Apply & Continue.

- Then you'll select your upload type as a Print then Cut Image and choose Upload.

- Then you can add your images to your Canvas. This project is using three images to make three different types of stickers.

- Select your first image and click the Create Sticker dropdown in the top toolbar. Here you'll see two options: Die Cut and Kiss Cut. Choose Die Cut first.

- Then you'll see some more options. You can choose to have a border around your image and there are several sizes here. Here Standard was chosen. You can also change the color of your border fill if you'd like.There's also an option for Cut Interior Shapes. These free images don't have any interior shapes, but if you were, for example, cutting letters of the alphabet, you could have Design Space cut the insides of the letters A, B, etc.

- Click apply and you'll see that your sticker is created. It has a dark gray line around the edge of the border you chose and your image is flattened if you started with a cut image. You'll also see Sticker in the Layers Panel on the right.

- Creating a Die Cut Sticker in Cricut Design SpaceNext up, let's do a Kiss Cut sticker. Choose Kiss Cut from the initial dropdown and again you'll see similar options. The same standard border and white border fill color was chosen here. Don't click Die Cut Edge…that will be next. Again, you'll also have the Cut Interior Shapes option if you'd like.

- Click Apply and you'll see your border around your Kiss Cut sticker. Notice that the Kiss Cut border is slightly lighter than the Die Cut border. This is so you can visually see that the darker border will cut all the way through the liner, whereas the lighter border will only cut through the sticker layer.Note: you'll see an error of "Review Warnings" at the bottom of the screen…but there are no warnings. This is a small example of how Beta can be a bit glitchy!

- Creating a Kiss Cut / Die Cut Sticker in Cricut Design SpaceFor the final house, you will do all those same Kiss Cut options, but this time you will be choosing a Die Cut Edge.

- Click Apply and you'll see there are TWO borders on your image. There's a light gray border—this is your Kiss Cut sticker. And there is a darker gray border—this will be Die Cut all the way through the liner.

- Printing and Cutting Your StickersOnce you have all of your stickers ready to go, click Make It in the upper right. You'll be taken to the preview screen where you'll see your stickers. For this project two copies were made to make use of the piece of printable vinyl used, and also the tips and tricks from this post were used: How to Fit More on a Cricut Mat and Save Material!

- Click Continue to go to the Make Screen. Here you can print your image. The bleed was left on, but it doesn't really matter since the bleed will be white because there is the border. If you have NO border, then definitely use the bleed option so you don't end up with white edges where the image didn't cut perfectly.

- Using the System Dialog box was also selected so that the the print quality could be set to "Best."

- While your printer is printing your image, you can set the material for your project in Cricut Design Space. An older Printable Vinyl was used for these stickers so the correct material was chosen.Then place your sticker sheet on the Cricut mat and your Cricut will cut out your stickers! It was surprising that it cut all three types of stickers in one go—normally, you can only do one type of cutting on a single sheet, but here it did all three.

- Results!Now let's look at how these three sets of stickers turned out! The registration on this sticker wasn't perfect, even after calibrating the Print then Cut. So if you're struggling with that, you're not the only one!First up are the Die Cut stickers. These stickers cut all the way through the liner sheet. They worked well, though Printable Vinyl is not the best material for die cut stickers, only because it's a little thin.

- Next up are the Kiss Cut stickers. These were actually printed out of a different sheet of Kiss Cut stickers just because the whole sheet of stickers didn't photograph well with so many of them die cut out of it! These worked perfectly and are a great use of the Cricut Printable Vinyl.

- And then finally we have our Kiss Cut and Die Cut stickers. This is basically a combination of both methods above. You can just see that it left the white border on the liner. This is not a favorite way to make stickers, only because it feels like it uses more material than necessary.



Leave A Reply!