Want to truly customize all your Cricut crafts and projects? Learn how to upload fonts to Cricut Design Space! It’s easy and gives you a ton of flexibility when creating your Cricut designs.
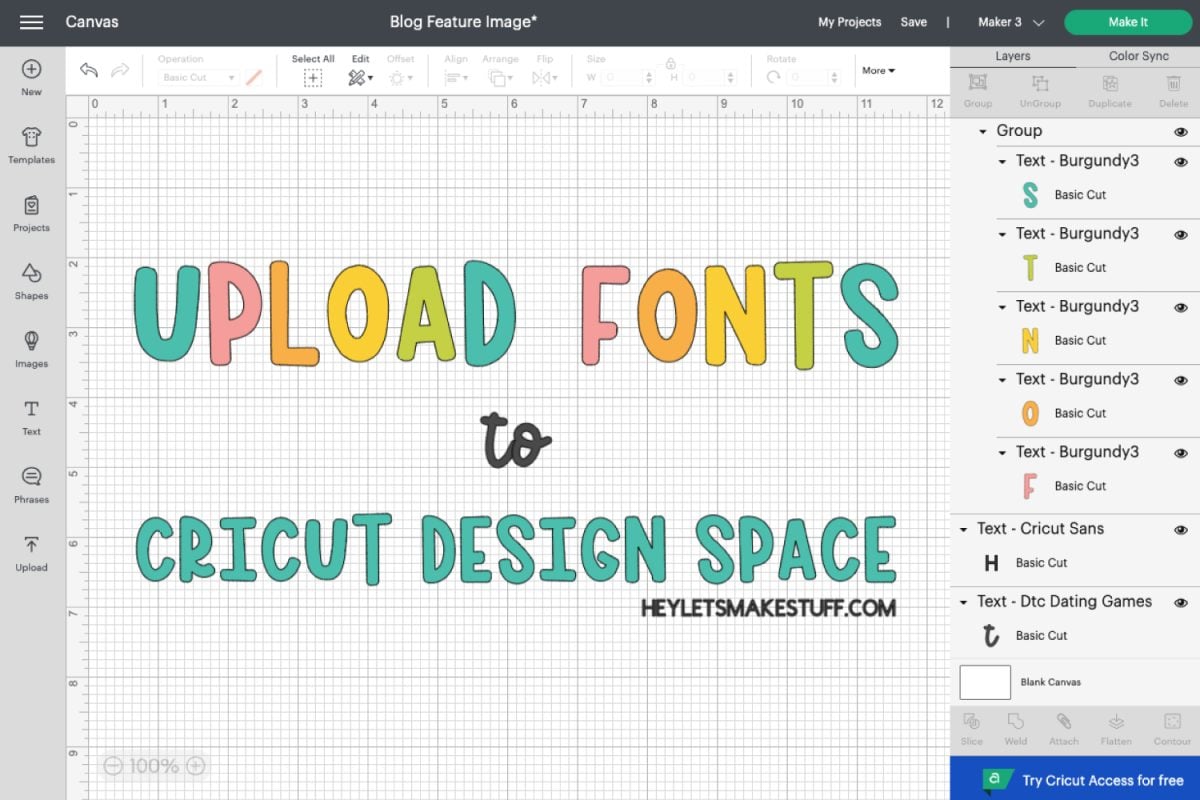
Who also love fonts? I love new fonts like a cat lady loves getting new cats. I tend to be fairly minimalistic in most areas of my life, but the font folder on my computer suggests otherwise—1571 fonts.
That’s not crazy, right? Tell me I’m not crazy.
One of the reasons I love fonts so much is that my hand-lettering game isn’t all that great. I’m working on it and I’m learning more and more every day, but it’s so much easier to be able to download fonts and put them right into one of my projects. Script fonts, block fonts, quirky fonts—I love and use them all!
Stop pulling your hair out and start creating confidently with your Cricut! Finally understand how to use your Cricut with my Learn Your Cricut eBooks!
Today we’re going to talk about how to use your own fonts in Cricut Design Space. Cricut Design Space has a ton of Cricut fonts, but often you may want to use your own fonts (called “System Fonts” in Cricut Design Space). If you have other questions about Cricut fonts, check out these posts:
- How to Use Font and Text in Cricut Design Space
- How to Upload Fonts to Cricut Design Space
- Working with Script Fonts in Cricut Design Space
- How to Curve Text in Cricut Design Space
- Cricut Design Space Kerning and Letter Spacing for Fonts
- Where to Find Cheap and Free Fonts for the Cricut
- 101 Fonts for Cutting Machines
Let’s get to it!
Video Tutorial for Uploading Fonts to Cricut Design Space
Check out how to upload fonts to a PC and Mac in this video, at time stamp 2:01:
Where to Find Fonts to Use On Your Cricut
First of all, where can you find new and free fonts for the Cricut? In the past, I just downloaded free fonts wherever I could find them online. But this came with one big problem. Often I didn’t know if I could use those fonts on products I sell, like the SVG files in my shop.
Some fonts had commercial licenses, some were for personal use, and some had licenses that were somewhere in between. Some fonts had a commercial license listed on one site and not on another. It was a mess. Additionally, often free fonts are poorly designed, so I spent a lot of time frustrated with letter spacing, kerning, and other font design issues.
Now I almost exclusively purchase commercial use fonts. First of all, I believe font designers deserve to be paid for their work. Second, I like purchasing my fonts when I know they have a commercial license attached—that way I can use them in my own files and not have to worry about breaking any licensing agreements.
Here are a few of my favorite places to purchase fonts:
- Font Bundles
- Creative Fabrica
- Creative Market
- The Hungry JPEG
- More: Where to Find Cheap and Free Fonts for the Cricut
I also love professionally designed fonts because they are better designed and they often come with alternate characters (also called stylistic alternates, glyphs or in some cases, ligatures). For instance, there may be three different styles of the capital A, or several styles of a double “tt,” or a bunch of swashes that you can use to customize your projects even more. Learn more about using alternate characters in Cricut Design Space!
You can totally up your Cricut design game when you have more options in your font folder!
How to Upload Fonts to Cricut Design Space
Before you start to use your fonts within Cricut Design Space you need to get those fonts onto your devices! If you’ve already installed your fonts on your computer, you can skip to the next step.
Throughout this tutorial, I’m using the font Bold Brush.
Your font (or fonts, if you buy a bundle) will be in an unzipped folder. Often there will be two versions of the font, one that ends with .ttf (a TrueType font) and .otf (an OpenType Font). For technical reasons I won’t go into here, I suggest going with the .otf font if it’s available (it’s just a more robust font type). If there’s only a .ttf, that’s fine too!
We’ll go through installing fonts on a Mac and PC, as well as mobile devices, and then how to open them in Cricut Design Space.
Step 1a: Install the Font On Your Mac
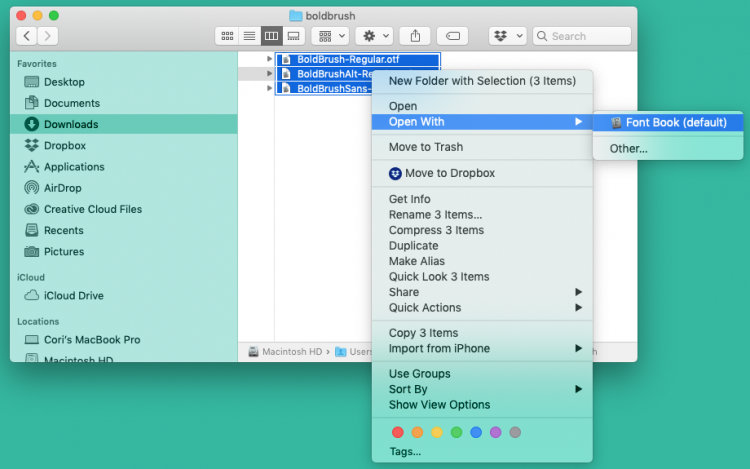
When you download a font, it will most likely come in a zip file. Double click or right click on the zip folder to unzip the downloaded file. Then select the three fonts and ctrl+click to bring up the menu. Then select Open With > Font Book.

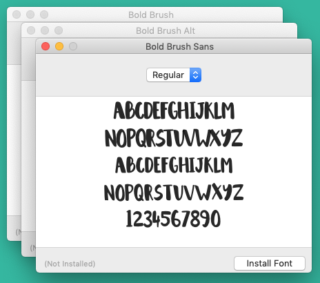
A box will pop up for you to install your fonts (if you choose to install all of the fonts in a bundle at once, a lot of boxes will pop up, one for each font!). Click Install Font and your computer will do its thing.
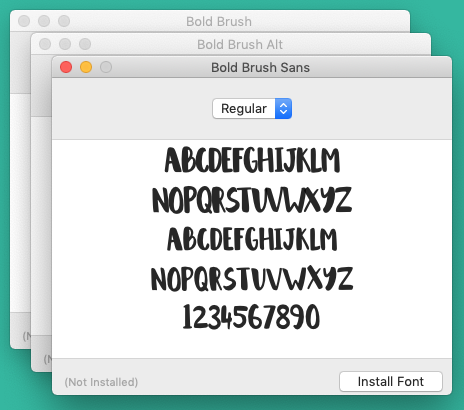
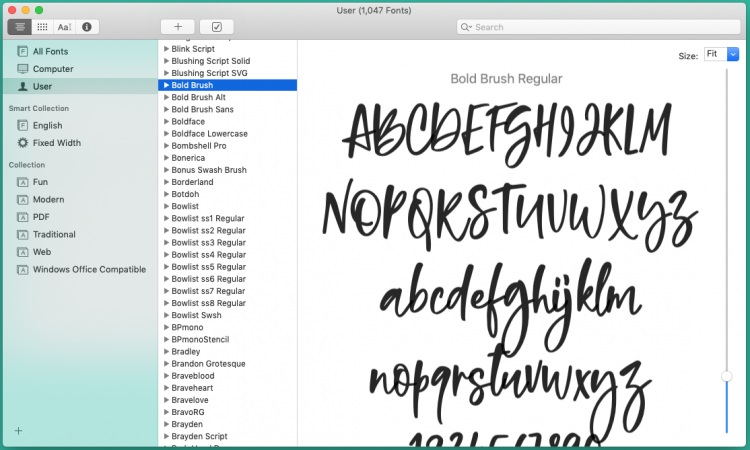
Your font file will now appear in your FontBook and be available for you to use in Cricut Design Space.

Step 1b: Install the Font on Your PC
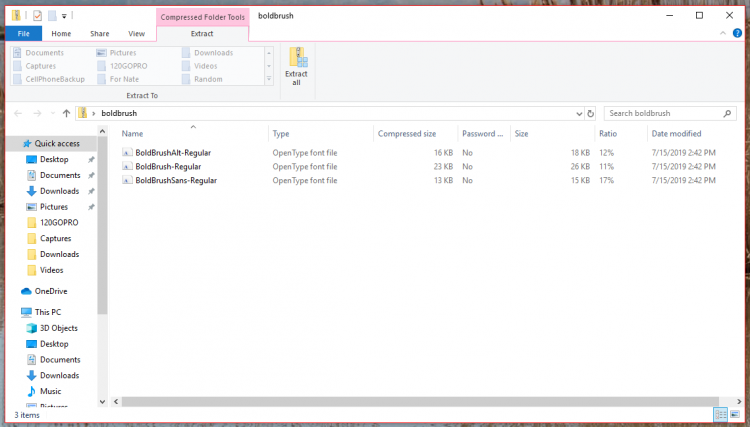
For a PC, click on the zip folder. It will open a window that will show you what files are inside the zip, but you’ll still need to unzip them.

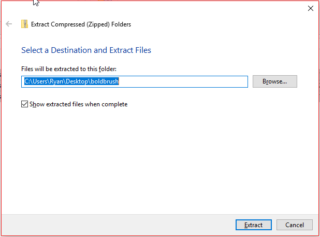
Select all the fonts and click Extract All at the top. You’ll select a destination folder—I chose the desktop.
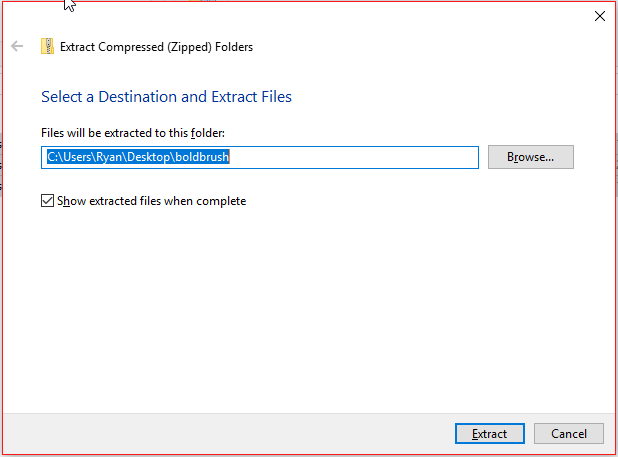
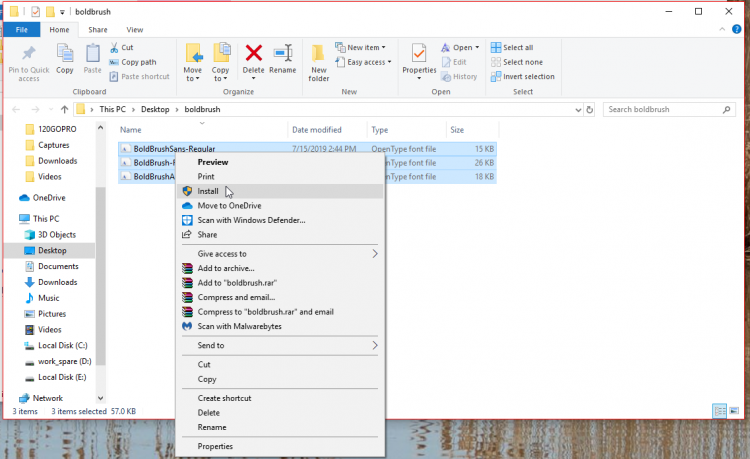
Then select your unzipped fonts and right click and select install. Your PC will install your fonts.

The font will now be available for you to access in Cricut Design Space!
Step 1c: Installing Fonts on a Mobile Device (iPhone or iPad and some Android devices)
Installing fonts on a mobile device is a little less straightforward. I like using the iFont app. I have an iPhone, so my screenshots are from the iPhone, but Android is similar.
Install the iFont app on your phone from the Apple App Store or the Google Play Store.

Then download your fonts from the website where you got them OR copy your fonts (either zipped or not) to your device. You can do this via Dropbox, AirDrop, iCloud, etc. I recommend saving your files in your Files folder on your phone.
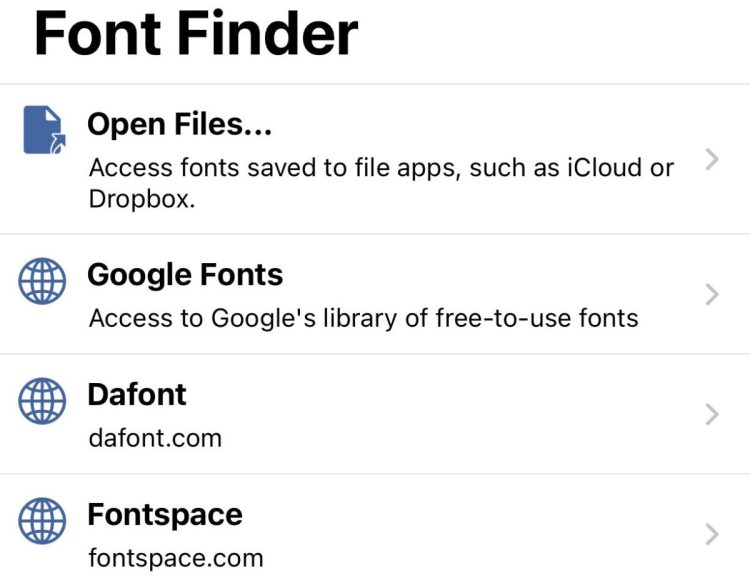
Open the iFont app and click Font Finder at the bottom.
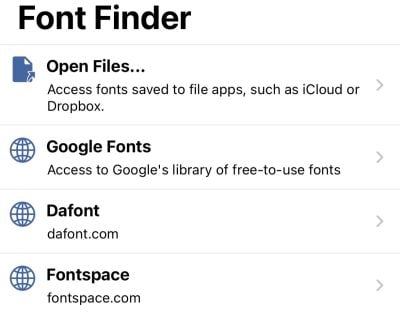
You’ll have a few options. You can search for fonts on the web using the three bottom options, but to upload a font you already had, tap Open Files.
Navigate or search for your font file on your phone and select it.
If it’s a zip, iFont will find the font files within the zip. Click on the files and click Import.
The font will show up in iFont, but it’s not installed yet. Click Install.

You’ll want to follow the specific directions within iFont whether or not you have an iOS or Android device. You will need to head into your phone’s settings and install “the profile” there. Thankfully, iFont has very easy-to-follow instructions for each device.
You’ll be warned that the profile doesn’t have a key or is “not signed.” It’s fine, it just because it was generated on your own device. Ignore the warning.
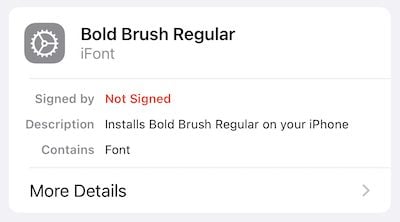
You’re done! The fonts should appear in Cricut Design Space as shown below.
Step 2: Access the Font in Cricut Design Space
Now that you’ve installed the font or fonts on your device, accessing them in Cricut Design Space is easy! Use the Text tool in the Design Panel on the left to create a text box. The Text Edit menu will open along the top of Cricut Design Space and you can use the Font dropdown to select different fonts for your project.
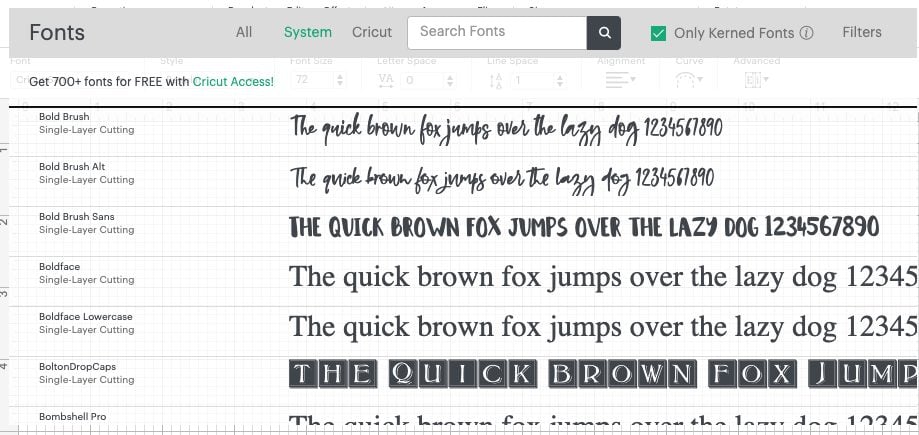
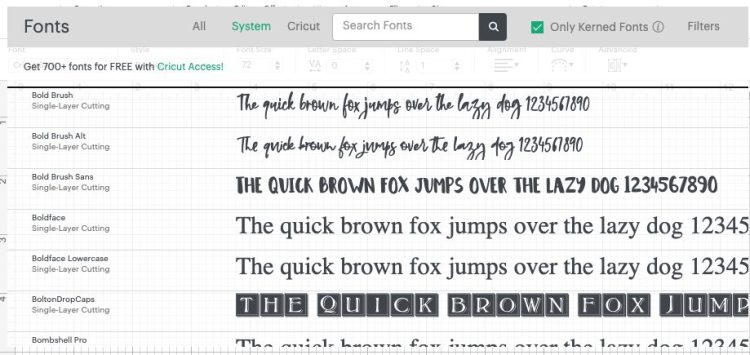
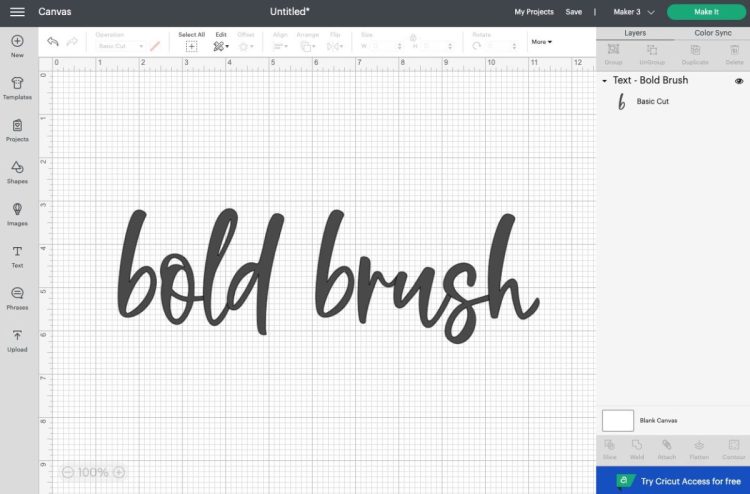
Both Cricut fonts and your system fonts are listed here. You can sort by system fonts, if you’d like, to only see the fonts installed on your device. You can also use the search bar here if you know the name of the particular font you are looking for. This is particularly helpful if you have a gazillion (bajillion million) fonts like me. Here’s the font we installed, Bold Brush:
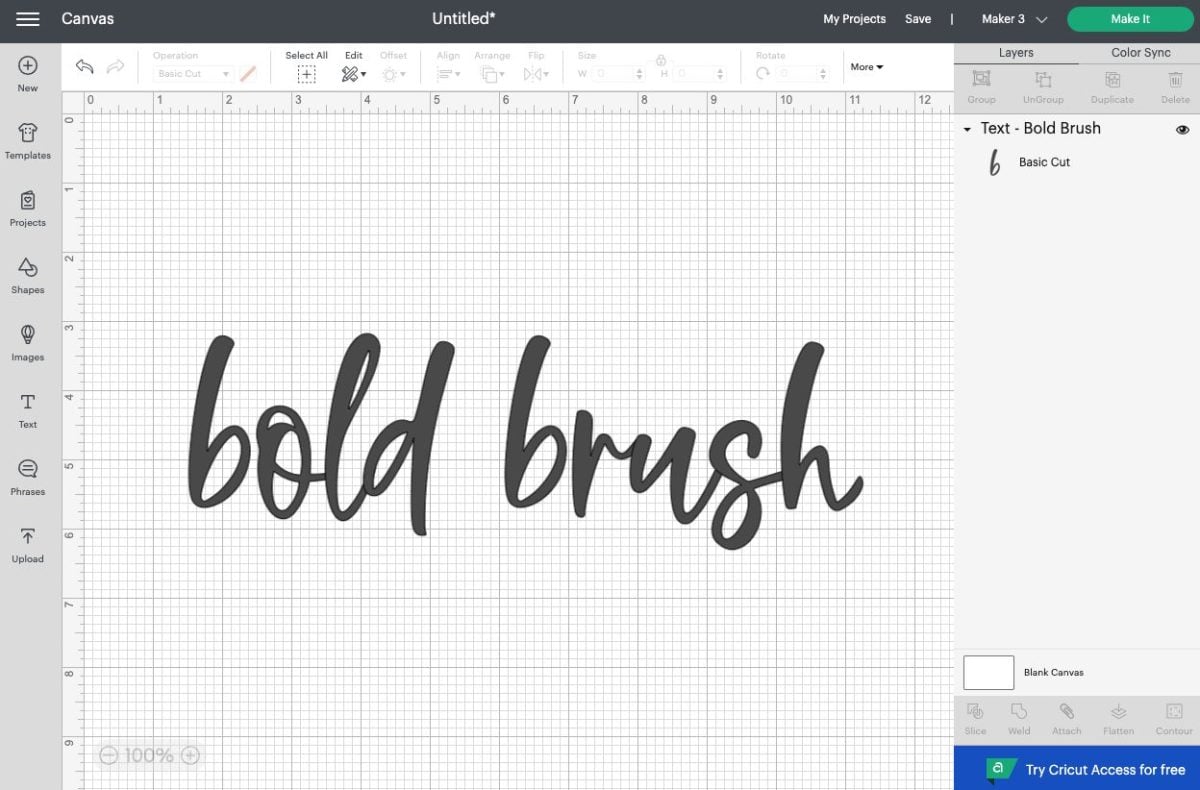
So easy, right? This is the process for selecting any system fonts you want to use!
What are Good Fonts for Cricut Design Space?
Okay! We’ve installed our fonts and accessed them in Cricut Design Space. I do want to talk about one thing you need to be aware of when it comes to using system fonts. Technically, using a system font is no different than using a Cricut font—though there is a risk I want to mention here.
The Cricut cuts mathematically simple files better than it does mathematically complicated files. Cricut fonts are designed to be mathematically simple, so they cut easily. Your system fonts, however, might not be as simple. Let’s take two fonts from this bundle as an example.
The first is Blushing. The edges of this font might be a little rough for the Cricut. The Cricut has to adjust the blade and mat direction with every little angle. The Cricut is an amazing machine, but it might not cut this as well as you’d like, particularly at smaller sizes.
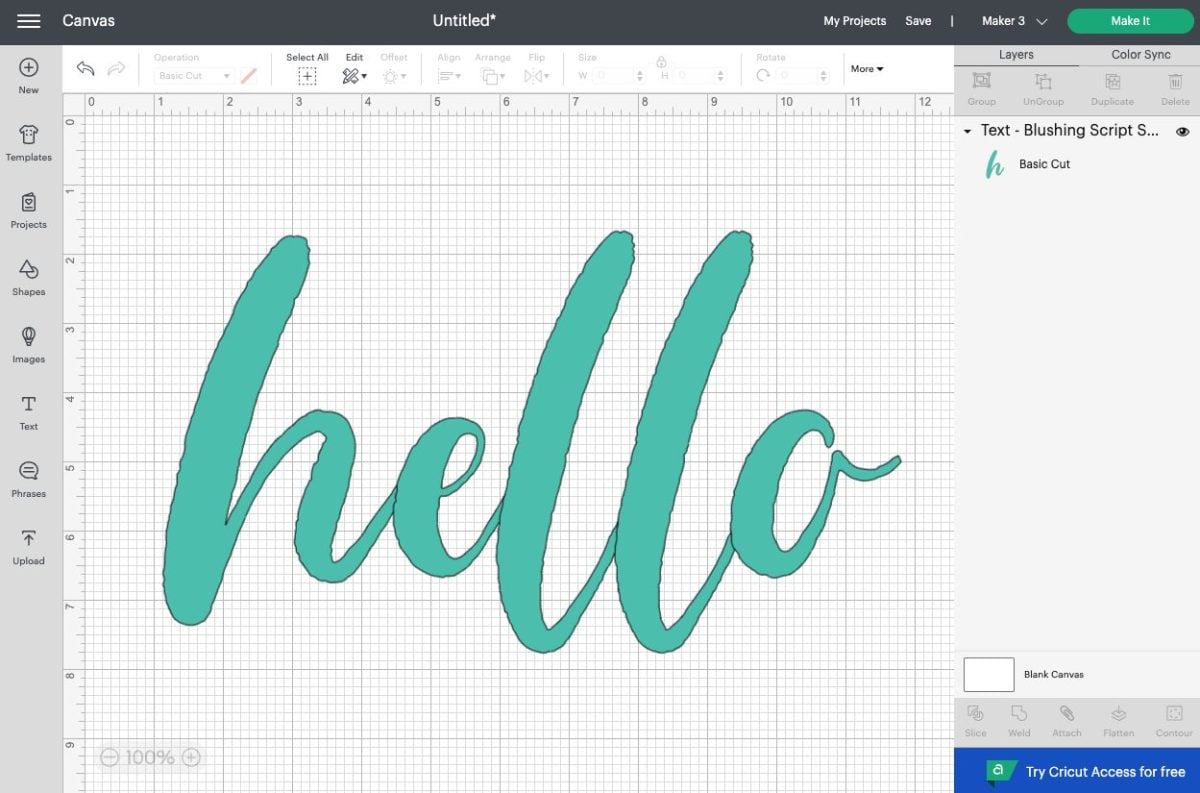
Take a look at Bold Brush, on the other hand. Nice smooth edges. Perfect for cutting on the Cricut!
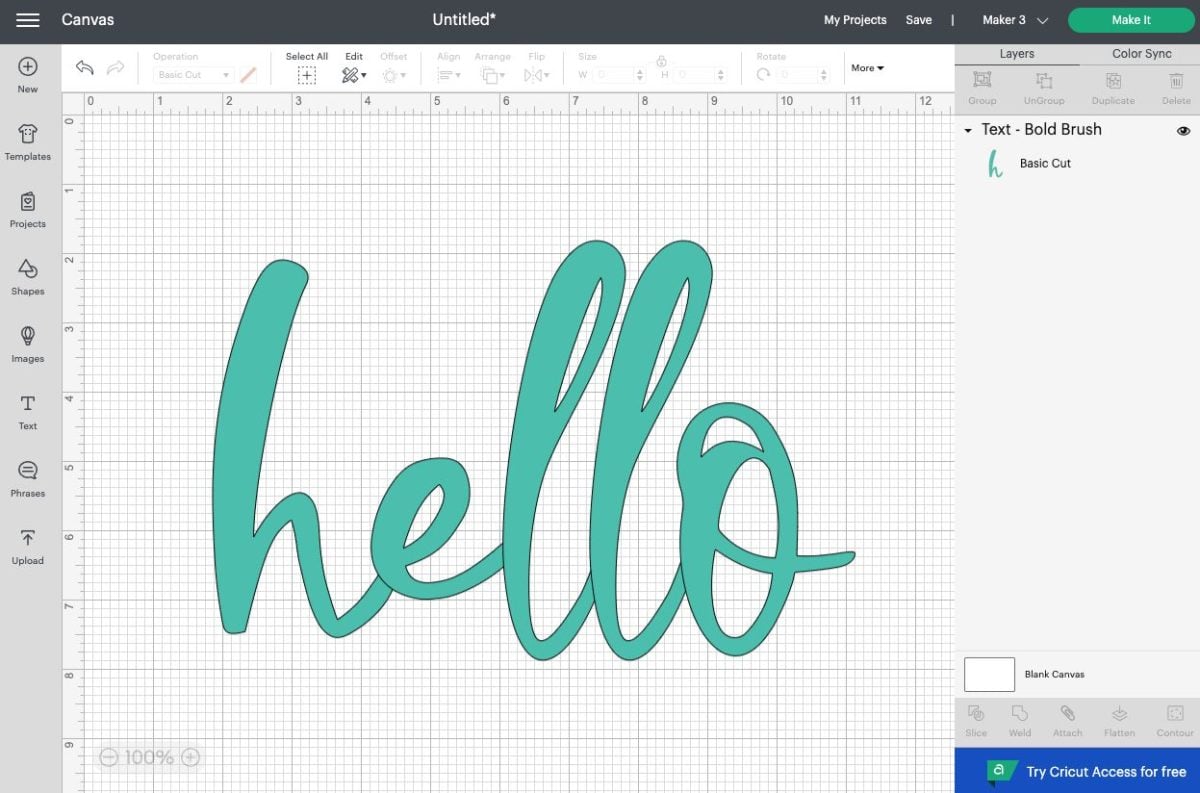
Keep this in mind when choosing one of your system fonts to cut on the Cricut—smooth edges will cut better. The nice thing about this bundle from FontBundles.net is that I found most of the fonts are actually really great on the Cricut. If you ever wonder if a font is going to cut nicely, just do a test cut using whatever material you’re planning on using in your final project. This can give you a good idea whether or not the font will cut well!
Make a Custom Design with Fonts
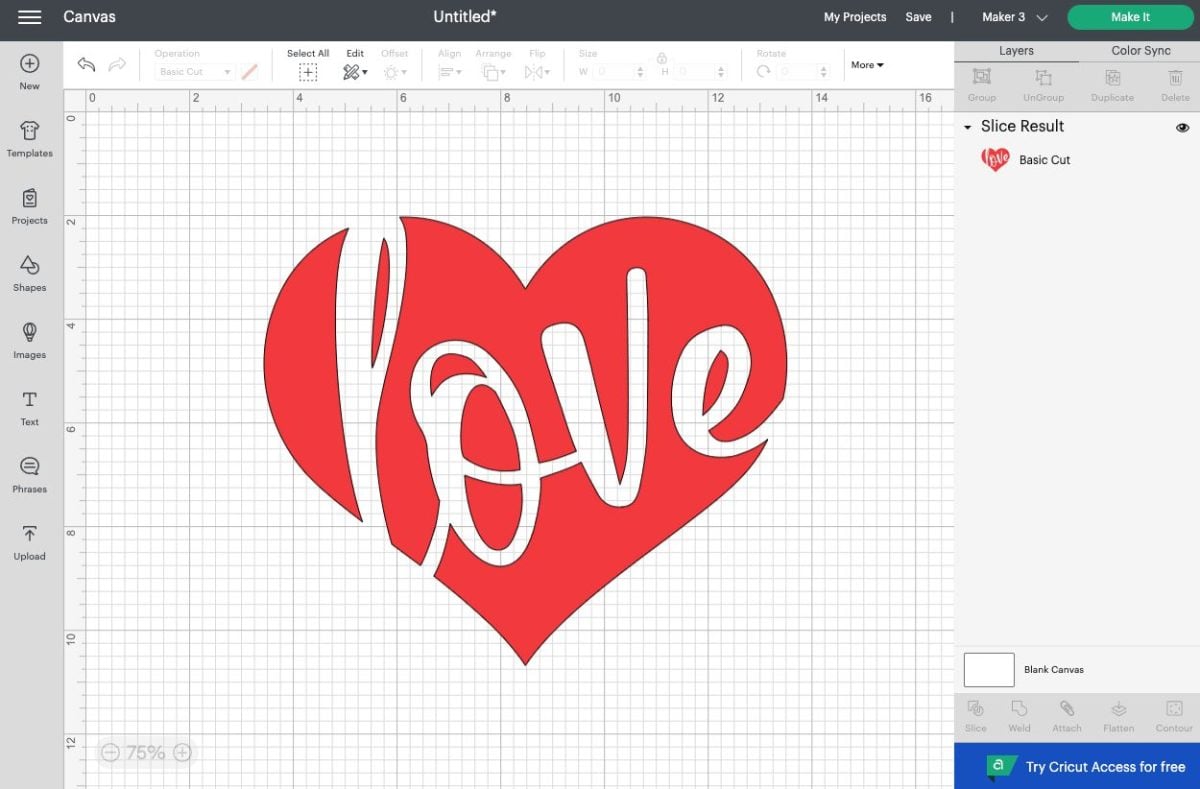
Let’s walk through the process of creating a simple design using uploaded fonts. Start by creating a heart using the Shapes tool in the Design Panel.
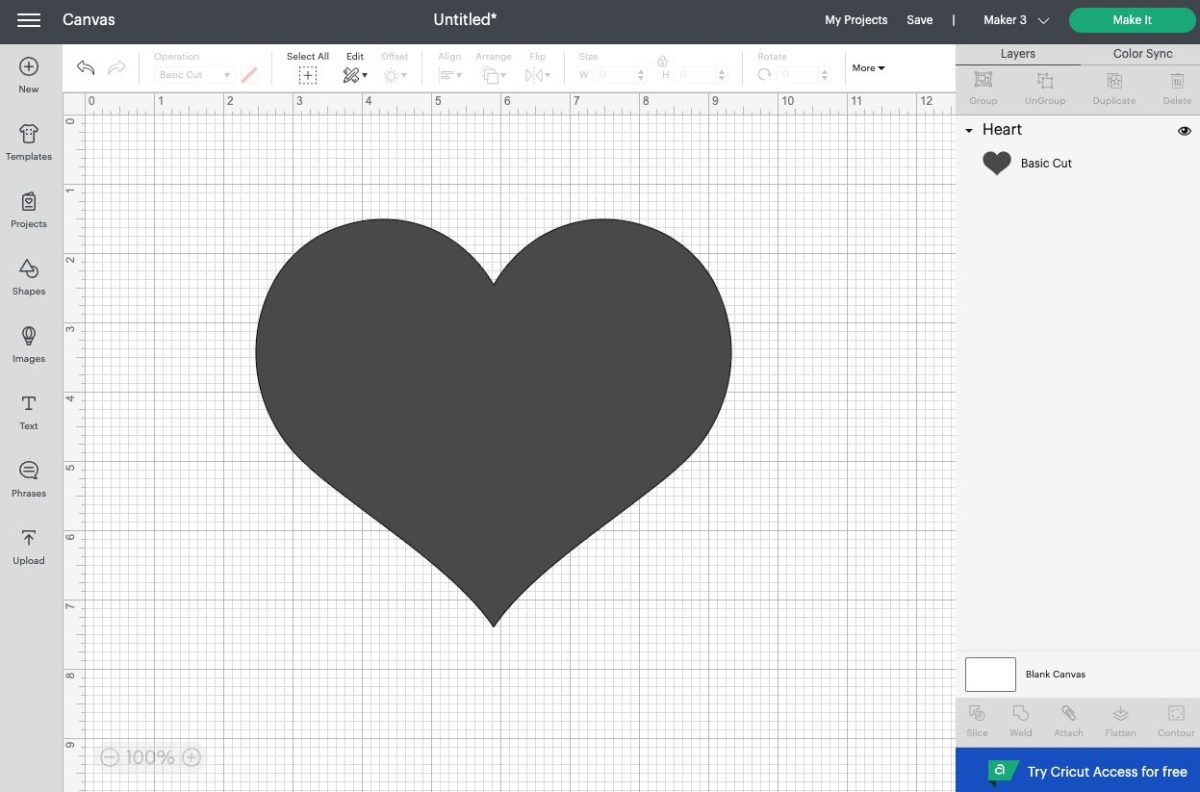
Change the color, if you’d like, using the color dropdown in the Edit menu at the top. I find it easier to work with different colors if I’m layering designs.
Create a text box and write the word Love. Then select that great Bold Brush font from this bundle. Then resize, rotate, and move over your heart.
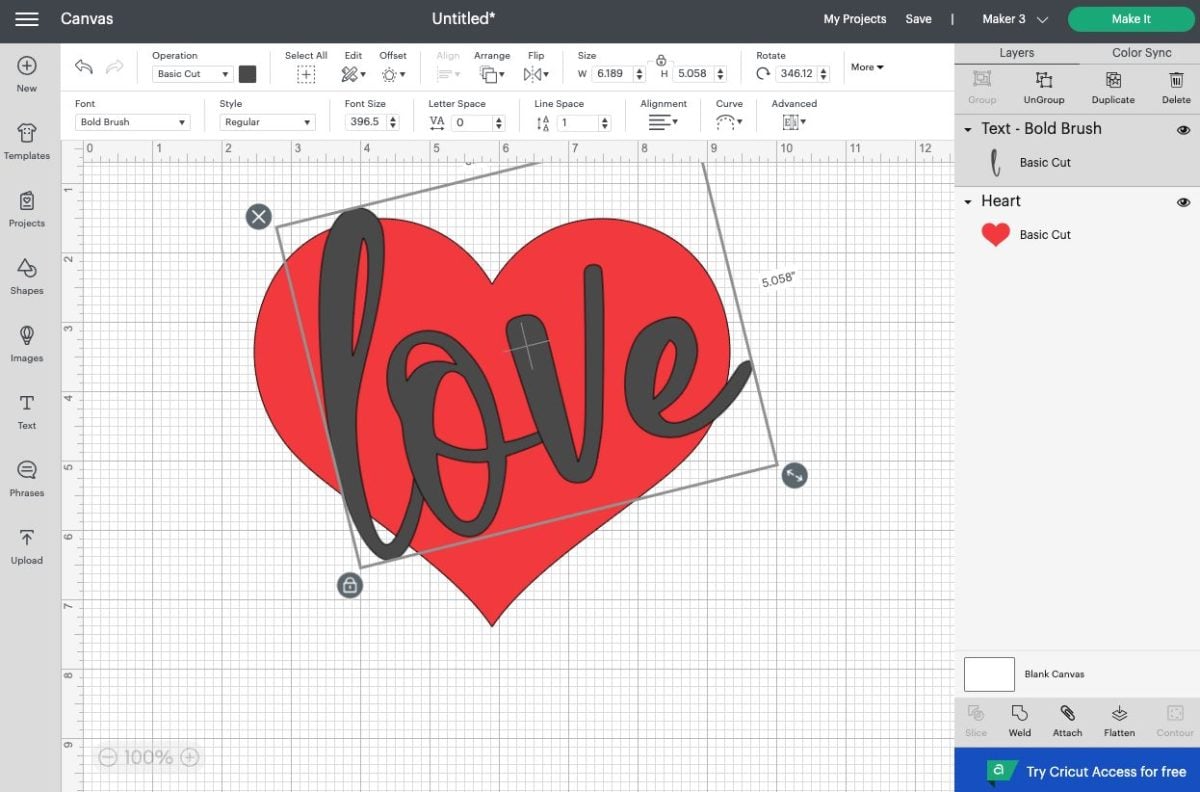
Select both the heart and the word and click Slice in the lower right, at the bottom of the Layers Panel. Learn more about the Slice tool in Cricut Design Space.
Your result will have quite a few extra shapes. Move them away from your final heart with the cutout and delete!
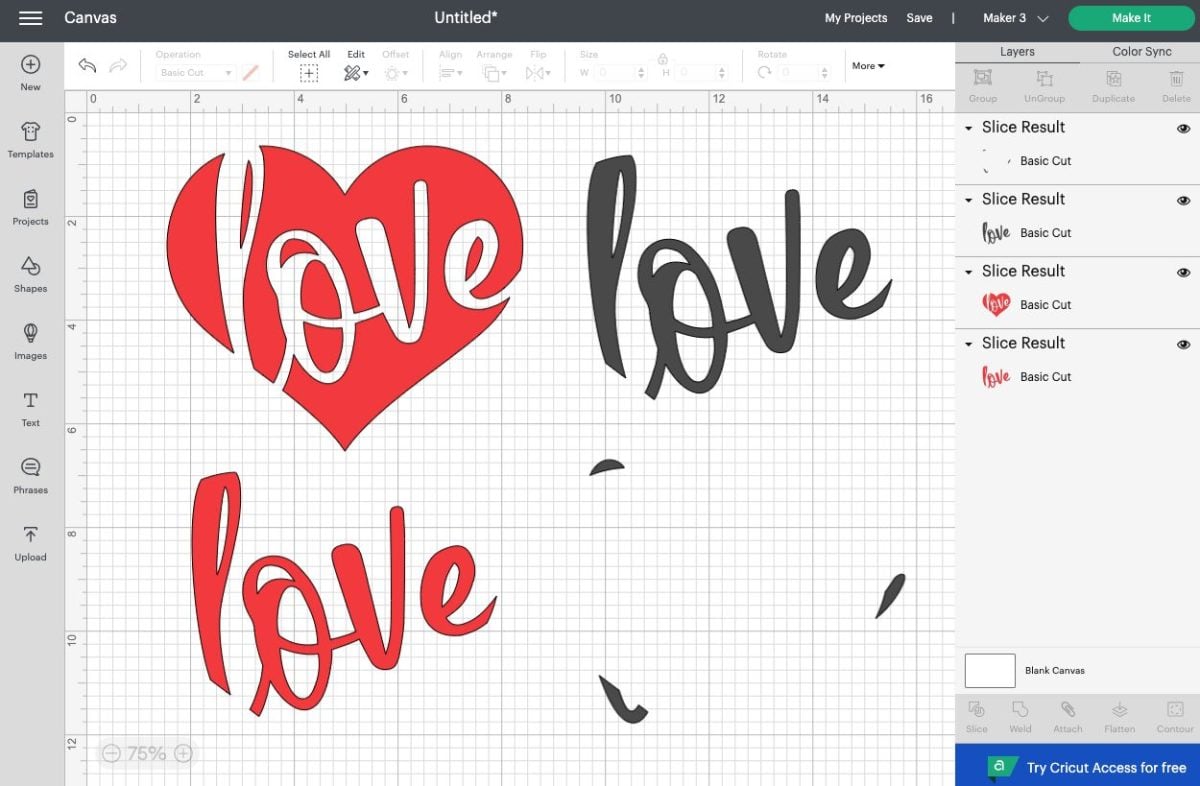
There we go! Now we have an easy file to cut using our Cricut!
I hope this post has helped show you just how amazing it is that you can use your own fonts within Cricut Design Space. It allows us to create amazing designs, above and beyond what Cricut Design Space offers on its own.
Get a Cricut!
Stop pulling your hair out and start creating confidently with your Cricut! Finally understand how to use your Cricut with my Learn Your Cricut eBooks!
HOW TO UPLOAD FONTS TO DESIGN SPACE
Instructions
- How to Upload Fonts to Cricut Design SpaceNOTE: Throughout these Instructions, the font Bold Brush is being used.Your font (or fonts, if you buy a bundle) will be in an unzipped folder. Often there will be two versions of the font, one that ends with .ttf (a TrueType font) and .otf (an OpenType Font). For technical reasons not being covered here, it is suggested to go with the .otf font if it's available (it's just a more robust font type). If there's only a .ttf, that's fine too!We'll go through installing fonts on a Mac and PC, as well as mobile devices, and then how to open them in Cricut Design Space.Step 1a: Install the Font On Your MacWhen you download a font, it will most likely come in a zip file. Double click or right click on the zip folder to unzip the downloaded file. Then select the three fonts and ctrl+click to bring up the menu. Then select Open With > Font Book.

- A box will pop up for you to install your fonts (if you choose to install all of the fonts in a bundle at once, a lot of boxes will pop up, one for each font!). Click Install Font and your computer will do its thing.

- Your font file will now appear in your FontBook and be available for you to use in Cricut Design Space.

- Step 1b: Install the Font on Your PCFor a PC, click on the zip folder. It will open a window that will show you what files are inside the zip, but you'll still need to unzip them.

- Select all the fonts and click Extract All at the top. You'll select a destination folder—here, the desktop was chosen.

- Then select your unzipped fonts and right click and select install. Your PC will install your fonts.The font will now be available for you to access in Cricut Design Space!

- Step 1c: Installing Fonts on a Mobile Device (iPhone or iPad and some Android devices)Installing fonts on a mobile device is a little less straightforward. I like using the iFont app. These screenshots are from the iPhone, but Android is similar.Install the iFont app on your phone from the Apple App Store or the Google Play Store.

- Then download your fonts from the website where you got them OR copy your fonts (either zipped or not) to your device. You can do this via Dropbox, AirDrop, iCloud, etc. It is recommended to save your files in your Files folder on your phone.Open the iFont app and click Font Finder at the bottom.

- You'll have a few options. You can search for fonts on the web using the three bottom options, but to upload a font you already had, tap Open Files.Navigate or search for your font file on your phone and select it. If it's a zip, iFont will find the font files within the zip. Click on the files and click Import.The font will show up in iFont, but it's not installed yet. Click Install.

- You'll want to follow the specific directions within iFont whether or not you have an iOS or Android device. You will need to head into your phone's settings and install "the profile" there. Thankfully, iFont has very easy-to-follow instructions for each device.You’ll be warned that the profile doesn't have a key or is "not signed." It's fine, it just because it was generated on your own device. Ignore the warning.You're done! The fonts should appear in Cricut Design Space as shown below.

- Step 2: Access the Font in Cricut Design SpaceNow that you've installed the font or fonts on your device, accessing them in Cricut Design Space is easy! Use the Text tool in the Design Panel on the left to create a text box. The Text Edit menu will open along the top of Cricut Design Space and you can use the Font dropdown to select different fonts for your project.

- Both Cricut fonts and your system fonts are listed here. You can sort by system fonts, if you'd like, to only see the fonts installed on your device. You can also use the search bar here if you know the name of the particular font you are looking for. This is particularly helpful if you have a gazillion (bajillion million) fonts. Here's the font we installed, Bold Brush:So easy, right? This is the process for selecting any system fonts you want to use!




Comments & Reviews
Laurie says
This video was helpful. Thank you! I have downloaded a font and it loads in design space it it works for letters but when I type numbers or symbols like “&” they look like boxes on my canvas even though the menu on the right displays it correctly. I’m on a windows laptop. Any ideas on how to fix this?
Cori says
Hi Laurie,
Have you tried going to the make it screen to see if they still have a box around those characters? It may just be the way that Design Space is reading them. If the letters are showing up with the boxes around them on the make it screen as well, please reach out to the team at Cricut to see if they can help. Here is their contact information: https://help.cricut.com/hc/en-us/articles/360020316674-Cricut-Contact-Information
Kayte Hansen says
I am having an issue in cricut recognizing the 4 different versions of a font, it will only “load” the original and I want to have access to the bold and italic versions as well…help?
Kayte Hansen says
and literally as I posted this it started working! LOL
Kylie says
Your article is the only one that helped me figure this out! Thank you for this post! So helpful!!
Rose Wilkinson says
Hi there
This was very helpful. If I am looking to buy a font, how do I know whether it can be used with the pen? Is there something I need to search for.
Crystal Summers says
Hi Rose,
You’ll want to look for simple line fonts – not thick, filled in ones. For example, thin-lined fonts or fonts that are outlined work best with the pen.
Hope this helps!
Crystal, HLMS Community Manager
Sophie says
This article was so helpful and answered the questions I had right away! Thank you!
Silvia says
This has been very helpful, thank you!
ilsie says
Hi Liz,
Thank you so much for the offerings on your site! So helpful and inspiring! I have a question which I hope to be able to articulate well as Im NEW to the world of creating on a Cricut! Im currently working on a card line and the issue I seem to be running into is when I put “text” into the design and I assign it as “draw” it doesn’t leave the letters filled in and bold it creates a space in them making almost look like a stencil~ I though this was an issue with the fonts offered through “design space” so I purchased some from “FontBundles” and Im running into the same issue! As I shared Im new to this and hoping its something Im doing incorrectly and can be corrected! Im hope Ive been able to describe my challenge! If not Im happy to share my number with you!
Thank you kindly for your time!
Amy Motroni says
Hi there,
Cricut cannot fill in fonts like you want — it’s always going to outline them.
This post might help as well:https://heyletsmakestuff.com/cricut-design-space-fonts/
Hope that helps!Amy, HLMS Support
Wendy Auger says
Hello, I have downloaded several fonts from Davonte.com. Some work fine in DS. Another font shows up on the font download in DS, but when I click enter, all it does is spin. Nothing works and the only way to stop it is to close out of DS. Can you help? (Just an fyi..my computer is currently only windows 7) Thanks for your help!
stacey Hooten says
Same!! Help!!