Learn all the best tips and tricks for using the scoring stylus with the Cricut Explore machine.
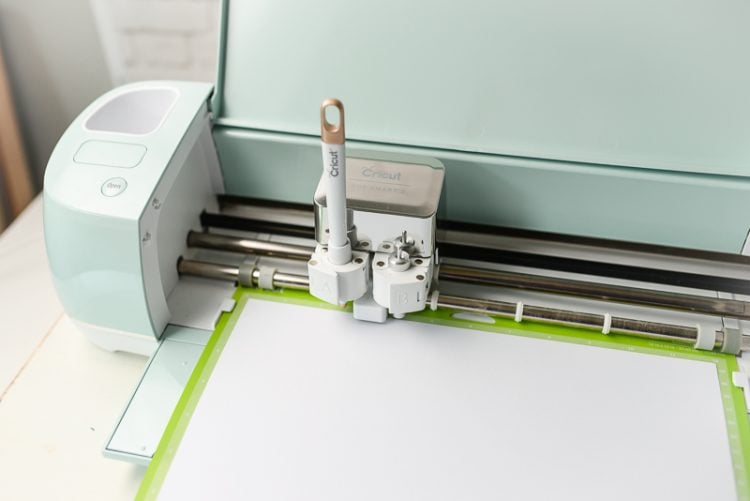
In addition to cutting all sorts of materials, the Cricut Explore also has the ability to score. Using the special Cricut scoring stylus, it will create fold lines in any project that needs to be folded. This is particularly useful with cards, as well as 3D projects like small gift boxes.
Using the scoring stylus is usually pretty straightforward, but I wanted to give you an overview of how it works, plus a few little tips and tricks I use to make my scored projects even better, no matter where you design your project.
Stop pulling your hair out and start creating confidently with your Cricut! Finally understand how to use your Cricut with my Learn Your Cricut eBooks!
Inserting the Scoring Stylus
Learn more about the different types of Cricut machines here.
Cricut Explore Air + Cricut Explore Air 3
To insert the scoring stylus, open the accessory holder clamp A and hold the accessory clamp up while pushing the stylus down into the holder until it clicks and the arrow on the stylus disappears. Close the clamp and you’re ready to go!
Scoring in Cricut Access Projects
If you choose a project from Cricut Access, the score lines will automatically be built into the file. Just cut your file and insert your scoring tool when promoted. If you’re designing your own files, I’ll go more into inserting score lines below.
Scoring in Cricut Design Space Projects
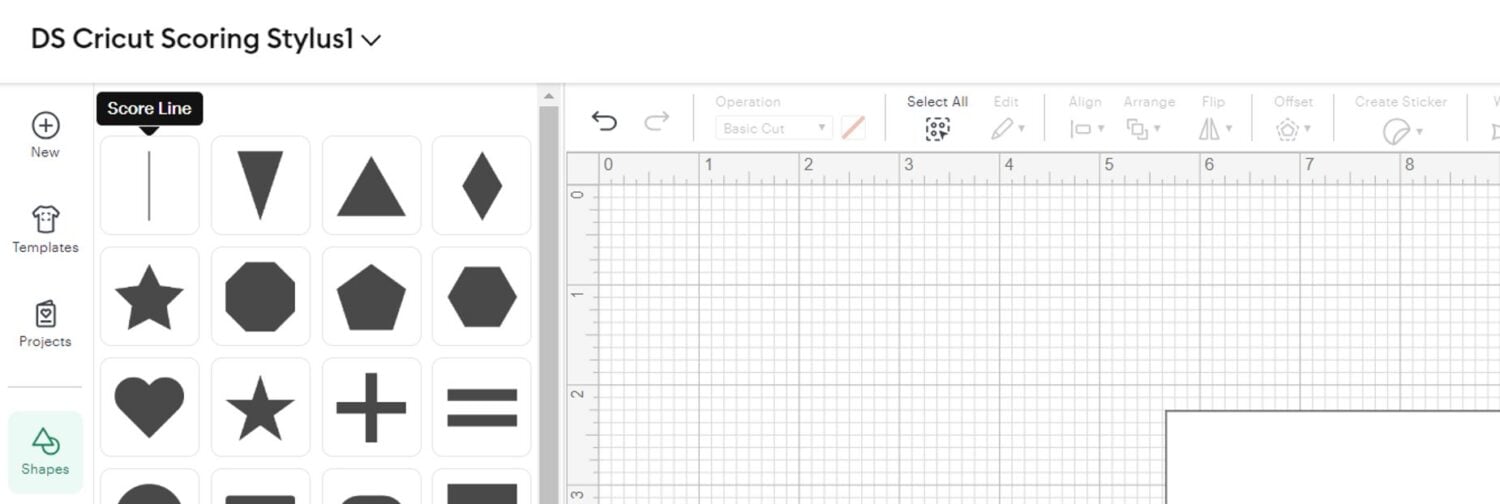
If you’re creating your own design in the Cricut Design Space, adding a scoring line takes a few more steps. In this case, I am making a small gift card. I started by adding a small rectangle to the Canvas. Then, to add a score line, I clicked on “Shapes” in the Design Panel and then selected “Score Line”. This placed the Score Line onto my canvas.
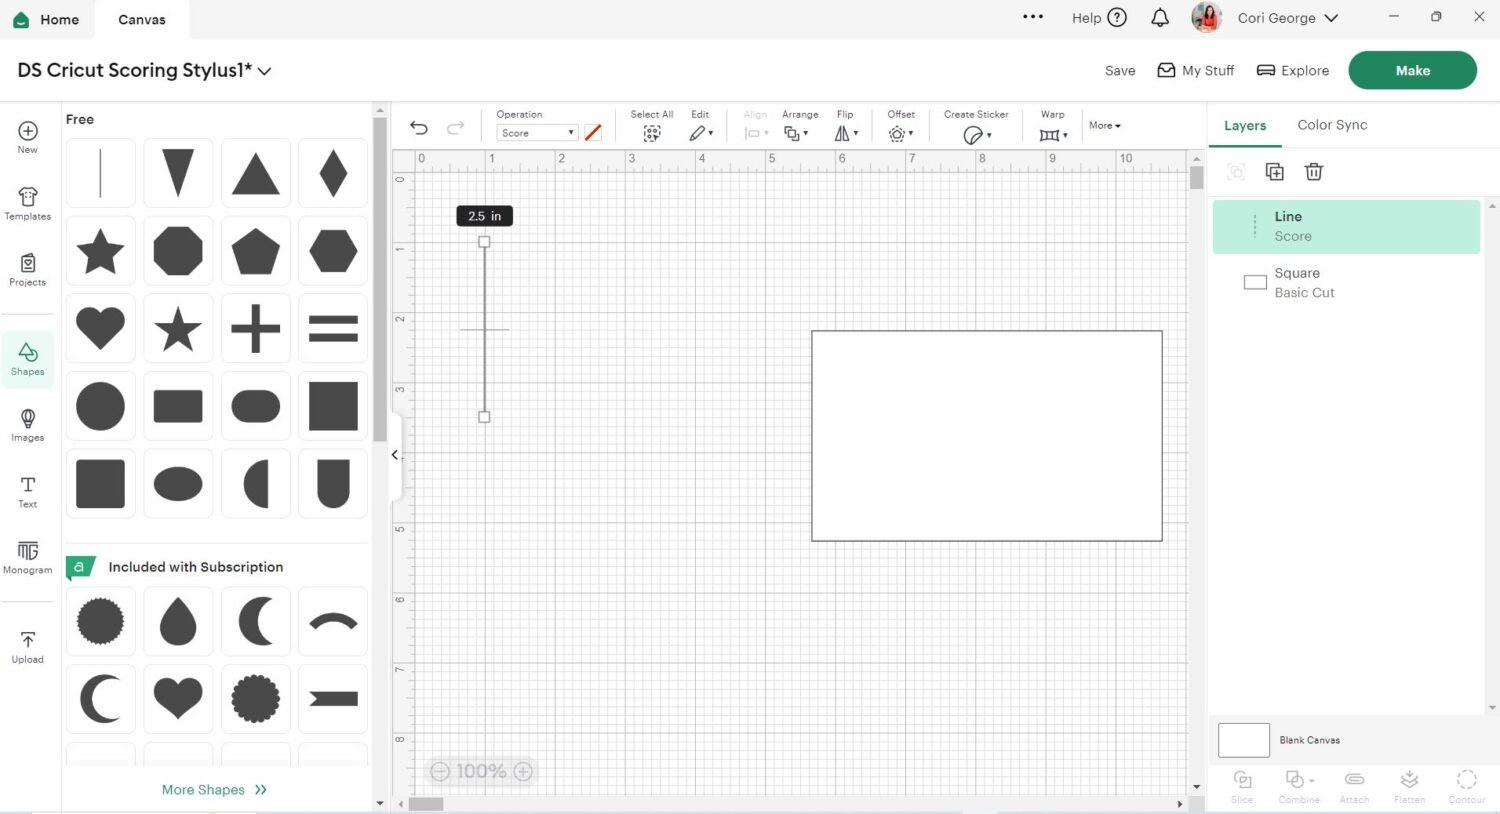
From this point, you can then manipulate the score line, making it as long or short as you need, as well as rotating it. Place it wherever you want it to be in your file. For my gift card, I made the height of the score line 3″, the same height of my card and then placed the score line in the middle of the rectangle. To make sure it was in the middle, I selected both the rectangle box and the score line and then clicked on the “Align” menu and selected “Center Vertically” and then “Center Horizontally” from the dropdown box.
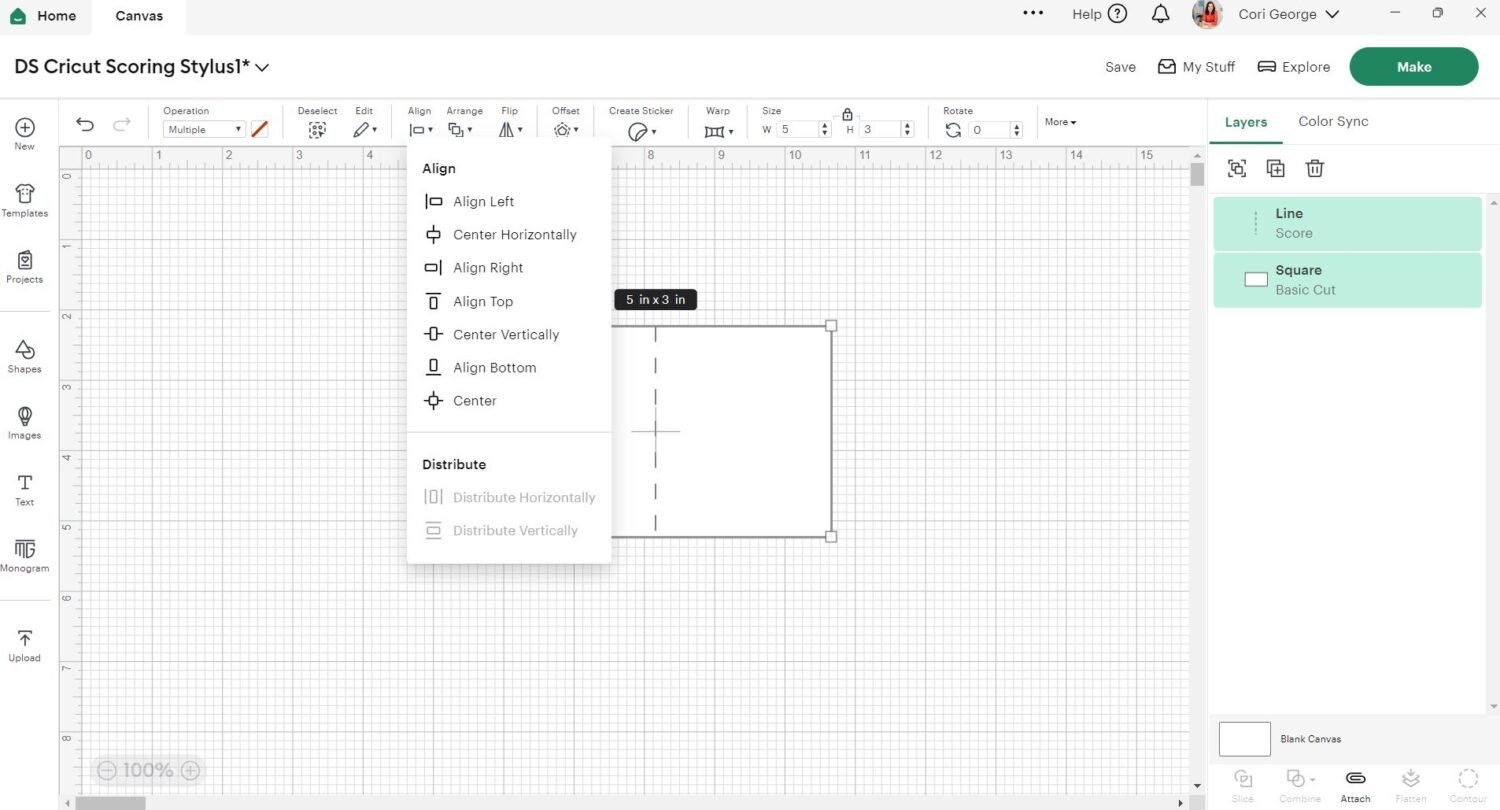
Once you have it exactly where you want it, “attach” it to the layer that you want to score by using the Attach button in the bottom right.
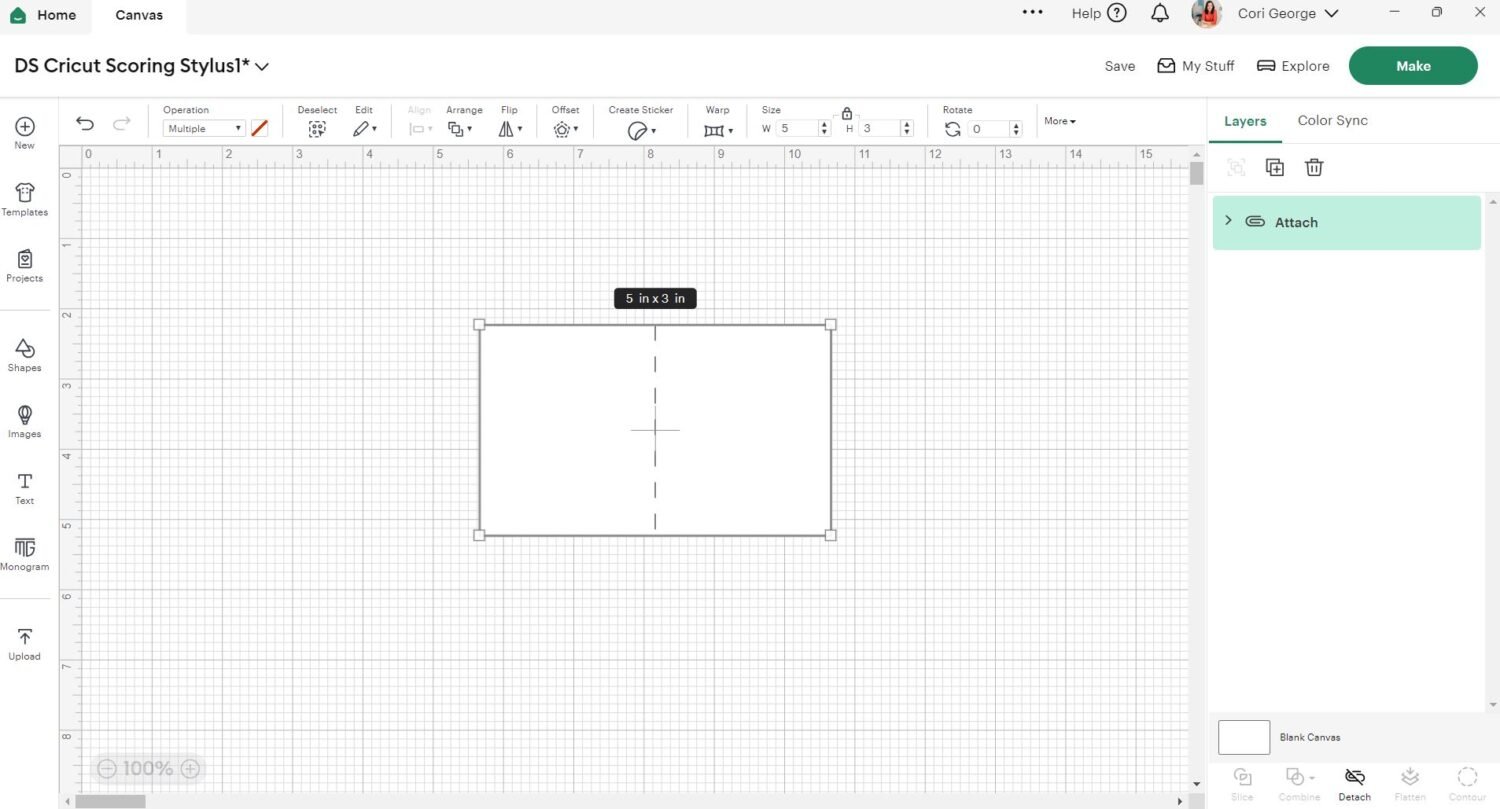
Your project is ready to make!
Scoring in Adobe Illustrator Projects
If you use an outside program, such as Adobe Illustrator, to make your projects, you will find that you can’t create score lines until you import your files into the Cricut Design Space. Instead, you will just create a line in Illustrator and change it to a score line in the Cricut Design Space.
For example, in my recent Pineapple Candy Pouch Cards, I added a red line in Illustrator that needs to be changed to a score line in the Cricut Design Space.
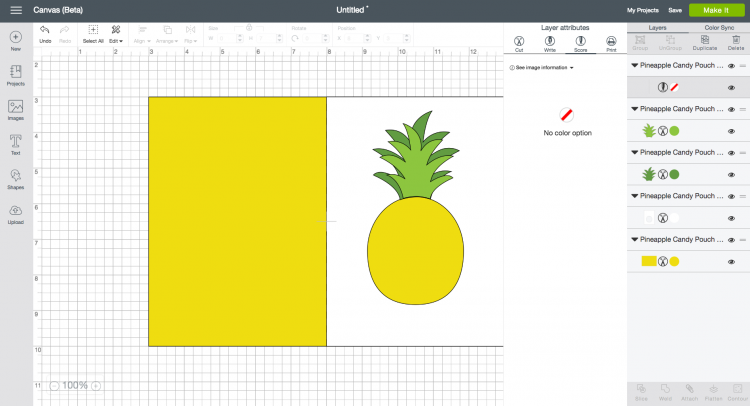
This is also my current workaround for creating curved score lines since Cricut Access only has a straight line. You don’t often need to create curved lines since most folds are straight, but there are a few instances — for example, pillow boxes. I’m working on trying to hack these curved score lines directly in the Cricut Design Space, but haven’t figured out a good workaround. Once I do, I’ll update this post!
One More Tip for Scoring
There may come a time when your score lines aren’t deep enough on whatever material you’re cutting. My favorite hack for getting deeper score lines is to copy and paste a new score line in the Cricut Design Space right on top of the original score line. You can use the X and Y position boxes to make sure they are aligned perfectly. The machine will read it as two score lines and double-score it. This creates a slightly deeper score line that can be folded more easily.
Hope you found these tips and tricks for scoring helpful! If you have any questions about using the scoring stylus or other fun tips and tricks you’d love to share, tell me in the comments!


Comments & Reviews
Vivian says
I am trying to design my wedding invitations with my Cricut Maker. I have the scoring stylus, the scoring wheel, and the double scoring wheel. I’m hoping to create a letterpress effect, and I was wondering if I could print the text, possibly even in Microsoft word, and have the Cricut score over the printed text to make it appear indented on the page. I have not figured out a way to do this, and I would so appreciate any feedback!
Theresa says
I have been researching the same question. Can I use the scoring tool and set it to draw?
Liz, HLMS Reader Support says
Yes, you can do this, but you will have the same results as the pen where it will be in a writing style or it will only outline block letters.
The feature to fill in the letters requires a feature that Design Space doesn’t support yet.
Happy Crafting!
Liz, HLMS Reader Support
Liz, HLMS Reader Support says
That is such a great idea!! I myself have been trying to figure that out as well.
Unfortunately, there is not yet a way to score/emboss block letters as that would require a vector fill function.
This would be a great idea to pass along to Cricut and they may be able to give some suggestions as well.
Good luck – and I want to see your invitations when you’re done!!
Liz, HLMS Reader Support
Vivian says
SO I figured it out, y’all. First off, the result isn’t exactly what I hoped for, but I did figure out how to do it.
1. draw a square to the size you want the invitation.
2. You’re going to want to get whatever you want to print in microsoft word laid out and in position on the square and set to print (when you’re typing the text in whatever font your using, i go ahead and set it to ‘regular’ and ‘print,’ because it changes the way the text appears, but it is exactly how the text will appear when it prints).
2. duplicate the text (select all, hold CTRL while deselecting the square in the layers panel) and set the duplication to score and lay it over the words, then you HIDE the scoring part. Make sure the text is grouped before duplicate it, because you could get into a world of confusion if you accidentally bump something out of place.
3. select all (you’re selecting the words and the square) and click “attach”
4. select the attached object and and select “flatten”
5. okay, now you unhide the score outline of the text and send it to the front, so it’s laying over the text like before
6. select all and click “attach”
and done! It will then print the text exactly like you have it laid out, and as far as I can tell you don’t need to use cricut fonts, then it will have you lay out the printed document and score over the text, and cut around your square.
it doesn’t really look letter pressed though, I’ll be honest.
I’ve decided to go another route…I bought a Sizzix embossing machine (Cuttlebug is the same type of machine) for about $30 on amazon, and I’m making an embossing folder on my Cricut (https://www.pinterest.com/pin/69172544246736262/) . I’ll update how that goes. If you have any questions about how I printed and scored just let me know!
Diane Trauzzi says
I found a REALLY good explanation on how to do Flat Embossing, where it looks like it has been filled in. Basically you do score lines on a .02 inset to your design (using new offset in Cricut set to -0.02). I am linking the Youtube explanation I found, it’s super well explained, though still fairly advanced method so it might be a bit overwhelming if you’re technically challenged. I found if I watched the whole thing, then watched again and paused as I followed along each step, it was pretty easy to follow. He does two explanations, one that explains the procees of doing the “embossing” and one on how to create the stencil.
Overview – https://www.youtube.com/watch?v=2SN2d4cjerU
How to create stencil and set up DS – Cricut Embossing Prep w/SCAL4 – YouTube
Franny says
I see here many are having trouble with score stylus, me too! I’ve only had my machine since fall and only used it since Feb cause I was too intimidated. So is it the machine that’s the issue?
Crystal Summers says
Hi Franny,
It sounds like it may be a technical issue. I would reach out to Cricut Support. They can help you troubleshoot.
Good luck!
Crystal, HLMS Community Manager
Mardi says
I am having a ripping problem too. My scoring tool rips the paper or card stock while scoring. Not the entire score but small sections.
Cori George says
Hi Mardi — can I ask whether you are using an Explore or a Maker?
Cori George says
And you’re scoring cardstock not construction paper? I find construction paper can be really tricky with the Cricut.
If it’s cardstock, maybe talk to support. I’ve had a few people having this problem lately (and never before), so I wonder if there was an update that changed the pressure settings. The Scoring Wheel came out for the Maker and it makes me curious that there might have caused a problem with the Scoring Stylus.
If you find anything out from them, let me know!
Jennifer says
I’m new to the whole scoring tool but for some reason I can’t get my scoring to make the actual intentions like the dotted line it just makes a makes.a solid line which kinda doesn’t make it any better to fold … am I doing something wrong , or am I suppose to use a different tool
Cori George says
The dotted line is just how Cricut Design Space shows a scored line. All scored lines are solid lines when actually scored. I hadn’t thought of scoring a dotted line being easier—I would think the solid line would be easier. You could fake a dotted line by using several small score lines, if you wanted to try that.
Tracy Macdonald says
Hi there, the design ive paid for comes with dotted scoring lines, and for some reason thats whats coming out instead of a solid line which i would prefer, how do i change this in the cricut space program? Ive changed it to score lines but its doing dashs instead of a solid line. Any ideas?
Lindsey says
Im a newbie, and I keep ripping my score line on cardstock please help me
Cori George says
Do you mean that your score line rips through your paper as it tries to score? Or that you’re ripping when you fold? I’m not quite sure what you mean by your comment. Clarify and I’ll try to help you out!
Cindy @ says
I’m having problems with my scoring tool working. I called Cricut and the girl told me that if my pens were snapping in place and working, then my scorer should work, too. The problem is that when I go to score, the tool will make a slight mark as it moves around my paper (the girl told me to push it down hard till it almost touches). Then when it goes to actually score, it pops out of the clamp. I’ve started just scoring them myself with my slicing tool.
Tarissa, HLMS Reader Support says
I’m sorry you’re having this issue! I would continue to contact Cricut customer support to see how they might be able to address this.
Lynda says
I have been having problems with my stylus popping out of the Maker machine. The same exact stylus works fine in the Explorer…
Tarissa, HLMS Reader Support says
Oh no! I would recommend contacting the Cricut Help Center for this type of issue.
Em says
Did you ever figure out how to fix this issue!? having the same problem
Sylvia says
Only got my Cricut after Christmas but has been working great and made a number of cars with the scoring stylus. Then suddenly today I am having same issue with the stylus popping out as soon as it makes contact with the card. If I don’t push it in all the way then there is no score left.
What did customer support say regards to this issue….seems from reading back here it is fairly common and a long standing one
Nitin Gautam says
Suddenly my machine stopped Scoring i can see stylus is positioned correctly and moving when on scoring command but no score line getting created looks like no pressure applied. what is the life of scoring stylus?
Tarissa, HLMS Reader Support says
Hmmm. I have not experienced this, but depending on the material I am scoring, I sometimes do double-lines on Design Space to get an extra score mark, making it a bit deeper.
Em says
Did you ever figure out how to fix this issue!? having the same problem
Alecia says
Any news on this, mine will not score @ all Triple score lines didn’t help. :(
Amy Motroni says
Hi Alecia and Em,
It sounds like you may need to contact Cricut support to see if there’s a problem with the tool.
Hopefully they can help!
Amy, HLMS Reader Support
Lala says
Same problem here.. Stlus pops up once pressure is applied.. After some research, it seems that it needs to be replaced s the cartridge A is apparently easy to break… A little to much pressure eh installing the stylus can pop out out of position… Easy fix tho
Heidi says
how can you get your score lines deeper. mine are hardly visible when scoring on aluminum sheeting
Cori George says
Hi Heidi — you can double the score line, which might help. You can also try different material settings — sometimes the machine will use a harder score line on different materials. Hope that helps!
Karen says
I actually hold the tool down lightly as it is scoring and this seems to work. You can’t leave the machine to get on with on with it though.
Erika says
Hello, I have a trouble with score lines because they never are aligned with the cut sometimes is 0.2 mm other times are almost 1 cm in x and y. Somebody have had the same problem?
Cori George says
HI Erika — are you making sure to attach your score lines to the correct piece of your file?
Peggy says
Hi Erika, I use my Cricut to cut out pieces for little buildings (about an HO train scale size). I also have heck of a time trying to get it to score as precise as it cuts. I’ve been trying lately to find out if there is a common adjustment to the X and Y position to make this happen. I am getting close I think. If I get it to work I will post it here. I was beginning to think it was just my machine that was screwy until I saw your post. I’ll keep in touch.
Jandi says
I have this same issue every time I do a project with score lines. I make sure to attach them, but they are never aligned in the finished project. Anyone happen to have a solution for this yet?
Tiffany says
You can also add a score line by clicking shapes.
Cori George says
That’s good to know! I forgot that was there — I should update the post!
Sandie says
Hmmm… Now you’ve got me thinking about the curved score line again! I haven’t got round trying it yet but I’m thinking that maybe if we put a circle or oval shape into design space and used the same technique that’s used for curved text but instead used lots of short score lines then maybe that would work? I’ve only had my cricut for a few weeks so please don’t judge me if it’s a completely stupid idea!!
Cori George says
This might work! It might also work to draw an arc and just change that to the score tool in DS. I need to play around with this more.