Learn all the best tips and tricks for using the scoring stylus with the Cricut Explore machine.
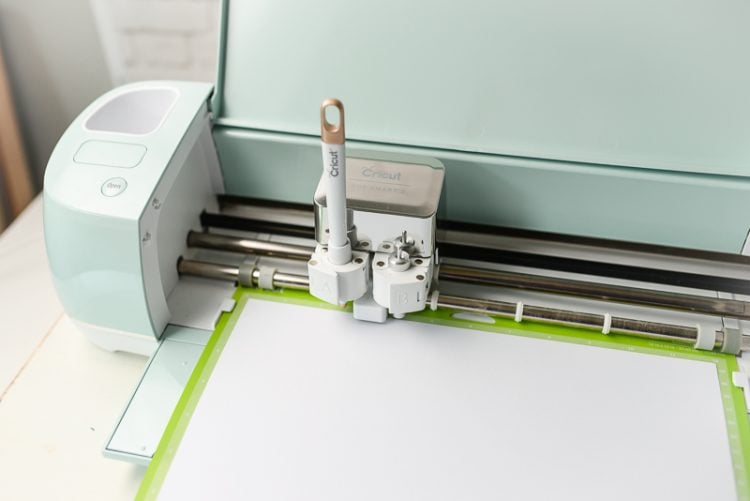
In addition to cutting all sorts of materials, the Cricut Explore also has the ability to score. Using the special Cricut scoring stylus, it will create fold lines in any project that needs to be folded. This is particularly useful with cards, as well as 3D projects like small gift boxes.
Using the scoring stylus is usually pretty straightforward, but I wanted to give you an overview of how it works, plus a few little tips and tricks I use to make my scored projects even better, no matter where you design your project.
Stop pulling your hair out and start creating confidently with your Cricut! Finally understand how to use your Cricut with my Learn Your Cricut eBooks!
Inserting the Scoring Stylus
Learn more about the different types of Cricut machines here.
Cricut Explore Air + Cricut Explore Air 3
To insert the scoring stylus, open the accessory holder clamp A and hold the accessory clamp up while pushing the stylus down into the holder until it clicks and the arrow on the stylus disappears. Close the clamp and you’re ready to go!
Scoring in Cricut Access Projects
If you choose a project from Cricut Access, the score lines will automatically be built into the file. Just cut your file and insert your scoring tool when promoted. If you’re designing your own files, I’ll go more into inserting score lines below.
Scoring in Cricut Design Space Projects
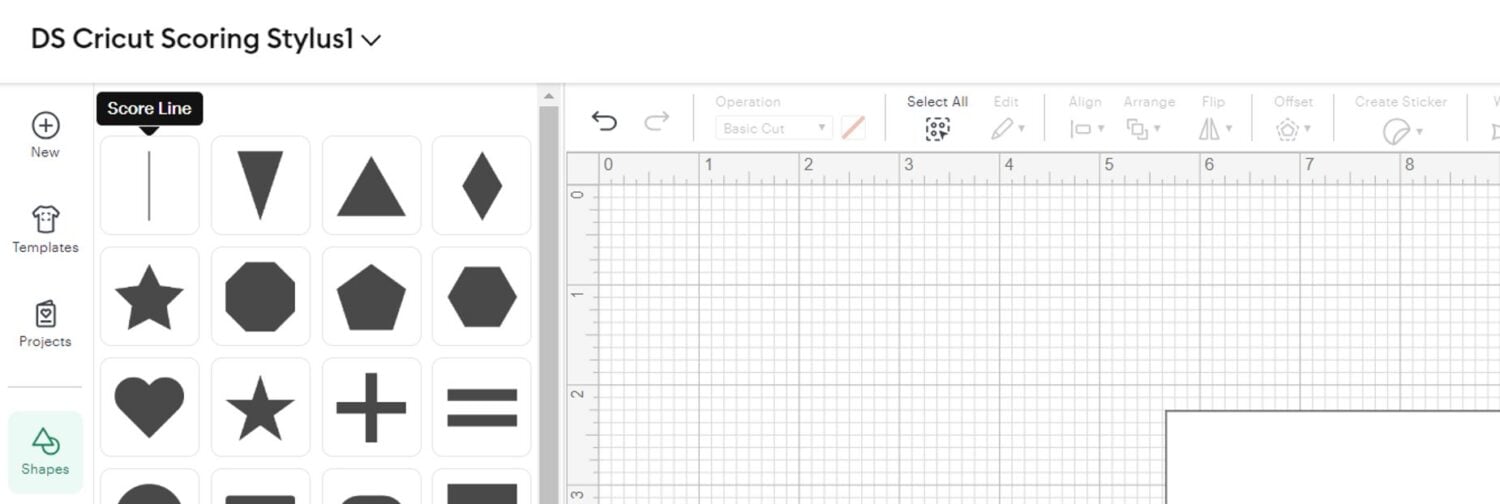
If you’re creating your own design in the Cricut Design Space, adding a scoring line takes a few more steps. In this case, I am making a small gift card. I started by adding a small rectangle to the Canvas. Then, to add a score line, I clicked on “Shapes” in the Design Panel and then selected “Score Line”. This placed the Score Line onto my canvas.
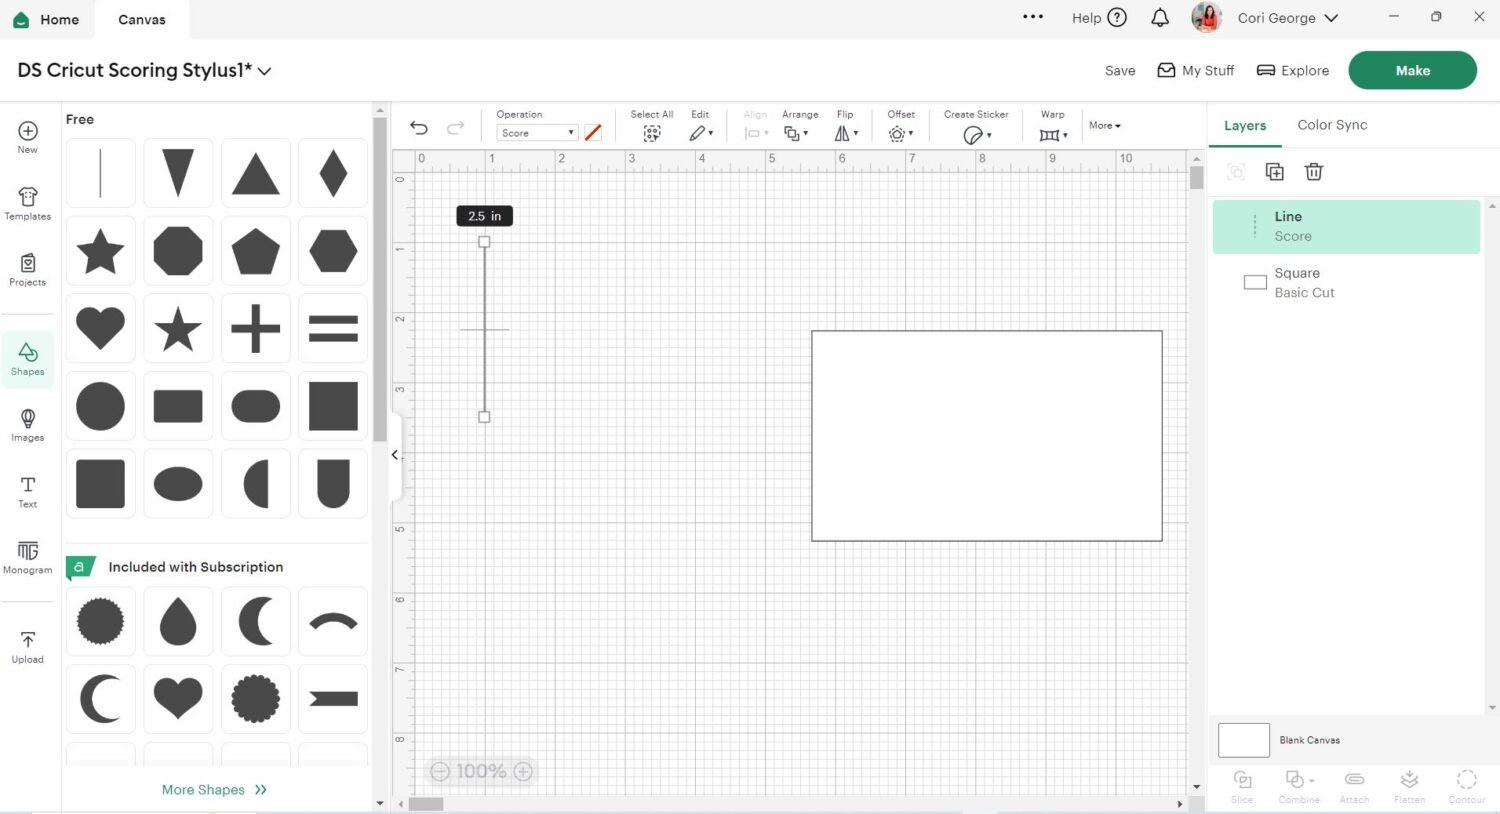
From this point, you can then manipulate the score line, making it as long or short as you need, as well as rotating it. Place it wherever you want it to be in your file. For my gift card, I made the height of the score line 3″, the same height of my card and then placed the score line in the middle of the rectangle. To make sure it was in the middle, I selected both the rectangle box and the score line and then clicked on the “Align” menu and selected “Center Vertically” and then “Center Horizontally” from the dropdown box.
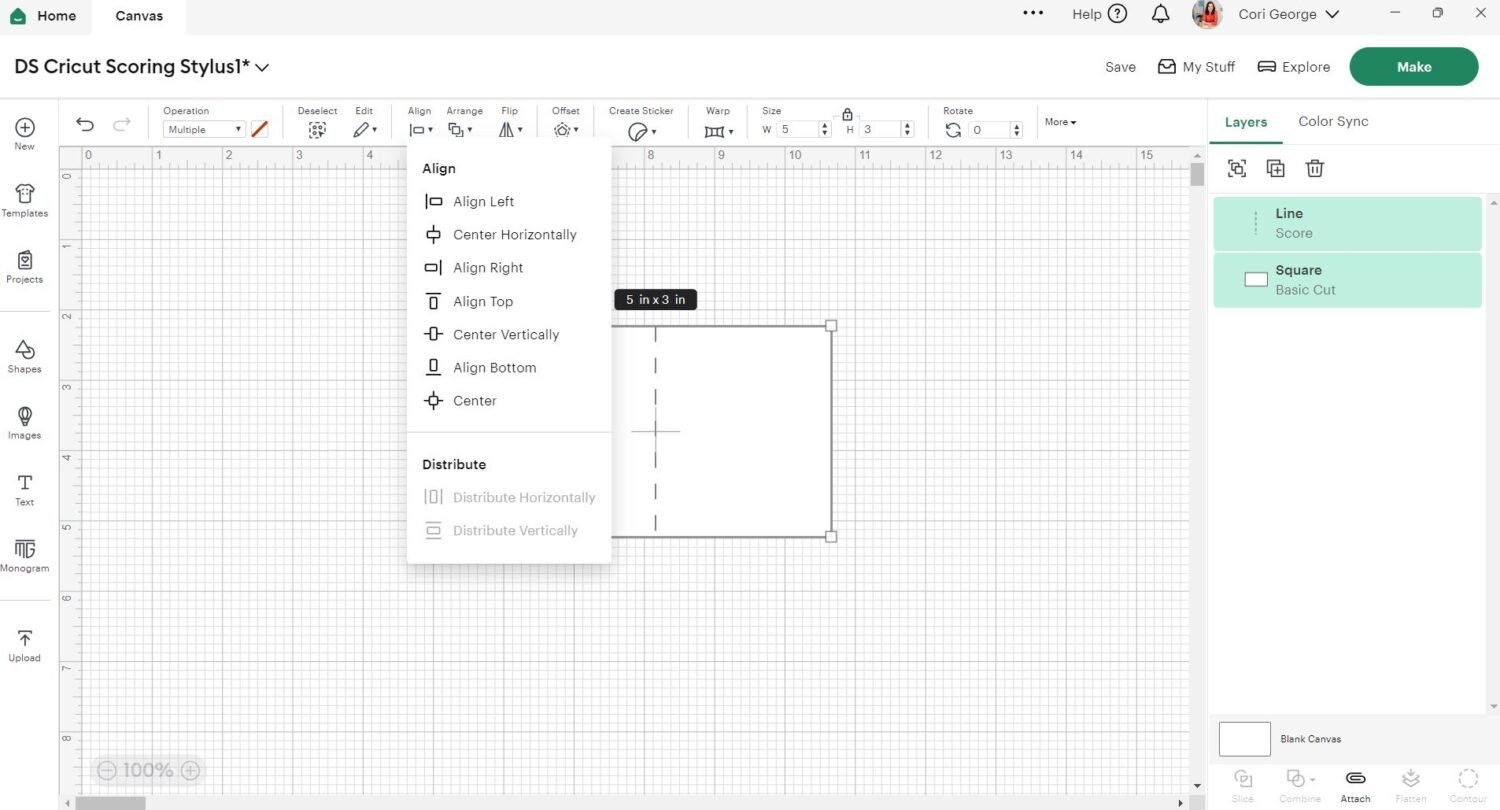
Once you have it exactly where you want it, “attach” it to the layer that you want to score by using the Attach button in the bottom right.
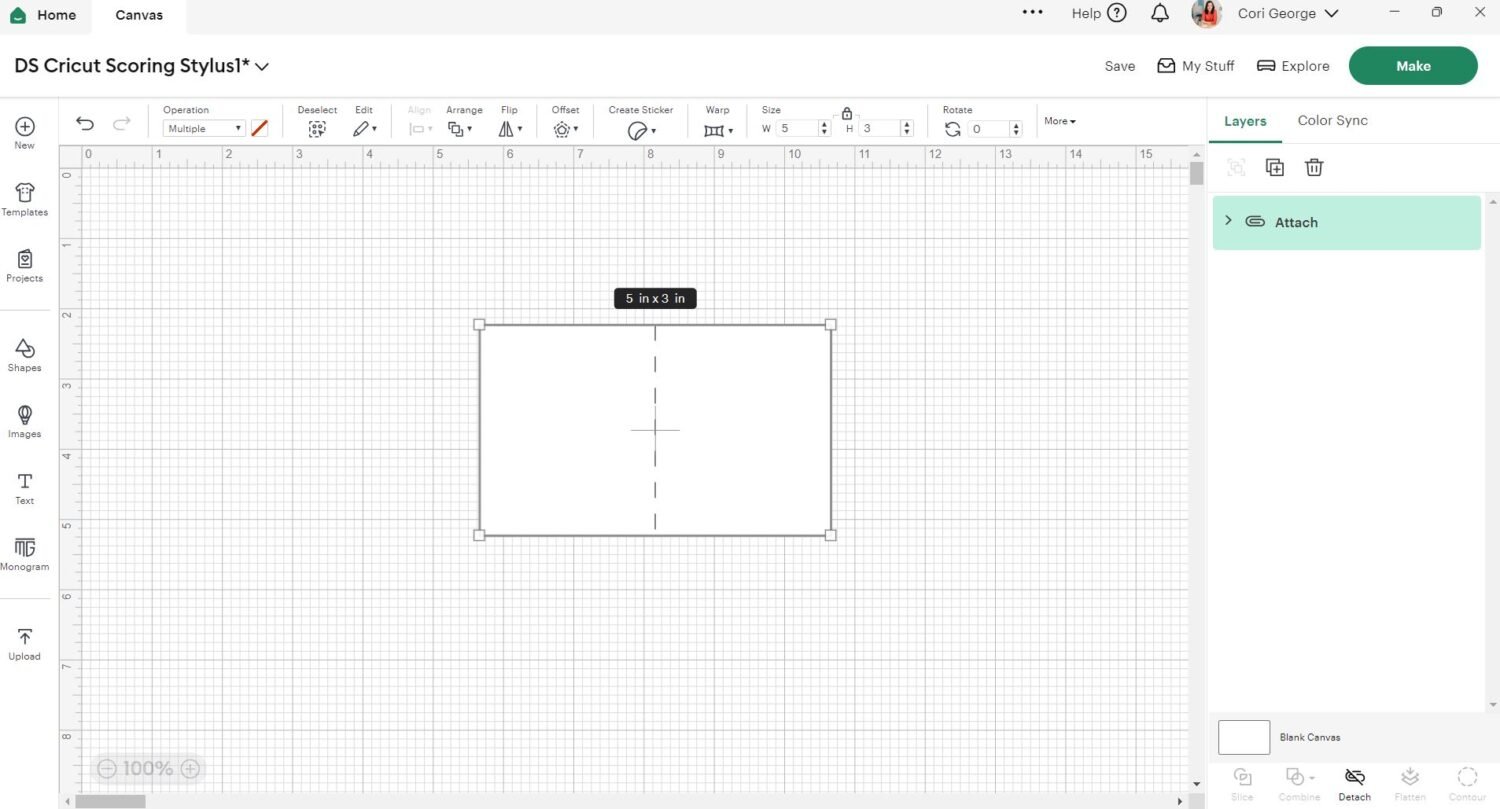
Your project is ready to make!
Scoring in Adobe Illustrator Projects
If you use an outside program, such as Adobe Illustrator, to make your projects, you will find that you can’t create score lines until you import your files into the Cricut Design Space. Instead, you will just create a line in Illustrator and change it to a score line in the Cricut Design Space.
For example, in my recent Pineapple Candy Pouch Cards, I added a red line in Illustrator that needs to be changed to a score line in the Cricut Design Space.
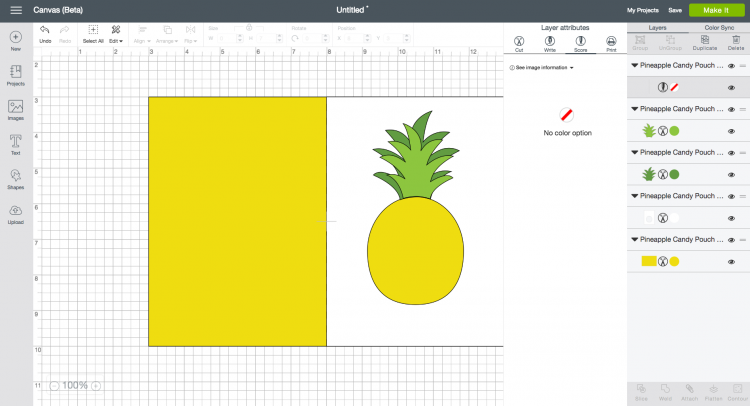
This is also my current workaround for creating curved score lines since Cricut Access only has a straight line. You don’t often need to create curved lines since most folds are straight, but there are a few instances — for example, pillow boxes. I’m working on trying to hack these curved score lines directly in the Cricut Design Space, but haven’t figured out a good workaround. Once I do, I’ll update this post!
One More Tip for Scoring
There may come a time when your score lines aren’t deep enough on whatever material you’re cutting. My favorite hack for getting deeper score lines is to copy and paste a new score line in the Cricut Design Space right on top of the original score line. You can use the X and Y position boxes to make sure they are aligned perfectly. The machine will read it as two score lines and double-score it. This creates a slightly deeper score line that can be folded more easily.
Hope you found these tips and tricks for scoring helpful! If you have any questions about using the scoring stylus or other fun tips and tricks you’d love to share, tell me in the comments!


Comments & Reviews
Carrie Fisk says
Hello – I’m having a problem with my score lines PRINTING on my project after attaching them. They’re not supposed to print, are they? Like literally print the score lines. How to prevent this from happening?
Lori VandeBerg says
Thank u so much for the tip on how to make score lines deeper! You saved my sanity!
Kim Stevens says
My scoring stylus keeps popping out of the clamp.
Cori says
Hi Kim,
One of our wonderful readers, Connie, found a solution that seems to help – wrap one layer of aluminum foil around it between the tip and the arrow that shows it’s in the right place. Then tape it in place at the top of the foil (where the arrow is) and snap the stylus back in place.
This may work for you as well, or you can contact Cricut Customer Support to see if they can help :)
Tye H says
@ CONNIE M
OMG!!!! Thank you so much for the suggestion, I just tried the foil method and it totally solved this random stylus issue that started out of nowhere.
Cori says
Hi Connie,
Happy to help! :)
Lena W says
Connie M THANK YOU THANK YOU THANK YOU!! I was having the same issue for a week with my Explore 2 & the stylus. I tried your suggested & it WORKED!!!