Here’s how to create a watermark in Adobe Lightroom. Set it up once and it will watermark any photo you export!

![]()
I was chatting with some blogging friends about adding a watermark to photos. It’s actually super easy to do, but can be unnecessarily complicated if you don’t know what you’re doing. I find the easiest way to add a watermark to my photos is using Lightroom.
Why Lightroom?
Lightroom is my favorite photo editing software — I rarely open Photoshop. Pretty much everything I need to do can easily be done in Lightroom. And, even better, if I make edits to one photo (such as adjust the exposure, contrast, etc.), then it’s basically one click to make those changes to all other photos in the set, and I can see it all as it happens. Batch processing at it’s finest.
Simple. As. Pie. (Actually, it’s easier than pie. Making a pie is actually quite intense. Maybe I cried the last time I made one. It’s much easier than pie.)
It’s really the best $150 you can spend to improve your blog photography. But first…
Why Do You Need a Watermark?
I think it’s important to watermark your photos for several reasons:
- Your images are worth protecting. It’s so easy to right click and save images, so having your watermark gives you one more step in copyrighting your own work.
- Finding your content on scraper websites. As an extension of #1, there has been a rash of “scraping” websites recently — they steal your posts in their entirety. Having your photos watermarked gives you good claim that the content is yours. Yes, people can crop out a watermark, but thieves are often lazy.
- They help people find your blog if a link is broken. Have you ever clicked on a link to a project on Pinterest only to find that it leads to Google images or other image hosting site? Having your watermark on a photo at least gives someone a starting point for finding your actual image and tutorial.
- Brand recognition. You work hard on your projects and photos, and that watermark helps build brand integrity. The more often your name shows up, the more and more people will recognize it.
- It’s not that hard. I know. There is SO much to do in blogging. But if you know how to do it, adding a watermark should, literally, add no additional time to your general photo processing when using Lightroom.
How to Watermark a Photo Using Lightroom
The nice thing about Lightroom is that you set up your watermark once, and then it can be used on every photo with just the click of one little box.
Step 1
First you need an image file for a watermark. A PNG is best because it doesn’t have a background. I created mine in Illustrator, but you could also use PicMonkey or Photoshop or other imaging software. I used my logo, colored it white, and saved it as a PNG 150px wide.
If you use a lot of light colors in your photos, you might also want to create a colored version of your logo (I prefer a single darker color, like gray) so it will show up on these photos.
If you prefer just a text watermark, you can do this directly in Lightroom, as shown in Step 5.
Step 2
Open up the photo (or series of photos) you want to watermark in Lightroom. Once you’ve made all of your edits to the photo (contrast, sharpening, etc.), you are ready to export your photos and save them.
Step 3
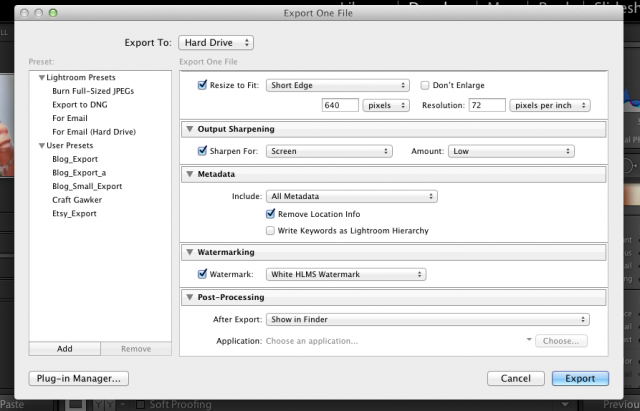
Highlight the photo (or series of photos) and either go to File > Export, or click shift+cmd+E (Mac) or control+shift+E (Windows) to bring up the export screen. Scroll down to the “Watermarking” section.
Step 4
Click the drop-down menu and select “Edit watermarks…” The Watermark Editor will open.
Step 5
Here you can do one of two things. You can either create a text-only watermark, or you can upload your watermark PNG you created in Step 1.
Text-Only Watermark
Click the radial button at the top that says “Text.”
You can type in new text into the box below the photo, and then use the text options to customize your text using any font on your computer. You can also change the position of the watermark if you’d like under Watermark Effects.
Click save, and move to Step 6.
Upload an Image Watermark
Click the radial button at the top that says “Graphic.” This will open up your finder so you can browse to the correct PNG image.
Select the image and the window will close and show you the watermark on your photo. Scroll down to Watermark Effects and you can change the size and position of the PNG file. I like to inset mine a bit so it’s not hanging out right at the edge of my photos.
Step 6
Click Save and name your watermark. For the purposes of this tutorial, I named mine White HLMS Watermark.
With the “Watermark” box checked, you can now click “Export” to save your photo.
Tada! You’ve added a watermark to your photo. Now whenever you export a photo or batch of photos in Lightroom, you just have to make sure that box is checked and your watermark will appear in the same place on all your photos. No reinventing the wheel every time you edit a photo!
If you have any questions about this process, I’d be happy to answer them in the comments.

More Tech Tips
[ess_grid alias=”tech_tips”]









Comments & Reviews
Mike Biblino says
You are so right Cori. Our photos are with protecting!
Getting the watermark in the right spot so it doesn’t detract from the photo is the hardest part for me.
Katarzyna says
If you add watermark in the corner of the photo, somebody can cut it.