Many fonts come with extras, like glyphs, special characters, flourishes, ligatures, stylistic alternatives, and more! If you are making designs to cut on your Cricut, here’s how to use glyphs in Adobe Illustrator to make your designs even more unique.

In a separate post, I wrote about how using special characters and glyphs in Cricut Design Space (for Mac, PC, iOS, and Android). As I was creating the tutorials for that post, I kept thinking, “this is about a million times easier in Illustrator” (which is a thought I have a lot when working in Design Space!). So today I’m going to share how easy it is to use special characters in Adobe Illustrator.
What is a Glyph?
A glyph is a specific form of a letter or number. Think of a letter A with several different stylistic options, like in the font Cherryla:

This font, for instance, has more than 375 different letter and number forms! That means that it’s so much more customizable than a font with a more basic alphabet.
I could NOT figure out what non-designers might call these “fancy letters.” Technically they are glyphs, but I’m not sure the general user knows them by that name. You might call them:
- Glyphs
- Stylistic Alternatives
- Special Characters
- Letterforms
- Alternate or Alternative Characters
- Stylistic Options
- Swashes, swirls, or swooshes
- Flourishes or flounces
- Font Extras
- Ligatures (see the bottom of this post for more info)
- Those Fonts With the Swooshy Thingies
If you’re looking for more Illustrator tutorials that are specifically designed for making files to cut on your electronic cutting machine, check out these posts:
- How to Make SVG Files Using Adobe Illustrator
- Two Ways to Cut a Sketch on a Cricut (Design Space & Illustrator)
- How to Create an Outline in Illustrator
Using Glyphs in Adobe Illustrator
Open up Illustrator and start by using the text tool to type your word. I’m using the same word (“ethereal”) and the same font (Heartbeat Script) as I did in my Design Space tutorial, so you can directly compare.

Open up the Glyphs menu by going to the top toolbar, Window > Type > Glyphs.

This will open the Glyph window, which shows you all of the different glyphs included in the font. A lot of times they are in alphabetical order, but often things get cranky and the order isn’t great—as you’ll see below. Where are the “a”s? Oh, they’re down at the bottom, hanging out by themselves.

Having this full list is helpful…but you can make it even better. Select a single letter in your word—the first “e,” for example. Then in the Glyph window, click the dropdown to show Alternates for Current Selection. This will just show you all of the different lowercase “e”s you have to choose from! That is SO much easier than sorting through the big list.

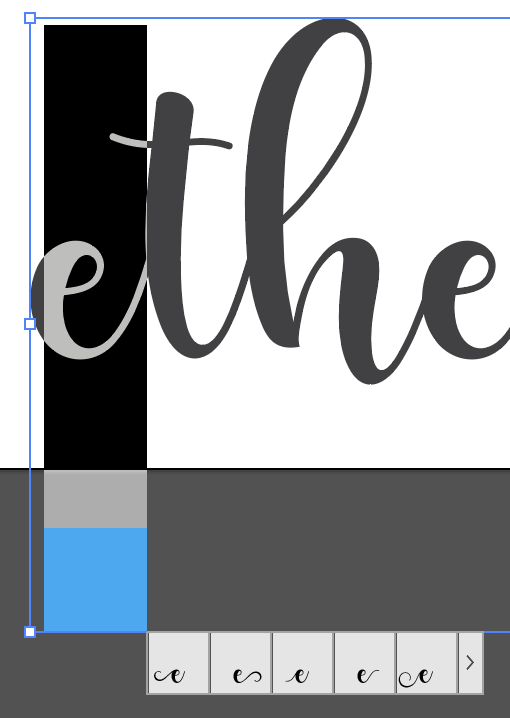
You’ll also notice that when you have a letter selected, it pops up a little responsive selector box below your letter, allowing you to choose your glyph directly. I don’t use this as often (it is tiny), but you might find it helpful!

Continue until you’ve selected all the glyphs you’d like in this word. The only letters that remained the same in mine are the “h” and that last “e.” The second “e” is a bit bouncier, the “r” has a bigger loop up top, and the “a” drops down a bit more than the original one. The other letters, obviously, have flourishes.

Want to export this to cut on your Cricut? Check out my post, How to Make SVG Files Using Adobe Illustrator!

Ligatures in Illustrator
One final note on ligatures. What the heck is a ligature? Ligatures are a type of glyph where two or more letters are combined into a single letterform. The most-used example is “fi” in a classic-style typeface, like Baskerville:

The one on the left is, frankly, ugly, with the overlapping “f” and “i.” The combination of the “f” and the “i” into a single ligature glyph is much more pleasing to the eye. Most classic fonts have ligatures built in, but many newer fonts do not. More and more, however, I’m finding them lurking in that dropdown menu in the Glyph window. For example, Isabella Script has a handful of pretty ligatures (in teal):

Illustrator will often combine the two letters together for you, right as you’re typing (Cricut Design Space does not do that, but you can read here about how to access ligatures in this post). And you can always look in that dropdown menu in the Glyph window for them as well! Sometimes there’s an option for “Standard Ligatures.”
I hope you found this using glyphs in Adobe Illustrator tutorial helpful. I know that Illustrator can be a beast—there’s just SO much you can do with it! But keep at it—soon you’ll be an Illustrator pro, and you’ll be able to create artwork so much faster than you can in Cricut Design Space!


Comments & Reviews
judith levinsky says
Who knew? Thanks so much. If I learn one thing every day from you I will be a happy designer (illustration novice) Photoshop is my go to.
YEAH