The Pen tool is one of the most robust tools in Adobe Illustrator. But it can be very confusing and overwhelming for beginners! Here’s to use the Adobe Illustrator Pen tool to make simple illustrations for your SVG files.
Welcome back to my tutorial series on Adobe Illustrator for folks who want to design their own SVG files! We’re learning everything you need to know to design beautiful SVG files that are easy to cut on a Cricut, Silhouette, laser, or other cutting machine.
These tutorials build off one another, so if you got to this post but haven’t read through the others, I’d head to the beginning and start there. There will be concepts in this post that are explained in more detail in earlier posts!
- Workspace Overview (video)
- Paths, Anchor Points, and Handles (video)
- Make an SVG from a Font (video)
- Tips for Using Fonts in SVGs (video)
- Color Basics (video)
- Using Shapes and Lines to Make Illustrations (video)
- Using the Pen Tool (video)
- Creating Fun Text Effects (video)
- Image Trace (video)
- 10 Quick Tricks for SVG Design (video)
Today we’re tackling one of the most robust and capable tools in Adobe Illustrator: the Pen tool. This tool gives you the ability to create just about anything you can dream up, but it’s definitely on the more intimidating end of the spectrum. To start to get comfortable using this tool, we’ll be making some simple illustrations that you can use in your SVG files. These are illustrations that are harder to make than just using the shape tools alone.
This lesson will dive heavily into what we discussed in the Paths, Anchor Points, and Handles lesson, so make sure you are familiar with all of that terminology.
Then you can combine what you learned in this post and last week’s post about making illustrations using shapes to create a world of unique illustrations for your cut files!
As always, I encourage you to use keyboard shortcuts. They will speed up your workflow and you’ll be much faster at creating your SVG designs. I use shortcuts in this lesson in parentheses. You can also download a keyboard shortcut printable below to help you remember the most popular shortcuts for SVG design.
Watch the Video
A lot of this tutorial is much better explained in video! Just click play below. Or read on for a written tutorial!
Get the Free Illustrator Shortcuts File
Want access to this free file? Join my FREE craft library! All you need is the password to get in, which you can get by filling out the form below. The file number is: P121.
How to Make Simple Illustrations with the Adobe Illustrator Pen Tool
There are two ways to create curvature to your paths and corners when using the Pen tool. The first is to create a shape with the Pen tool (P) with no curves, and then add them using the Anchor Point tool (C). I think this method is easier for beginners and it’s generally how I use the Pen tool, so that’s the process we’ll use here.
You can also click AND drag as you are using the Pen tool (P) and that will create curves as you go. I’ll be honest—I just have not gotten the knack for drawing this way. You’ll see other tutorials out there that use this technique and if you want to try it, go for it! I’m sure it works really well for some folks, I just don’t happen to be one of them!
Heart
Hearts are a great way to get a feel for how the Adobe Illustrator Pen tool works. I make them all the time for different SVG files and each one is a little different!
Select the Pen tool (P). Click to make anchor points and draw this type of shape, making sure to enclose your path (meaning that your path ends in the same place you started).
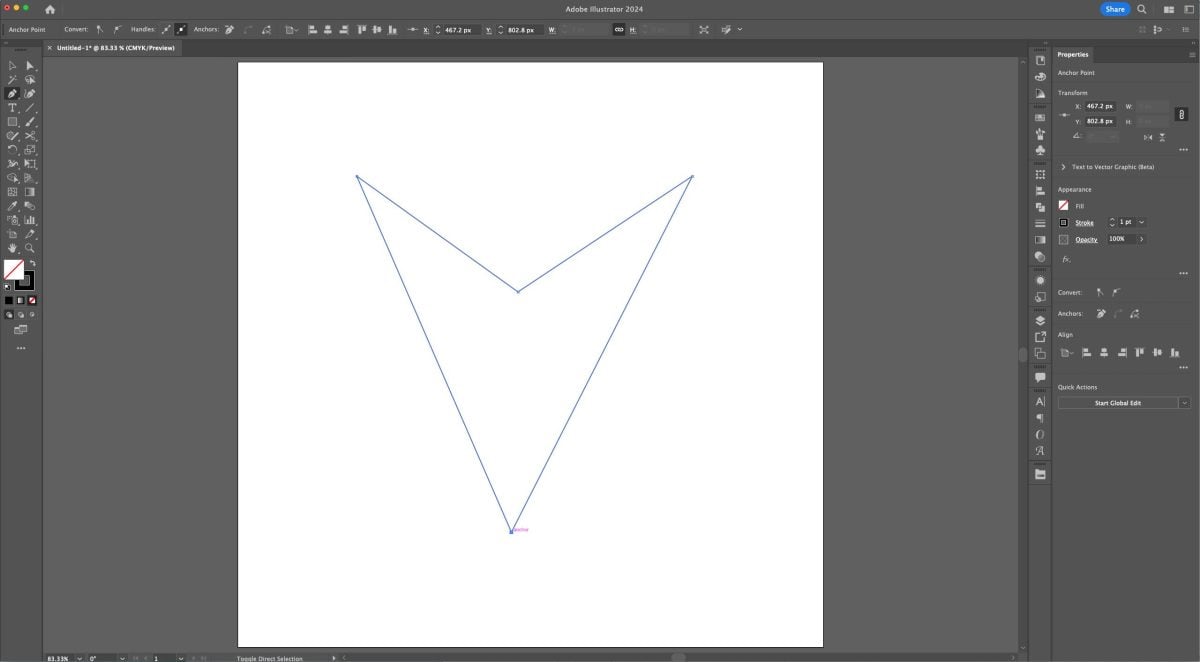
Select the Anchor Point tool (Shift+C). Click and drag one of the top points of your shape to the left until you have half a heart. Do the same with the other top point. If you don’t like what you’ve done, simply click on that anchor point to return it to where you started. You can even curve that bottom point slightly if you’d like.
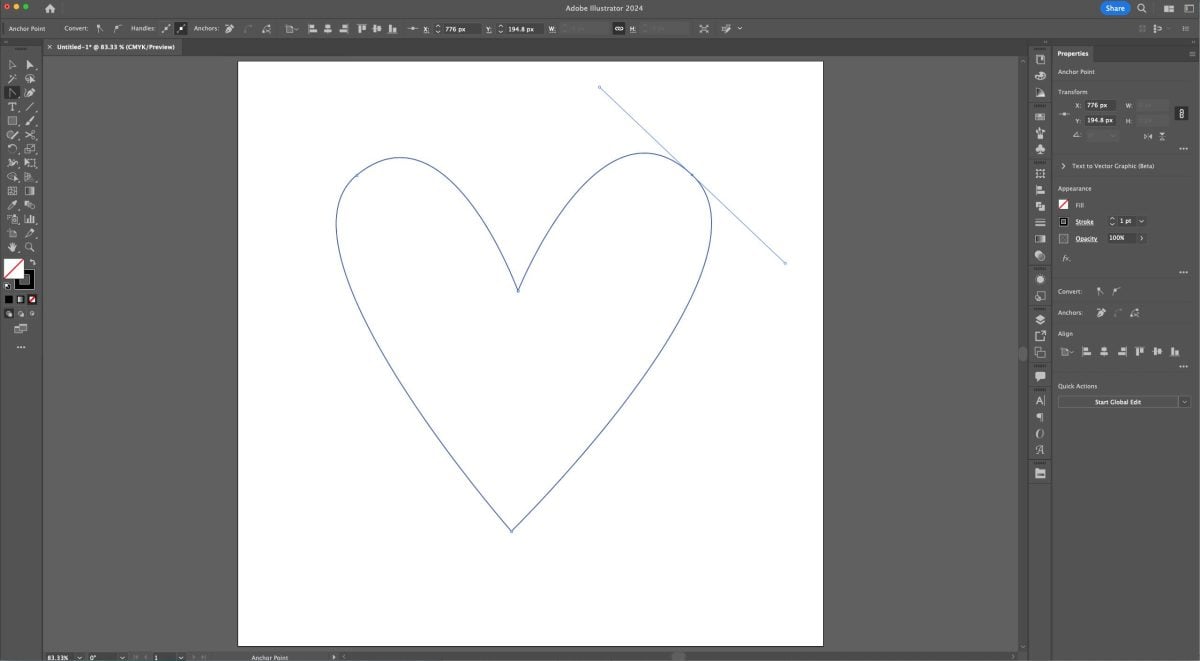
Easiest heart ever! You can make all sorts of heart shapes depending on where you put your points and how much you drag to create the curves in your anchor points. Use the Color Basics lesson to change the color of your image.
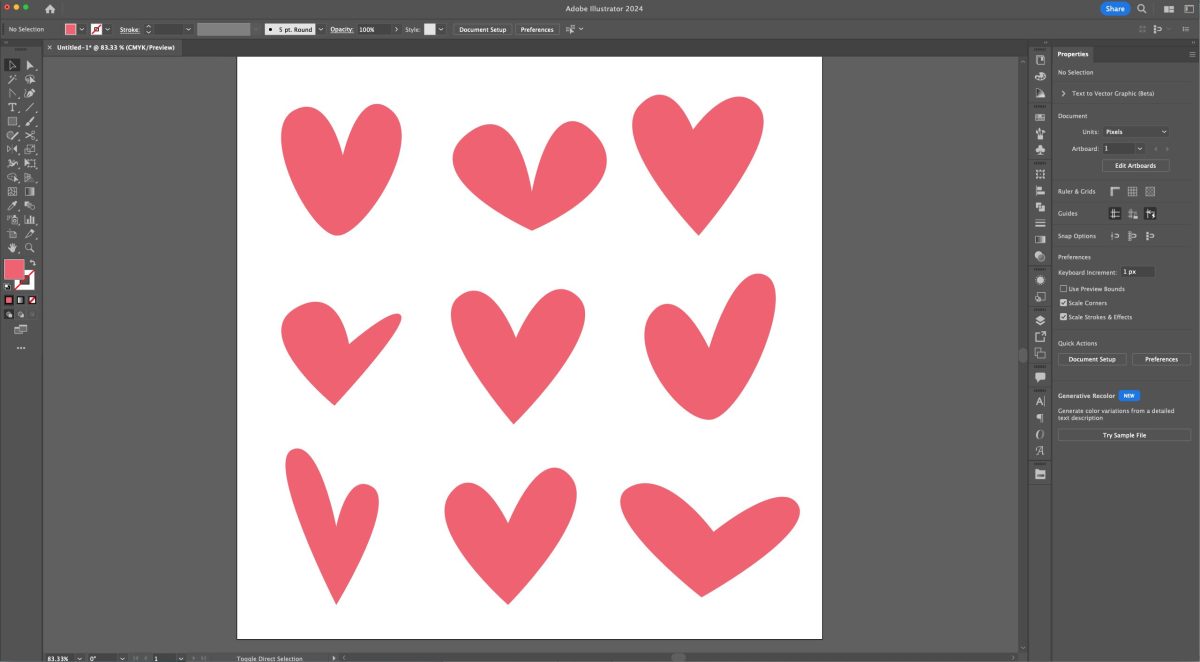
To export your heart image, make your heart a compound path (Command+8 (Mac) / Control+8 (PC)) and export!
Cactus
Next let’s draw a Cactus. I’m going to keep my lines black and white until the end to make it easier to see the shapes I am creating.
Select the Pen tool (P). Draw a very tall triangle shape, making sure to enclose your path.
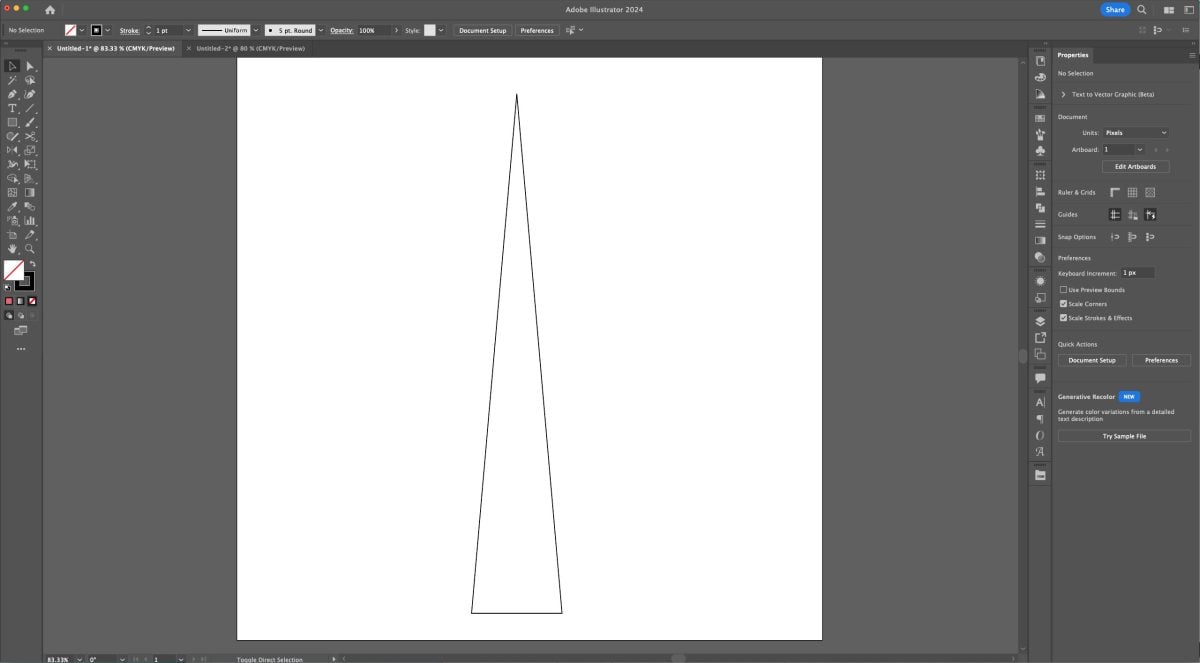
Select the Anchor Point tool (Shift+C). Click and drag the top point on the triangle toward the left until it’s rounded.
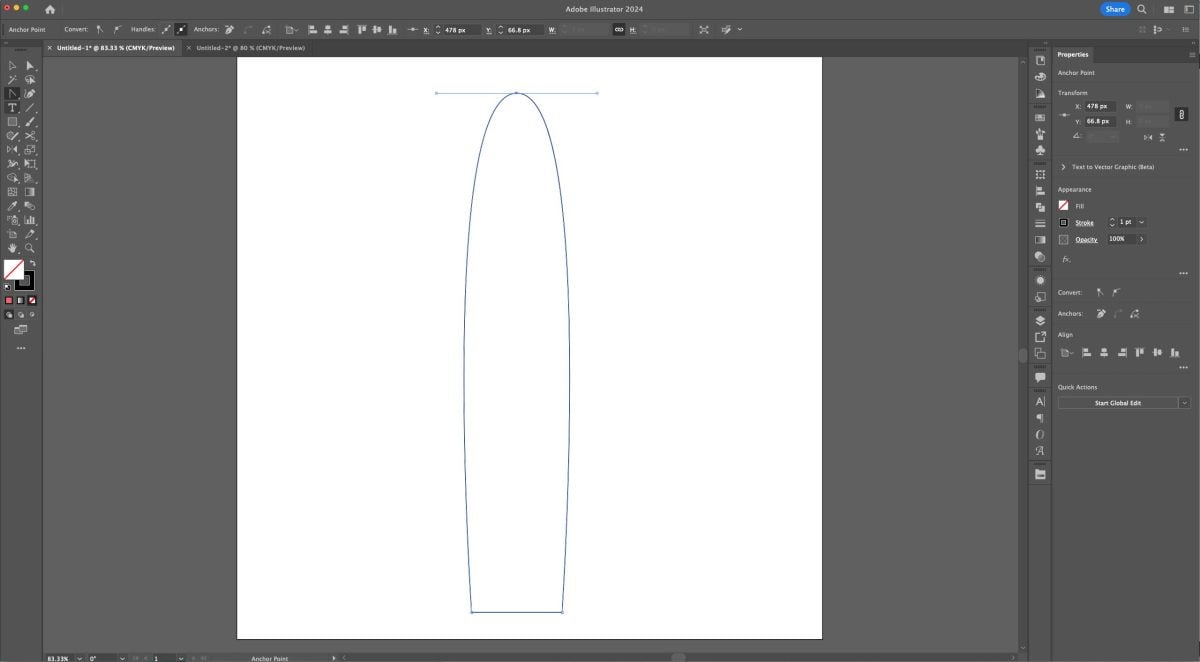
That’s our basic cactus body shape. Now let’s do the arms. Select the Pen tool (P) and we’re going to basically draw a cactus arm as we think it would look without the curves. Make sure to enclose the shape.
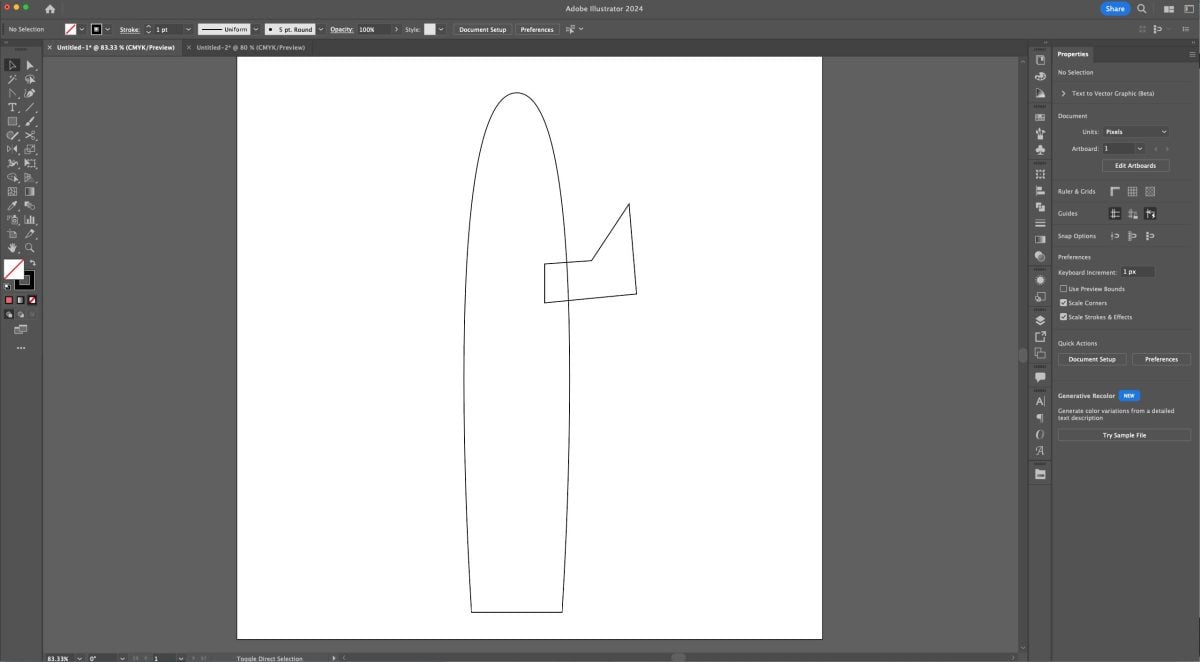
Select the Anchor Point tool (Shift+C) and click and drag on the anchor points to round out the corners of your cactus arm. You don’t need to worry about the ones that are overlapping the bigger piece, but you can adjust those if they help you get the shape you’d like.
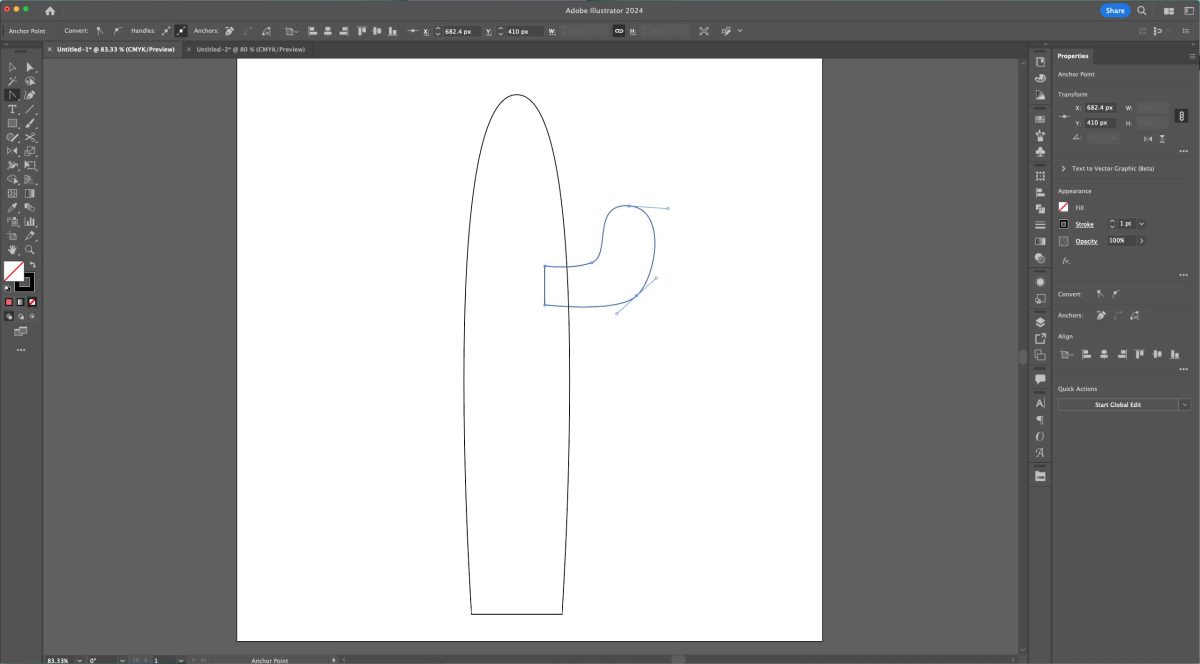
Now let’s duplicate that arm with copy (Command+C (Mac) / Control+C (PC)) and paste (Command+V (Mac) / Control+V (PC)). Select the new arm (V) and use the keyboard shortcut O+Enter to open the Reflect Tool. Make sure “Vertical” is selected under Axis and press OK.
Drag your duplicated arm to the other side of the cactus. If you’d like, choose the Direct Select tool (A) and click and drag on the top anchor point in that arm to make it a bit taller than the other.
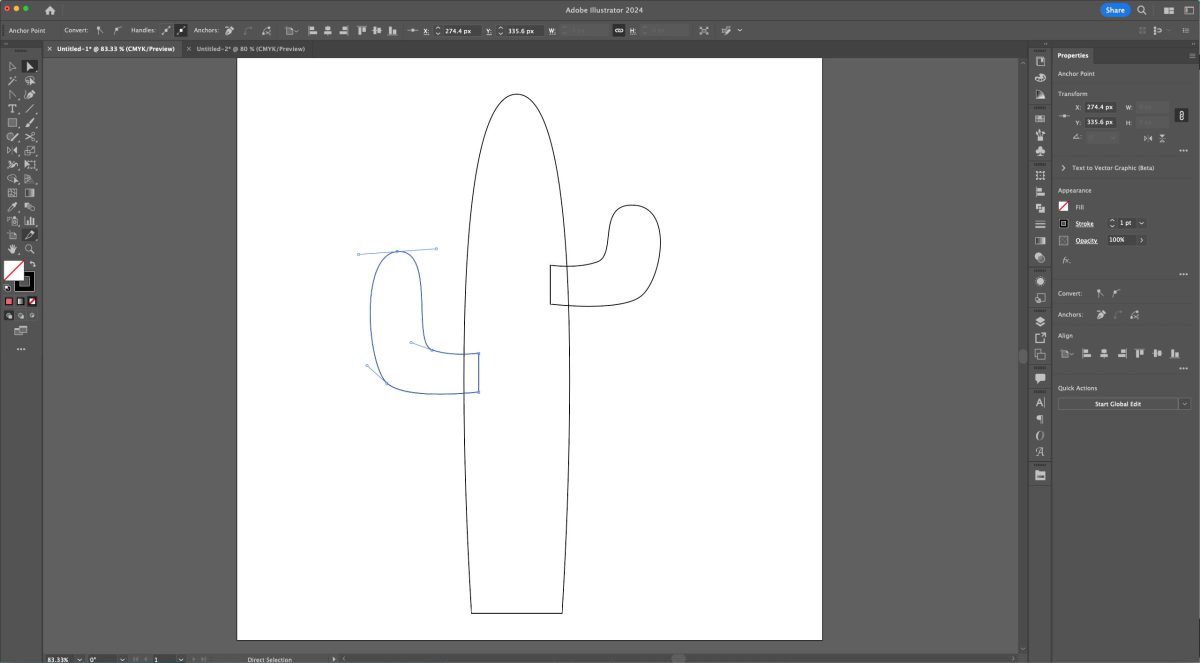
Now let’s make this into a single cut piece. Select all of the pieces of your cactus (drag over all the pieces or use Shift+A) Open the Pathfinder Panel on the left (go to Window > Pathfinder if you don’t see it). Then Select the first icon in the top left to unite all the pieces into a single shape.
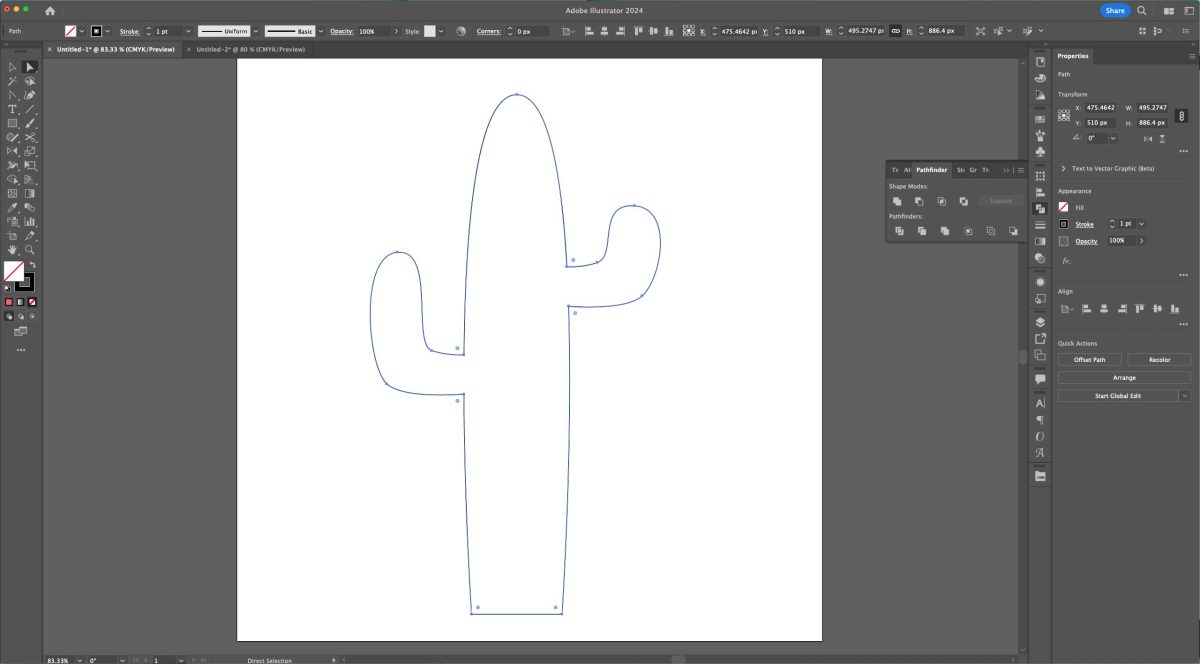
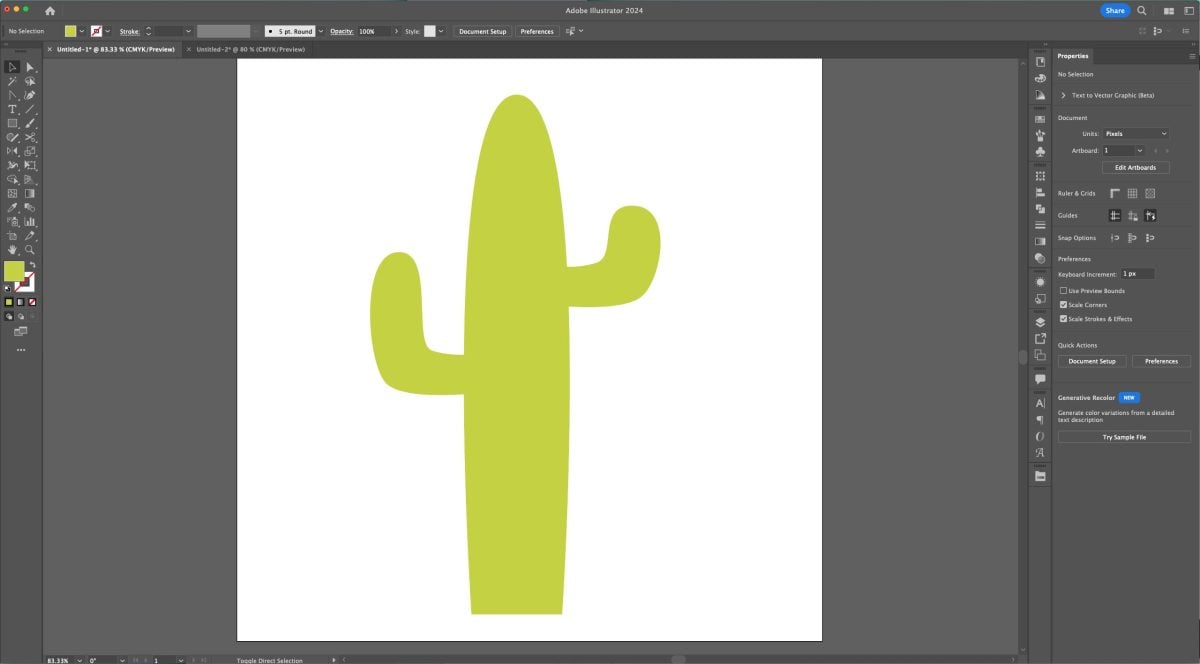
Then you can recolor your image, make it a compound path (Command+8 (Mac) / Control+8 (PC)) and export it!
Flower
Let’s take it up a bit and create a multi-layer SVG using the Pen tool and some of the other tools and techniques I’ve covered in the other tutorials so far. I’m going to keep my lines black and white until the end to make it easier to see the shapes I am creating.
Start by drawing a circle (L).
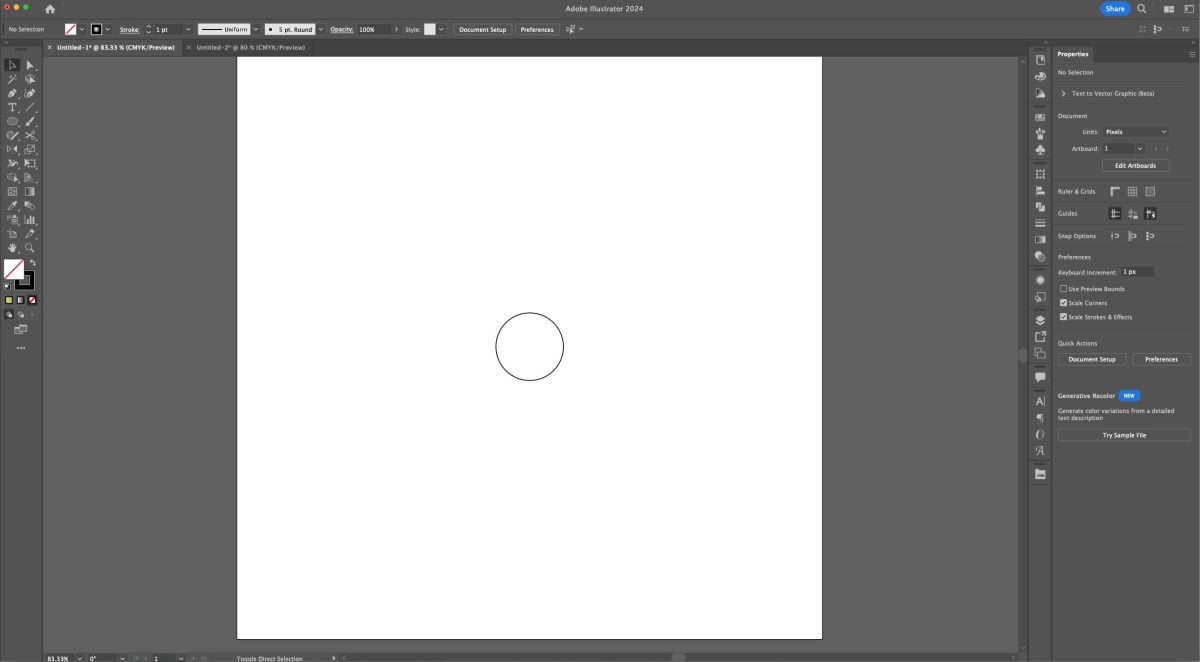
Make sure the circle is not selected (click off of it). Select the Pen tool (P). Click to create an anchor point at the top of the circle, then one an inch or two above the circle, and then back on the first point you made. You’re basically making a closed 2D path.
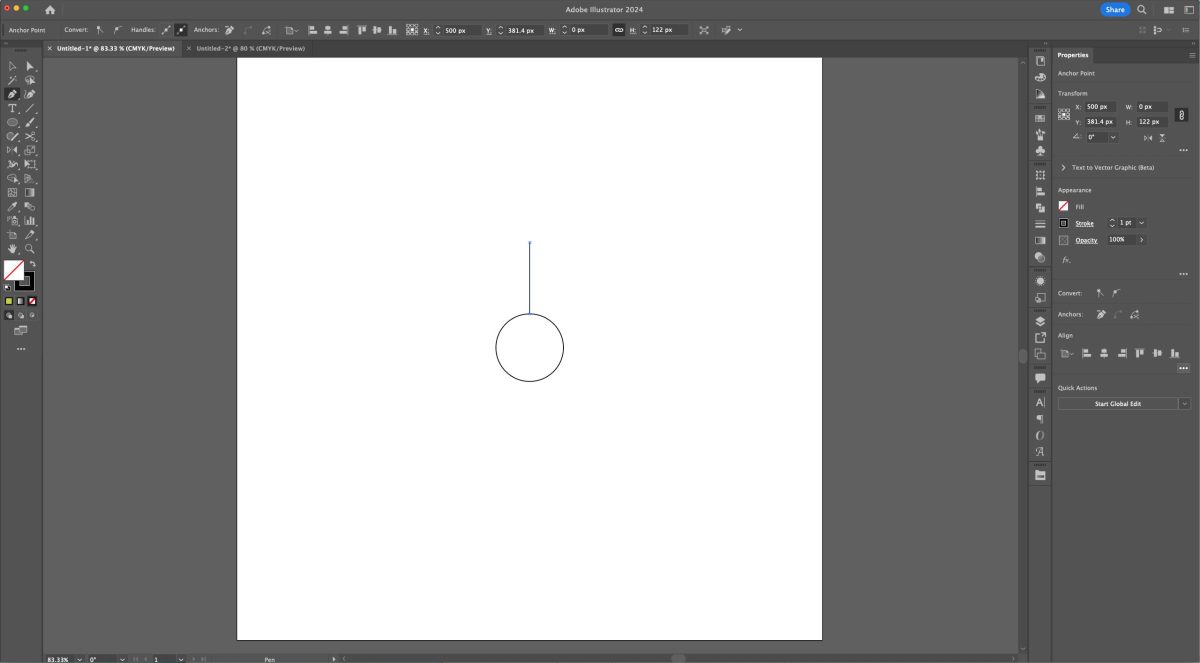
Select the Anchor Point tool (Shift+C). Click and drag the bottom anchor point toward the right to create a petal shape.
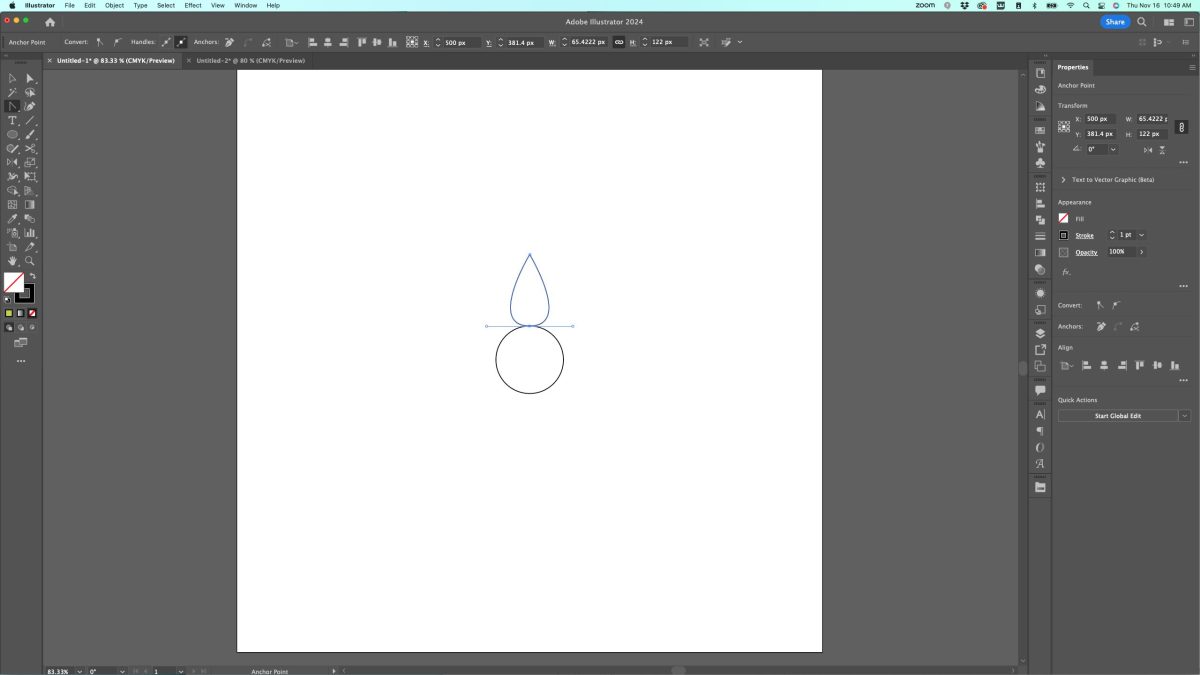
Now let’s duplicate that petal shape and rotate it around the circle (we did this with the sun in the last lesson). Select the petal (V).
Hit “R” on your keyboard to activate the Rotate tool, and then use your mouse to click in the direct center of your circle. There should be a guide that says “center” when you hover over it. This will tell the Rotate tool to rotate our petal around the center of the circle.
The Rotate window will open when you click.
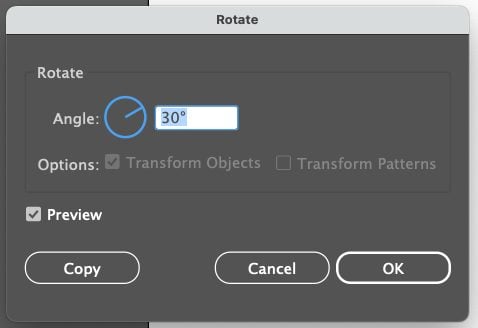
You can use whatever angle you’d like here, just make it nicely divisible by 360°. I chose 30°. Then click Copy (not OK!).
This will copy the petal at the specified rotation angle.
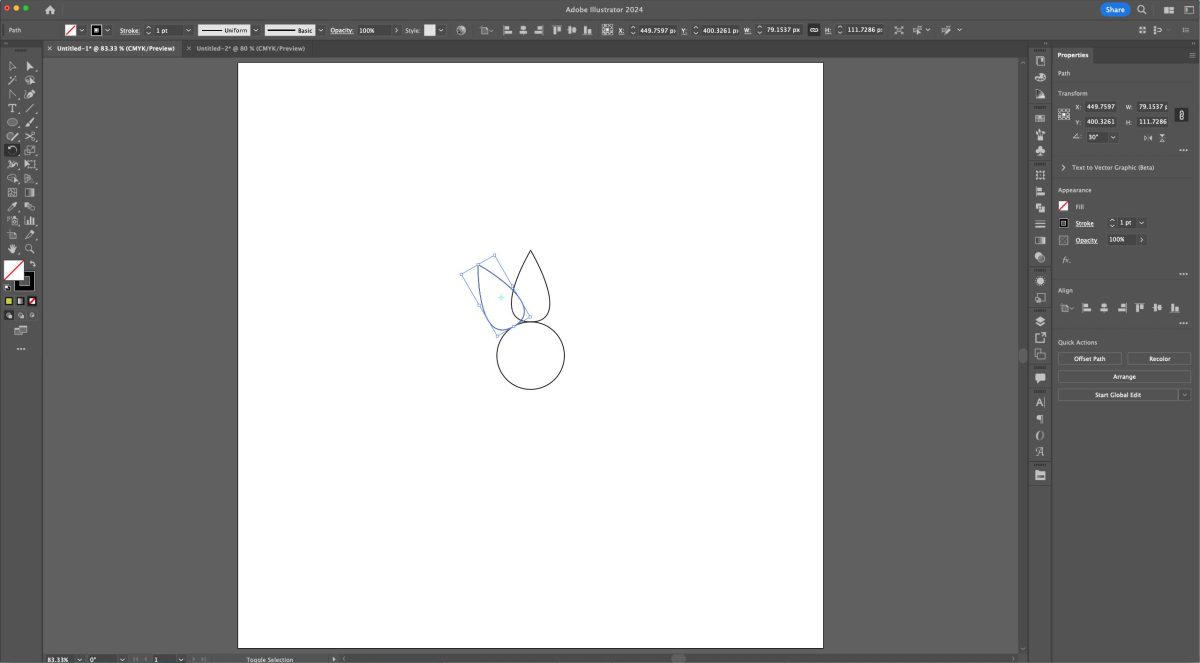
Then comes my favorite part. Use Duplicate (Command+D (Mac) / Control+D (PC)) to fill in all of the petals around the circle. As long as you clicked right in the center of the circle and you used a rotation degree divisible by 360°, it should work perfectly!
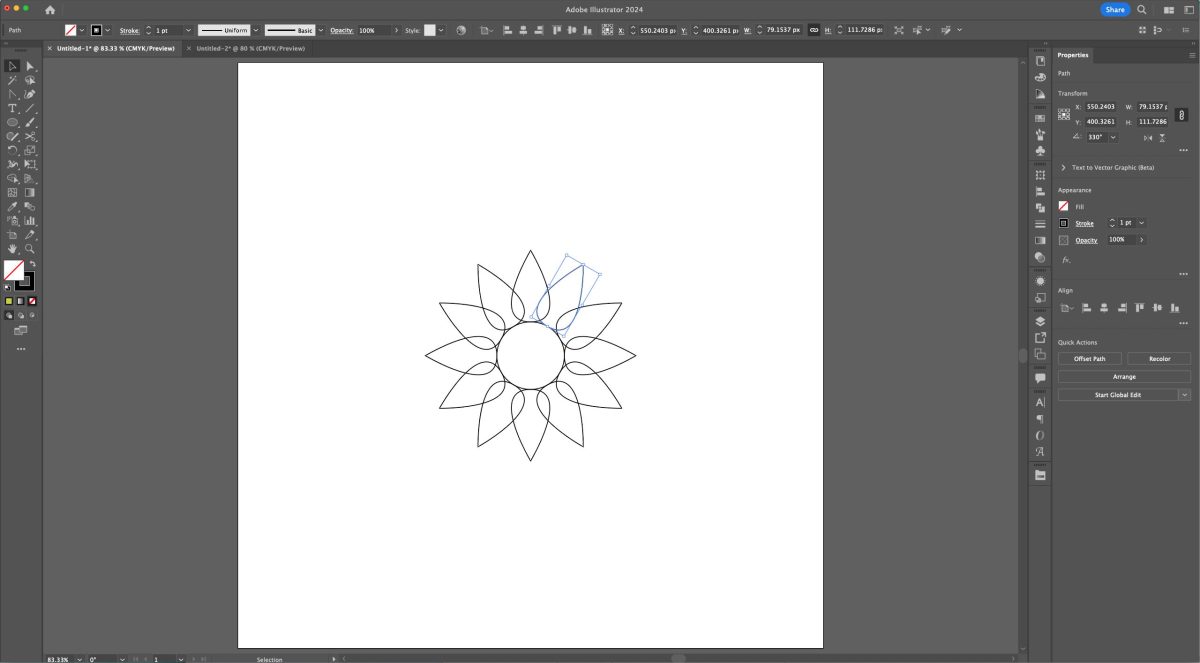
Now let’s select that center circle (V) and make it a bit bigger. You just want it to cover the “holes” between the petals and the circle.
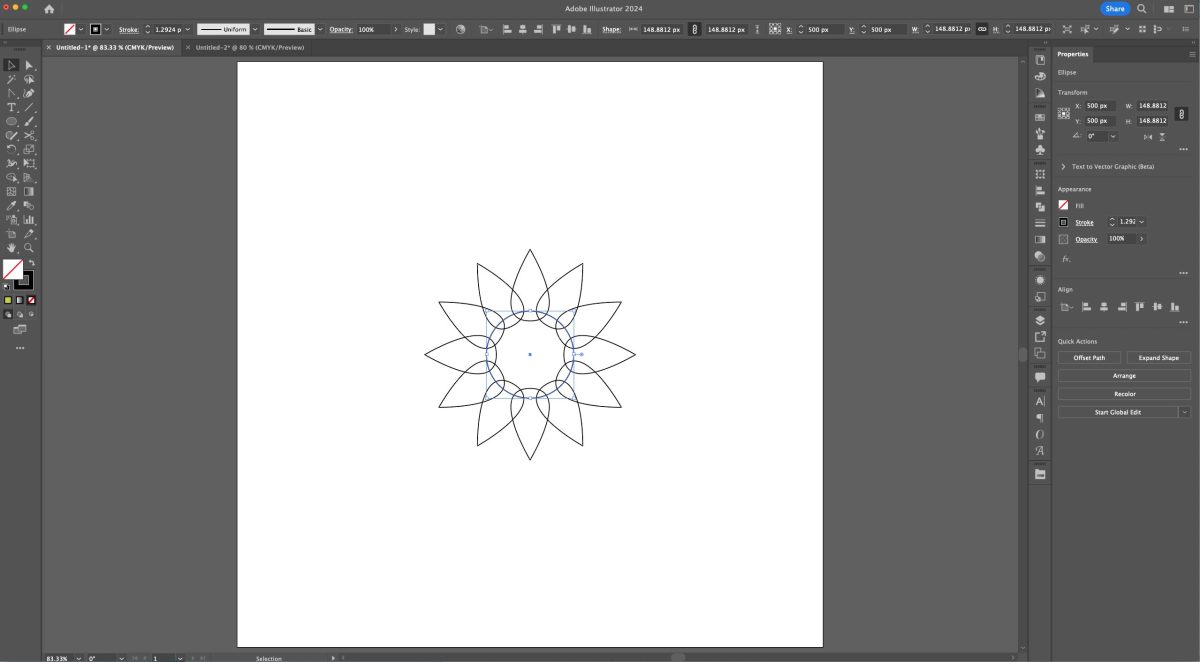
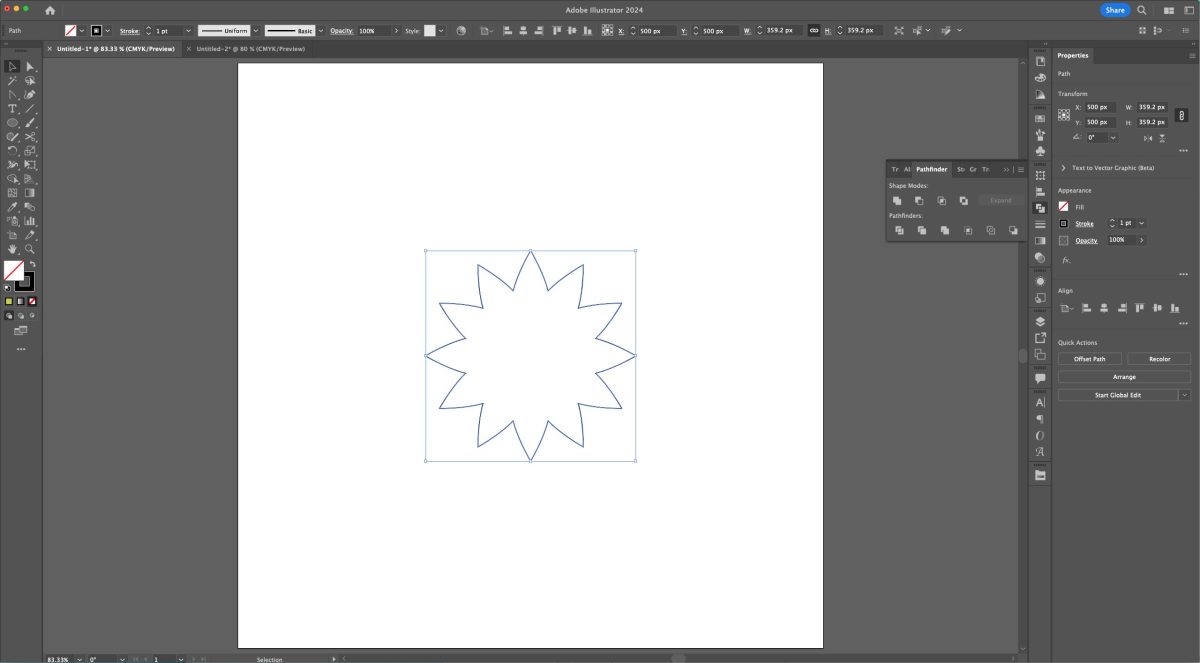
Then open the Pathfinder Panel and choose the first option to unite the entire shape. This gives us a starburst but with nicely curved petals for our flower.
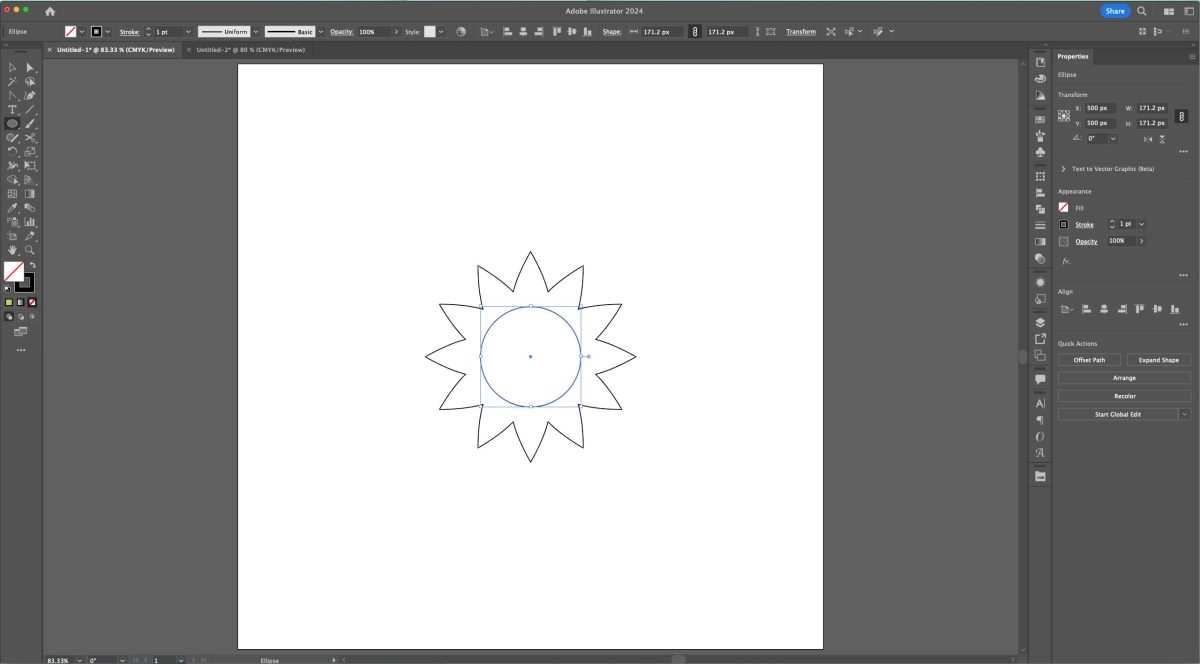
Now draw a second circle (L) in the middle of the flower. This will be the actual center of our flower.
Now let’s draw the stem. You can do this using the Line tool (\) or using the Pen tool (P).
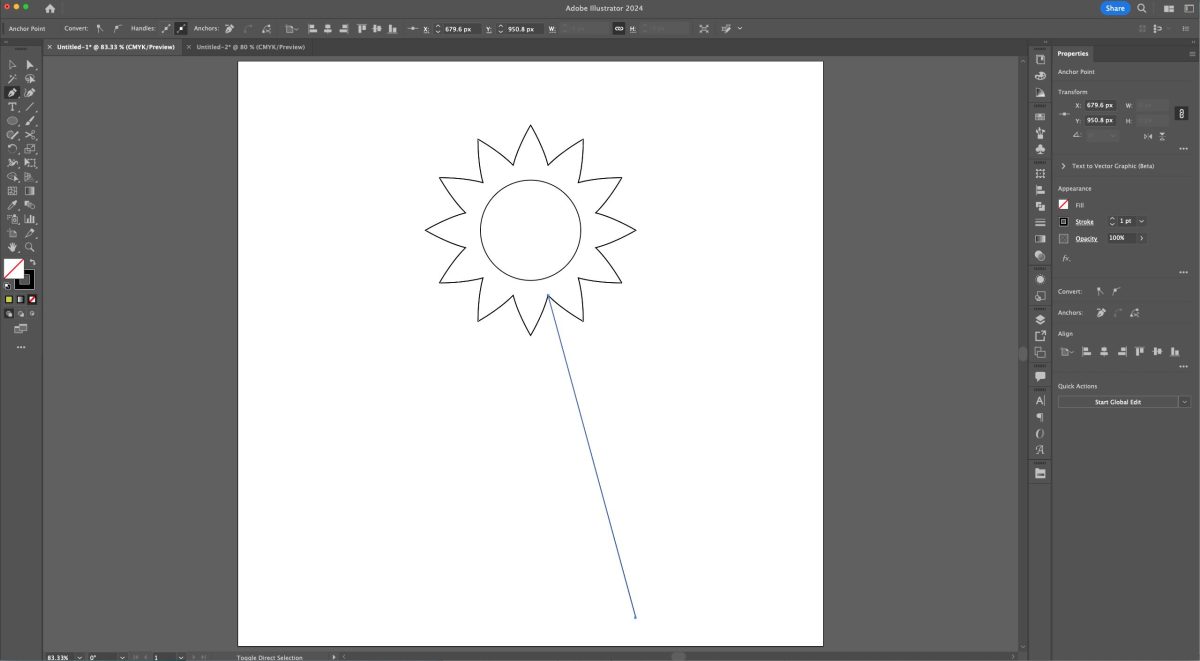
Use the Anchor Point tool (Shift+C) and click and drag on the center of the stem to bow it a little bit.
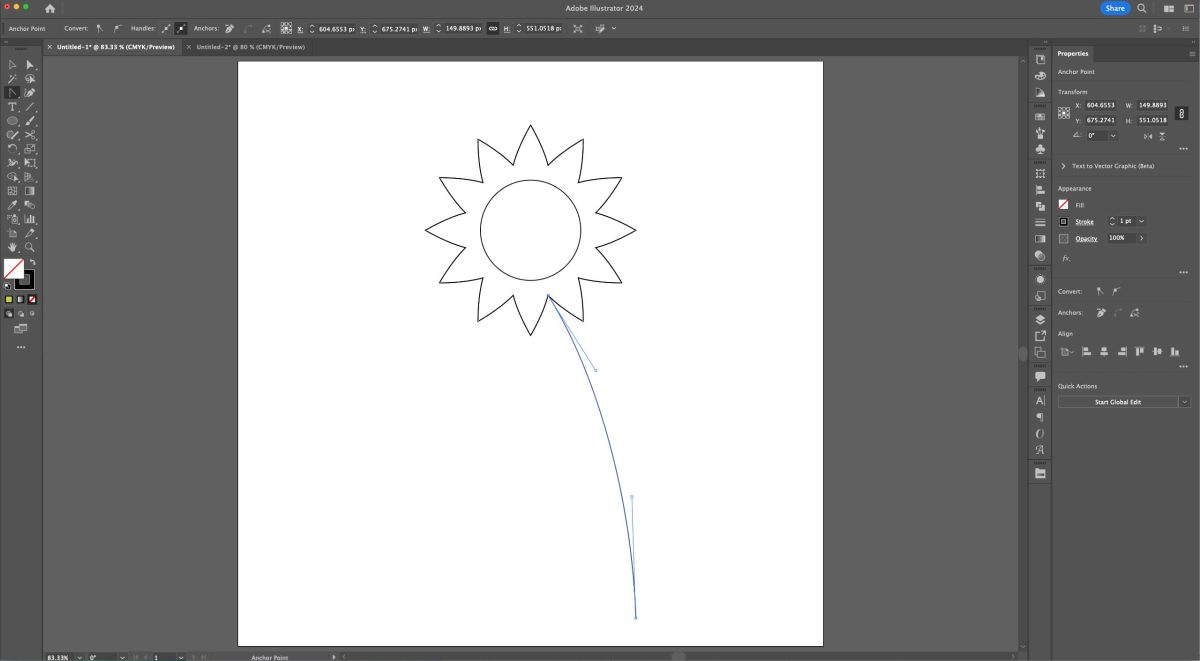
Now we’re going to draw that 2D closed shape again. Click off of the stem and choose the Pen tool (P). Click and add an anchor point on the stem, then one up and to the right, and then one back on top of where you started.
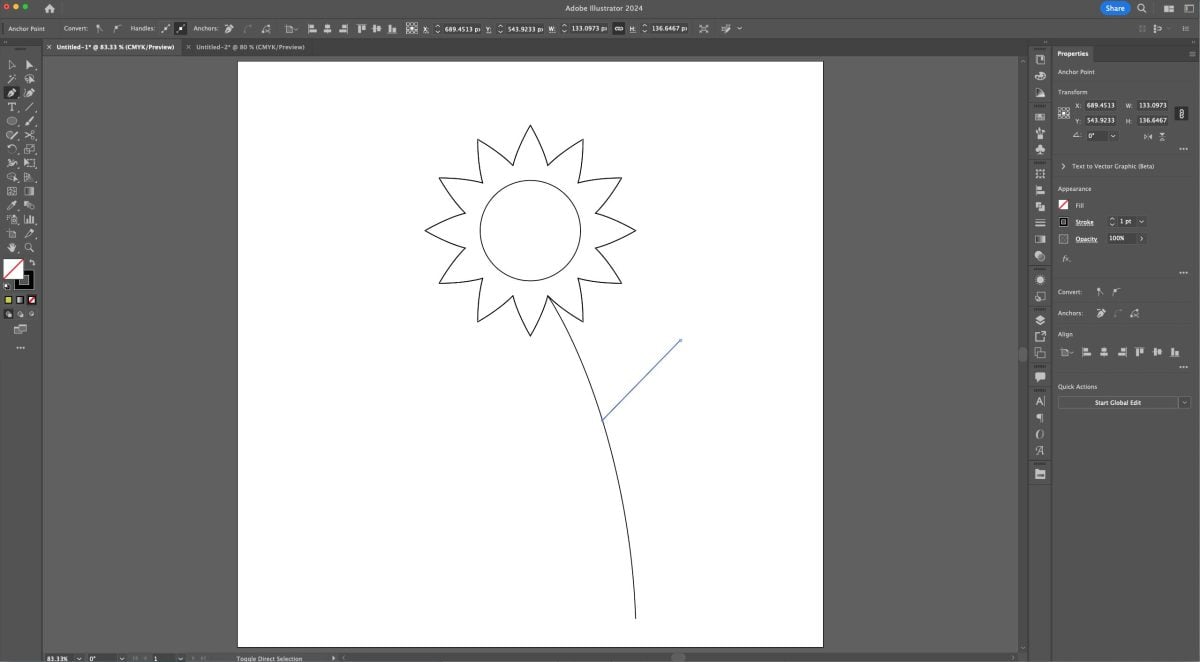
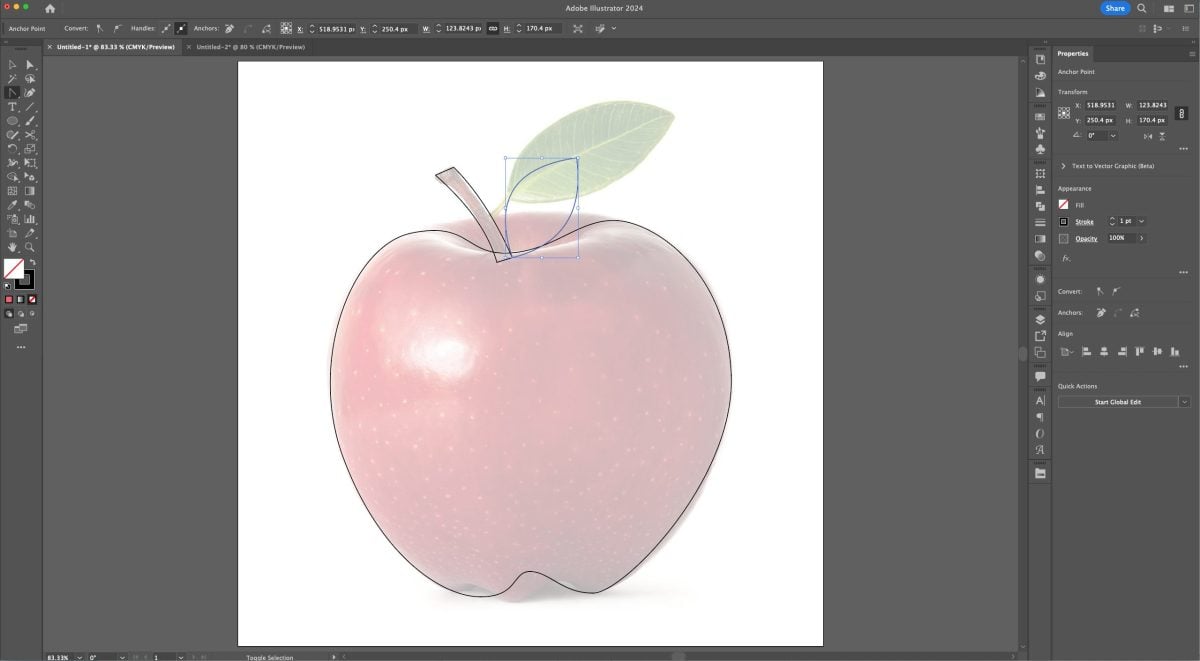
Now to create a leaf shape, use the Anchor Point tool (Shift+C) and click and drag from the center of the path (vs. at either end) to create half a leaf shape. Then do the same on the other side.
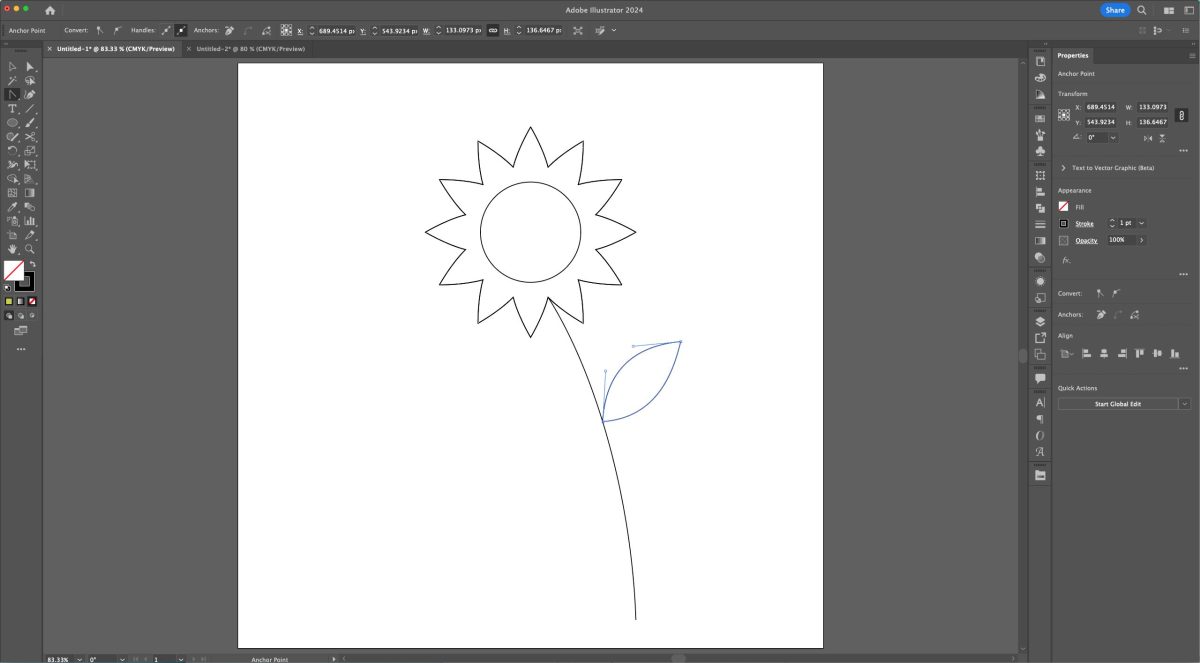
Now let’s color the closed paths of the artwork—the flower, the center of the flower, and the leaf.
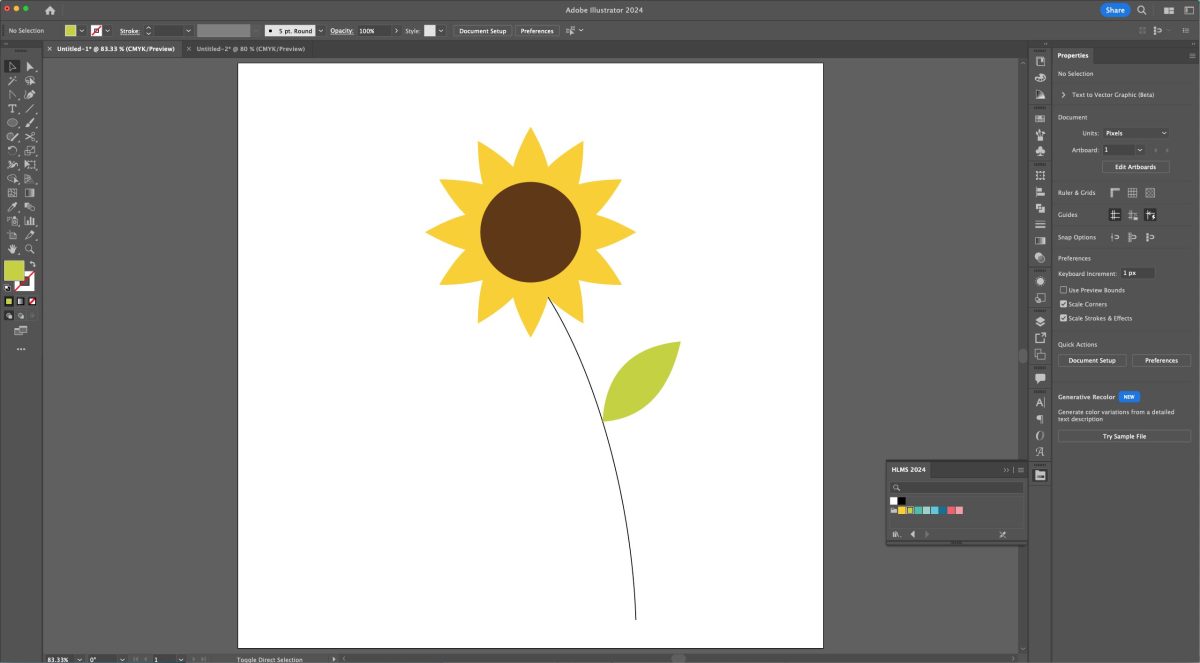
Now select the stem (V) and do a few things. First we’ll increase the stroke so it’s nice and chunky. Then change the end point to round in the Stroke Panel (again, we did this in the last lesson). Then change your stroke to green to match your leaf. I also made my stem a bit shorter using the Direct Selection tool (A).
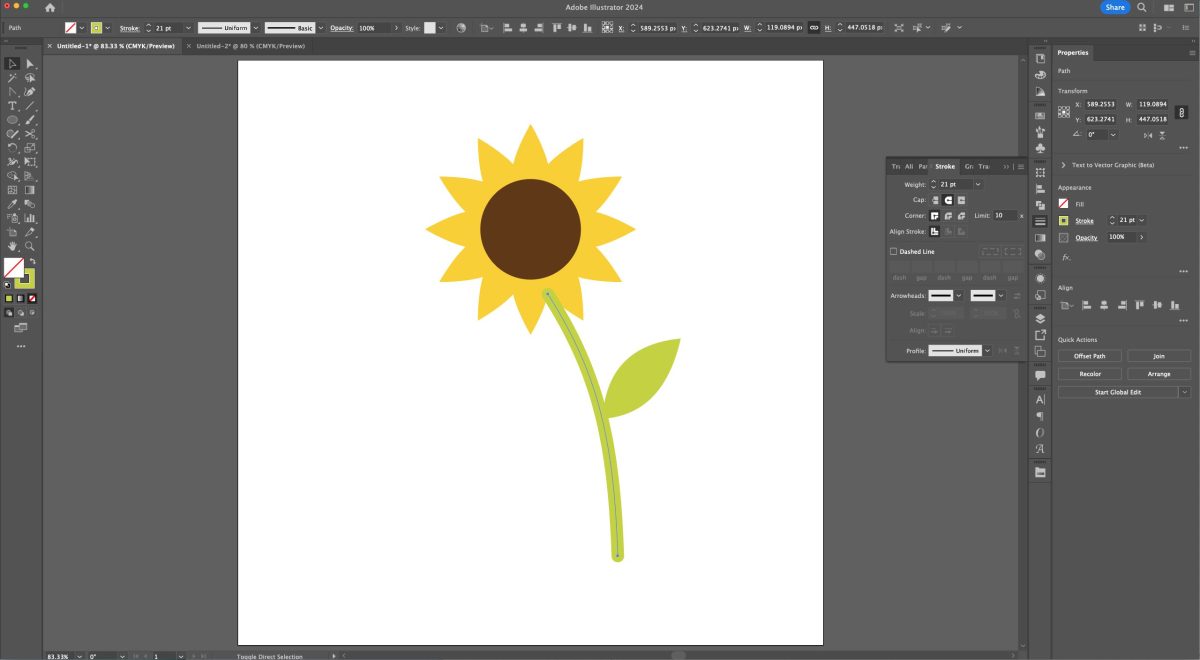
This is still a line, so we need to expand it into a shape so it will upload to the cutting software correctly. Select the stem (V) and then go to Object > Expand. This will open the Expand window.
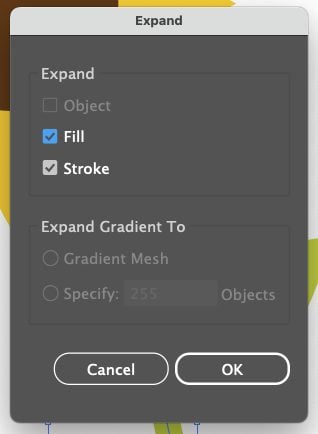
Make sure both Fill and Stroke are checked and click OK. You’ll now see an outline around your stem vs. the line inside the stem.
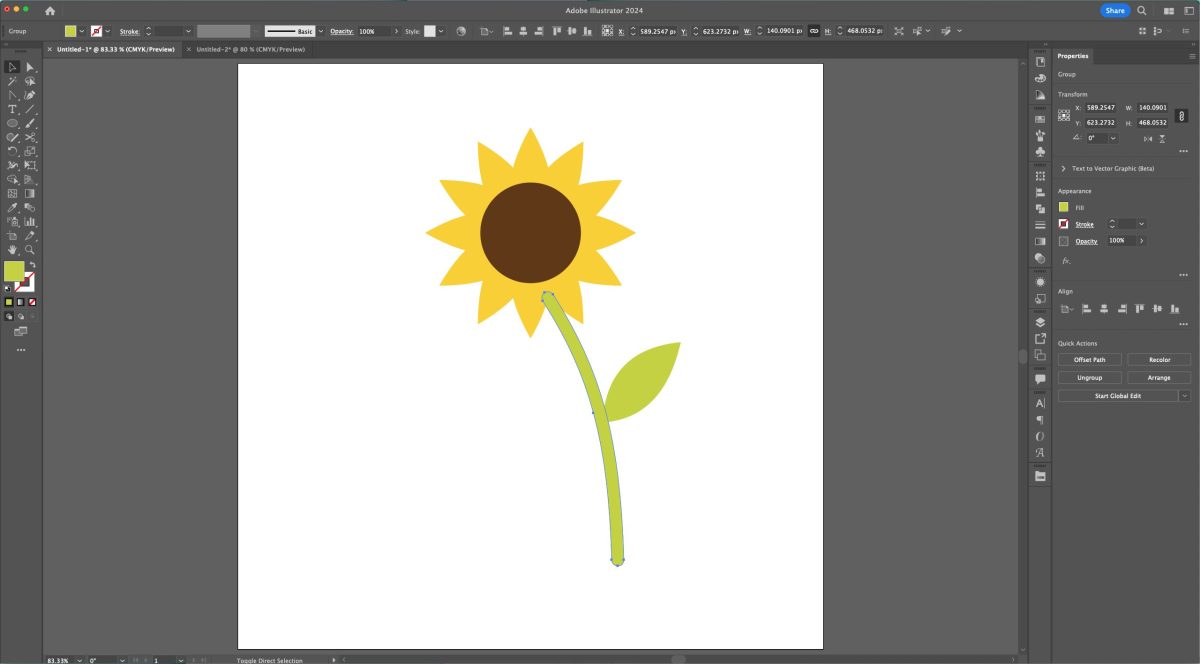
Now select both the stem and the leaf (V) and choose Unite in the Pathfinder Panel to make it a single shape.
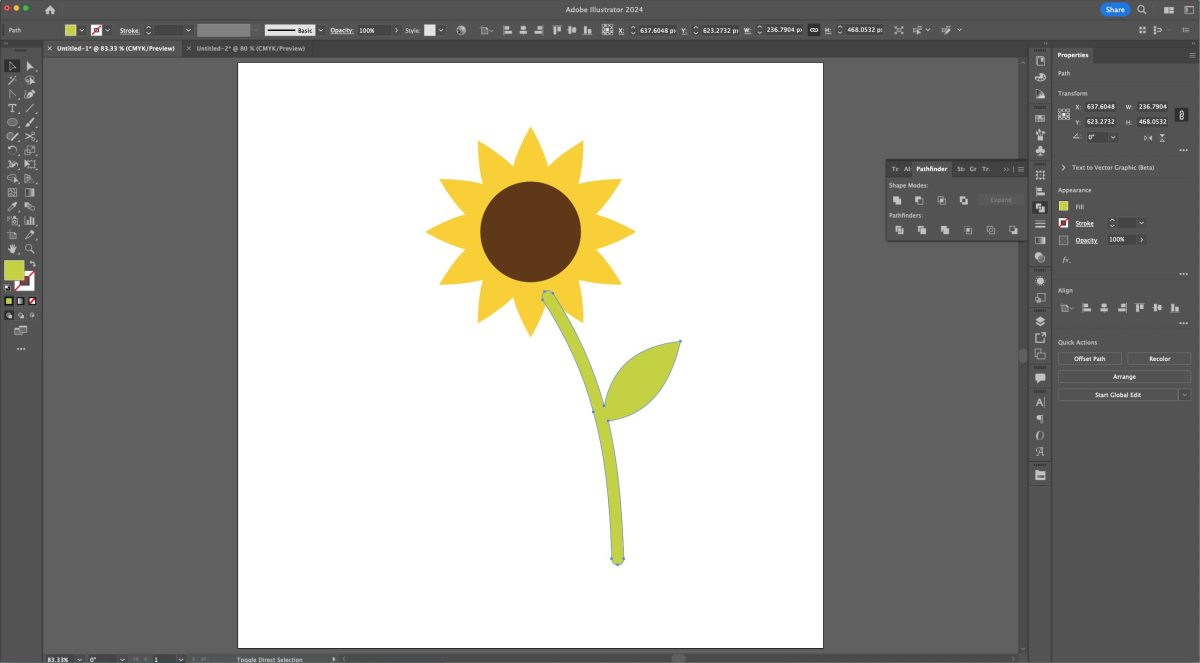
Now let’s move that stem to the back behind the flower. Select the stem and go to Object > Arrange > Send to Back, or use the keyboard shortcut Command+[ (Mac) / Control+[ (PC).
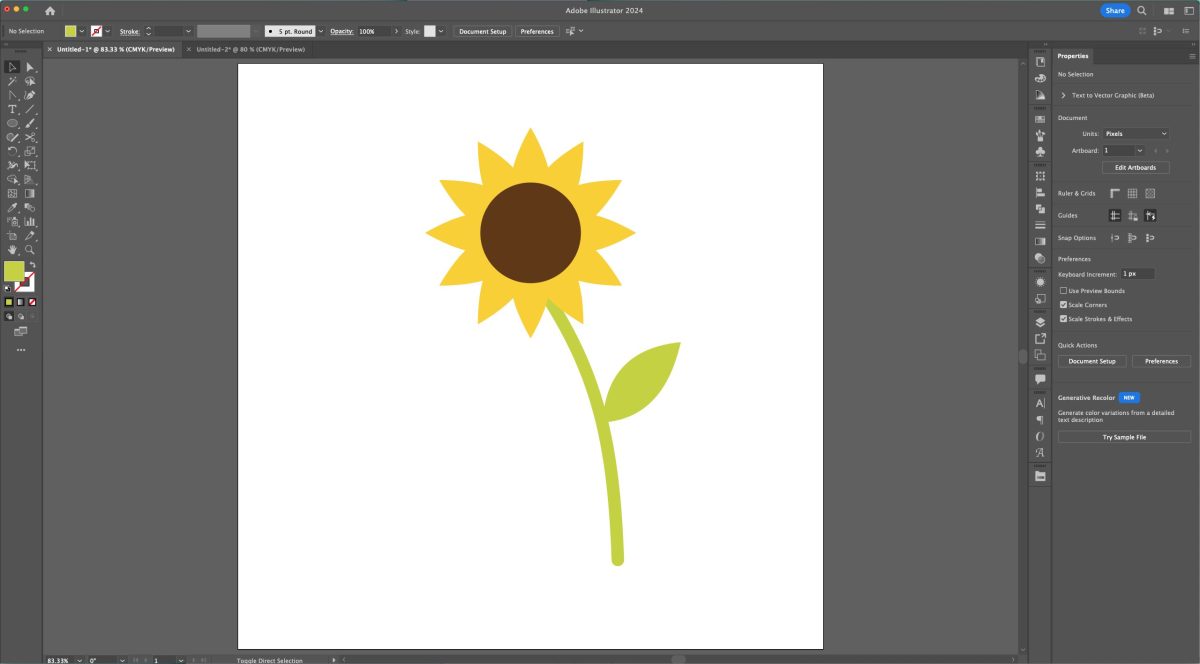
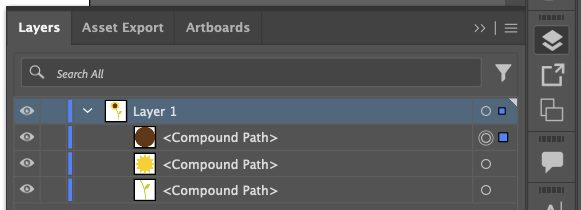
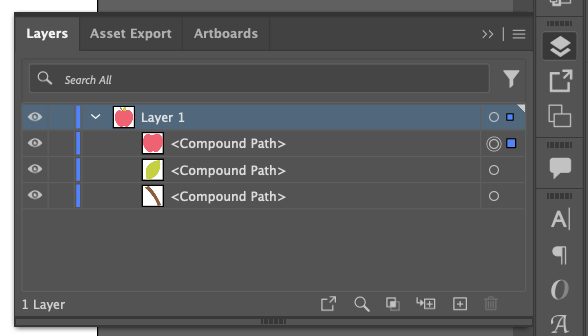
Our flower is just about done! Make each layer a compound path (Command+8 (Mac) / Control+8 (PC)). Double check your Layers Panel to make sure you don’t have any stray points. You should have a single layer with three compound paths below it. Then export!
Apple
Finally, let’s look at loosely tracing a photo to create an SVG. You can also do this with other images like PNGs and SVGs, but PLEASE do not copy people! That’s called stealing. Sometimes I will use another piece of artwork as a reference and then I will make changes as I go along so that it ends up being very different than my reference. Use what you’ve learned in this series to make your artwork your very own!
Start by finding an image of an apple you like. I found this one just in a Google search and saved it to my desktop. Go to File > Place ((Shift+Command+P (Mac) / Shift+Control+P (PC)) and place the apple photo on your artboard. Resize to be large enough to work with.
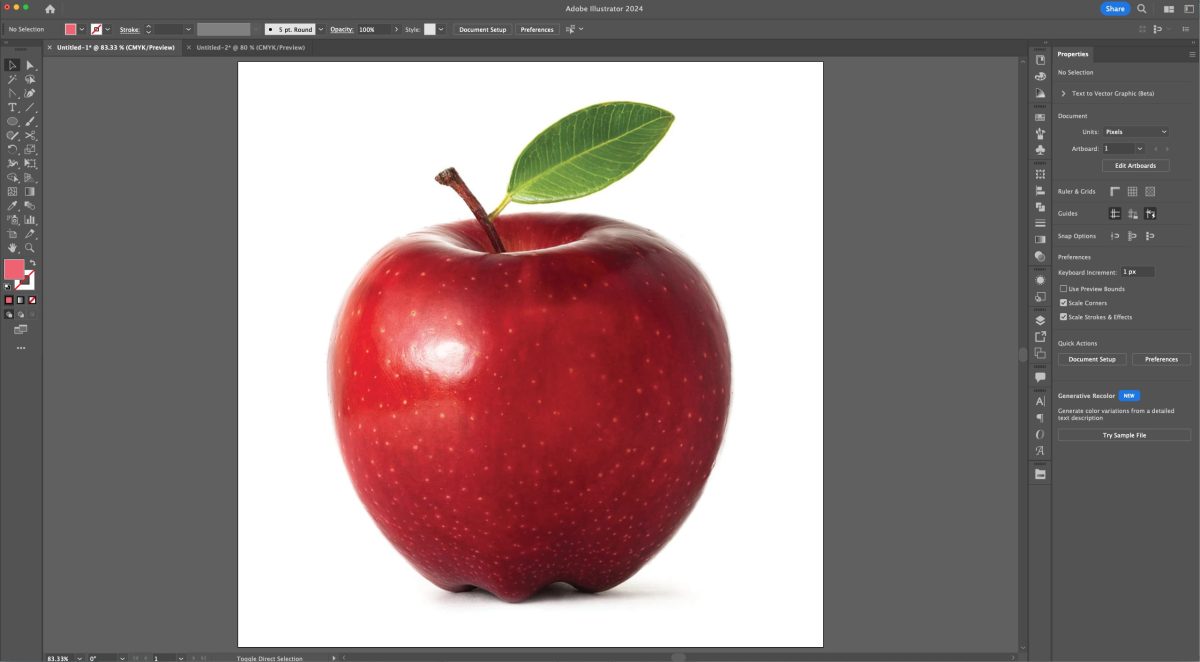
To make outlining easier, let’s change the opacity of the apple. Select the apple image (V). Open the Transparency Panel (Window > Transparency if you don’t see it) and change the opacity to about 30%.
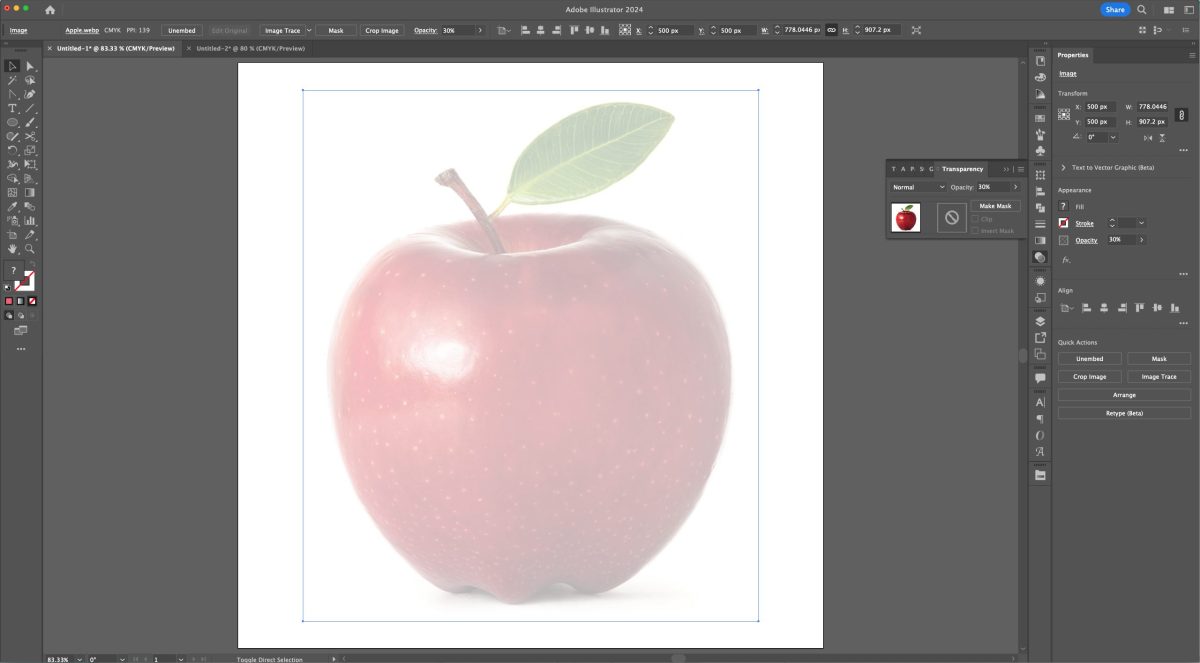
Now select the Pen tool (P). Loosely trace around the apple shape. I changed a few things as I went. I only wanted two “feet” on my apple, not three, and I wanted the apple to dip down at the top so I traced along the front contour instead of the back. When I first started doing this, I thought the more anchor points, the better. But I’ve found after doing this for years, that you actually don’t need a ton. You can always add more if you need using the Add Anchor Point tool.
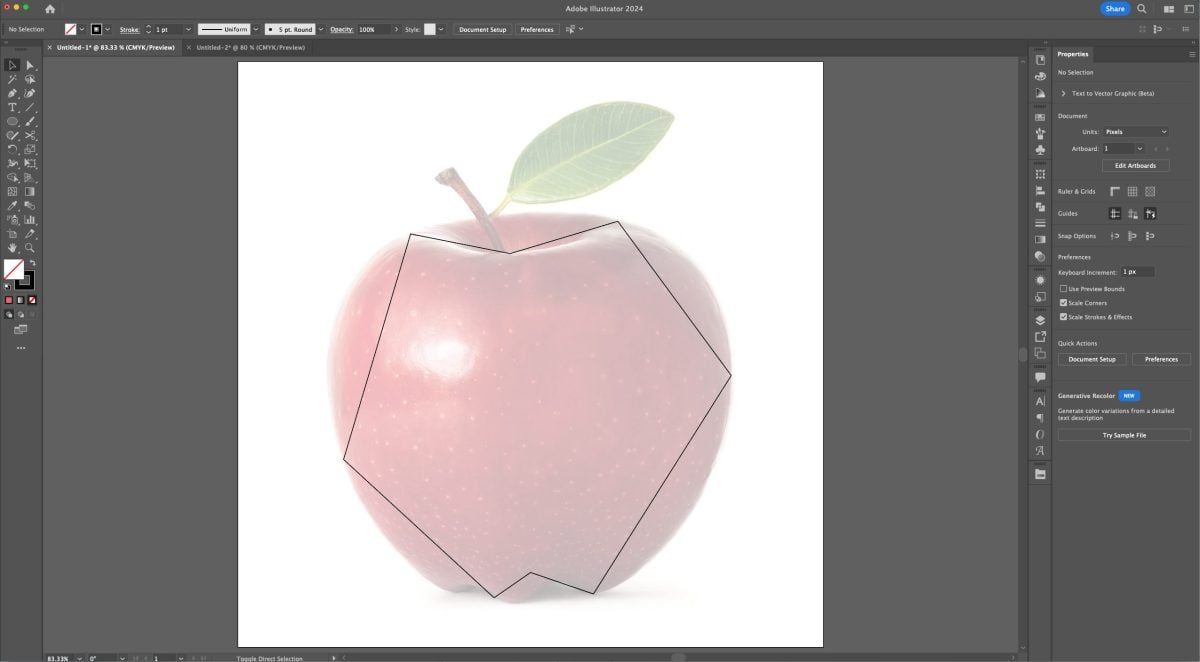
Now use the Anchor Point tool (Shift+C) to curve your anchor points. You can choose to click and drag on each path or each anchor point (I often use the anchor points but not always). Try to mimic the shape of the apple as you drag.
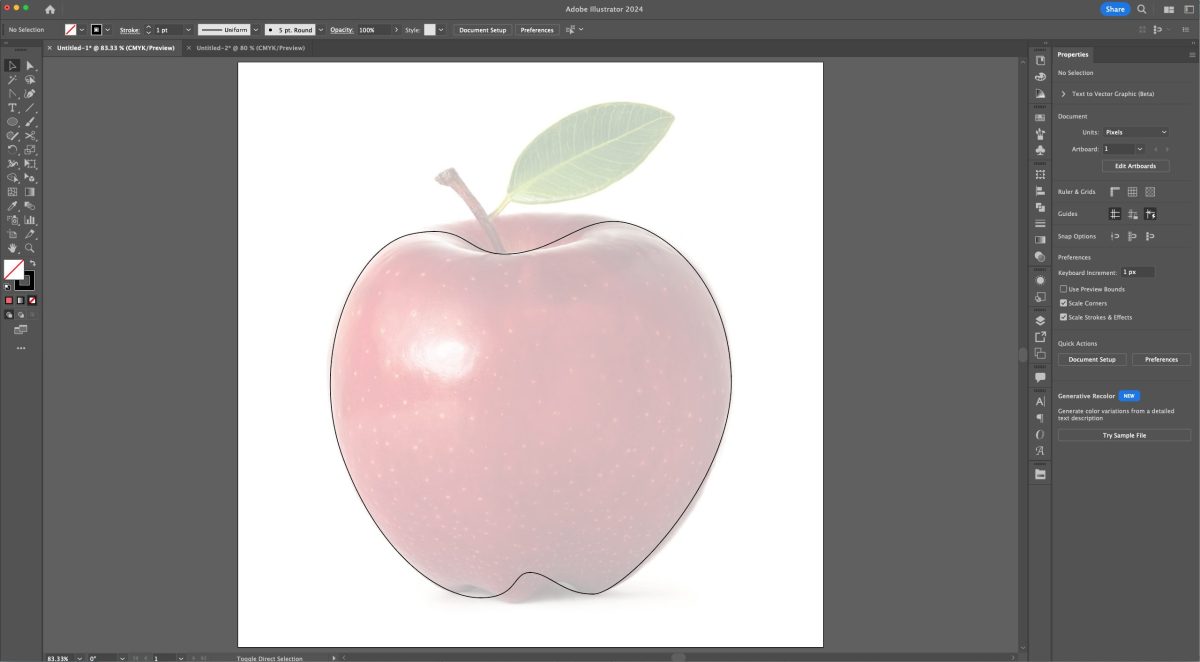
Now let’s do a separate shape for the stem using the Pen tool (P). I started with my rough outline.
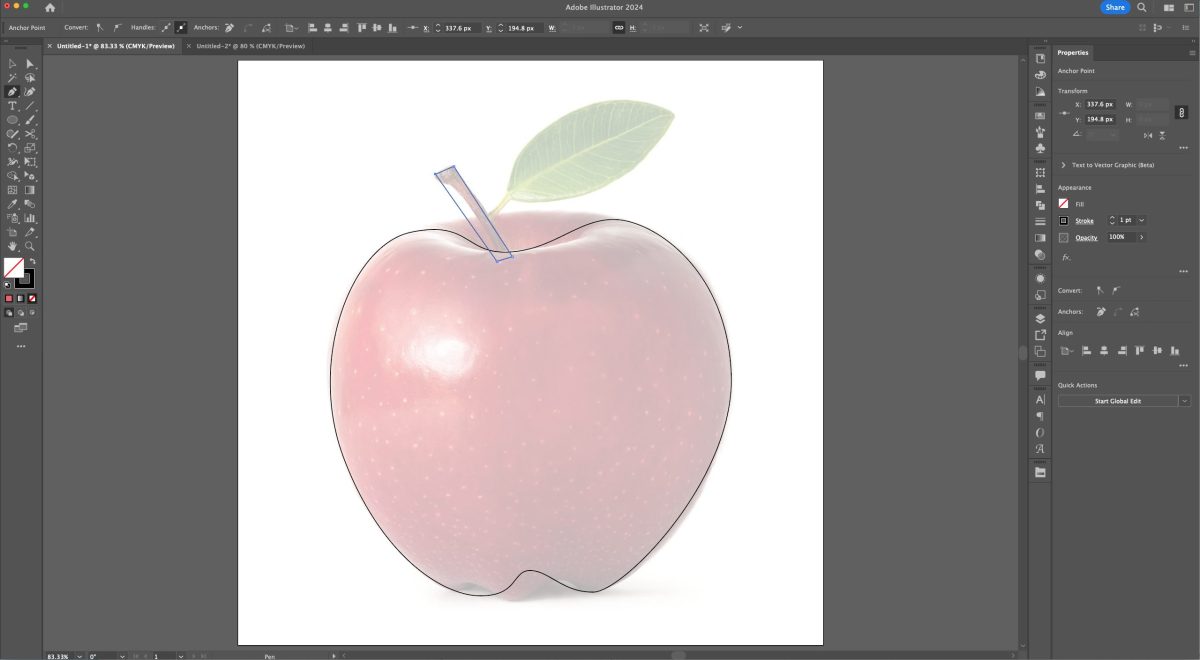
And then used the Anchor Point tool (Shift+C) to curve two vertical paths.
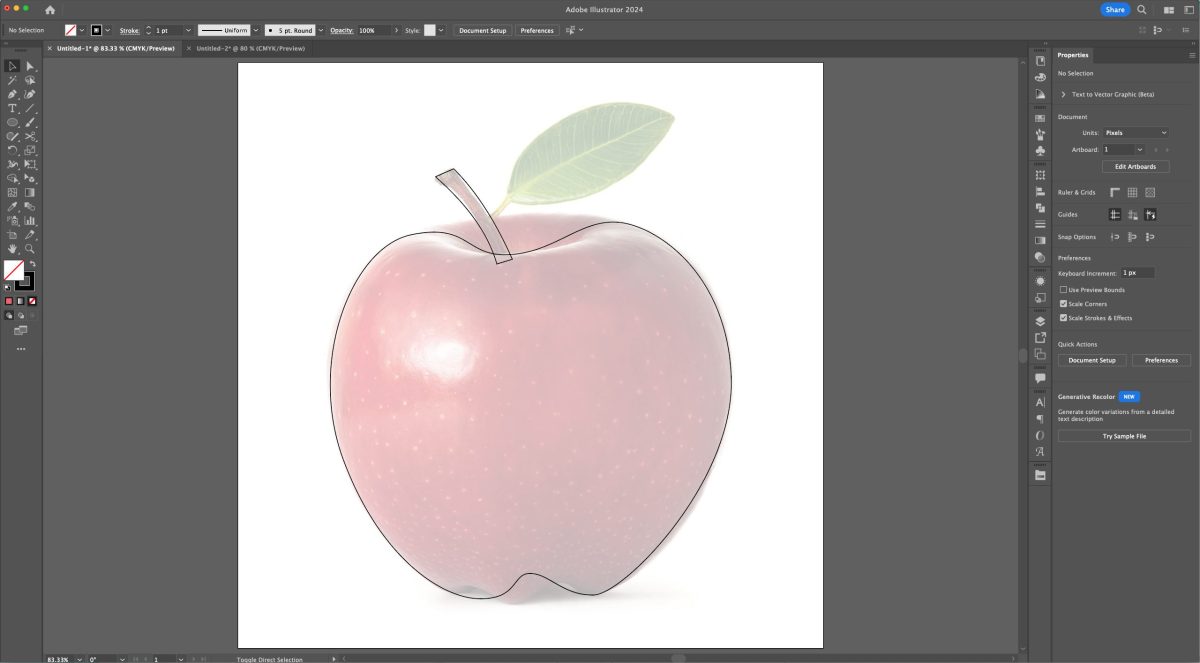
Finally, I made a leaf shape using the same technique as the flower above. I didn’t want it off the center of the stem so I nestled it right by the bottom corner of the stem. You could make it more like the real apple if you’d like!
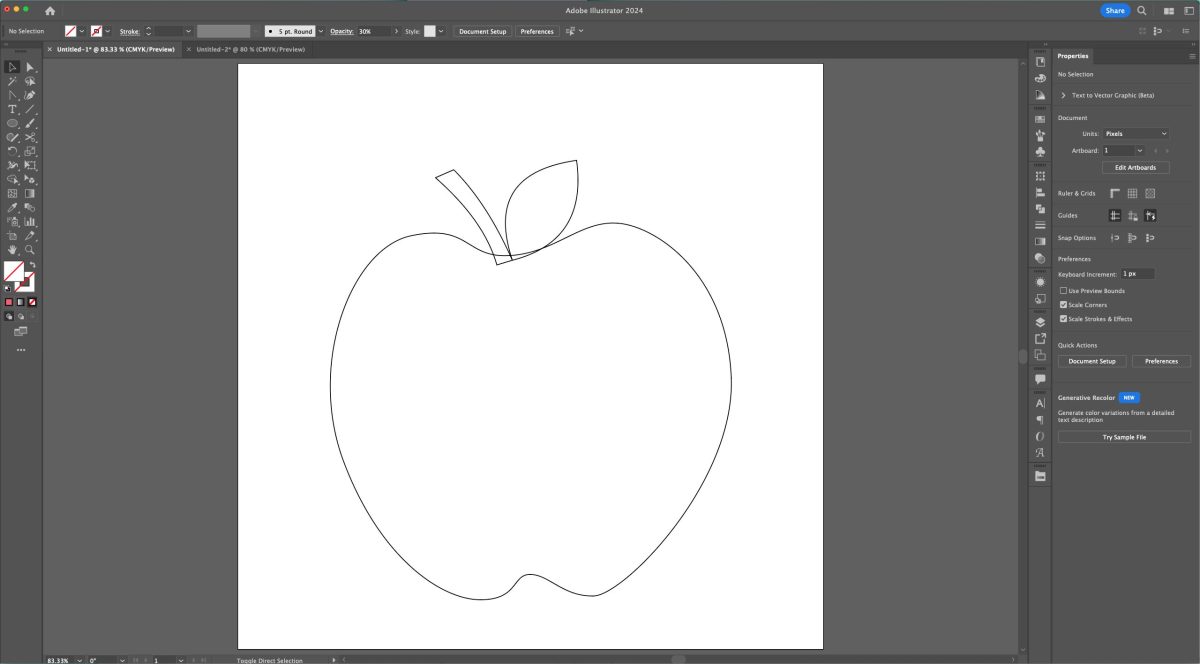
Then I deleted the apple photo, leaving me with the outline of my shapes!
Now re-color each piece. Like with the flower stem above, I sent my stem and leaf to the back, behind the apple.
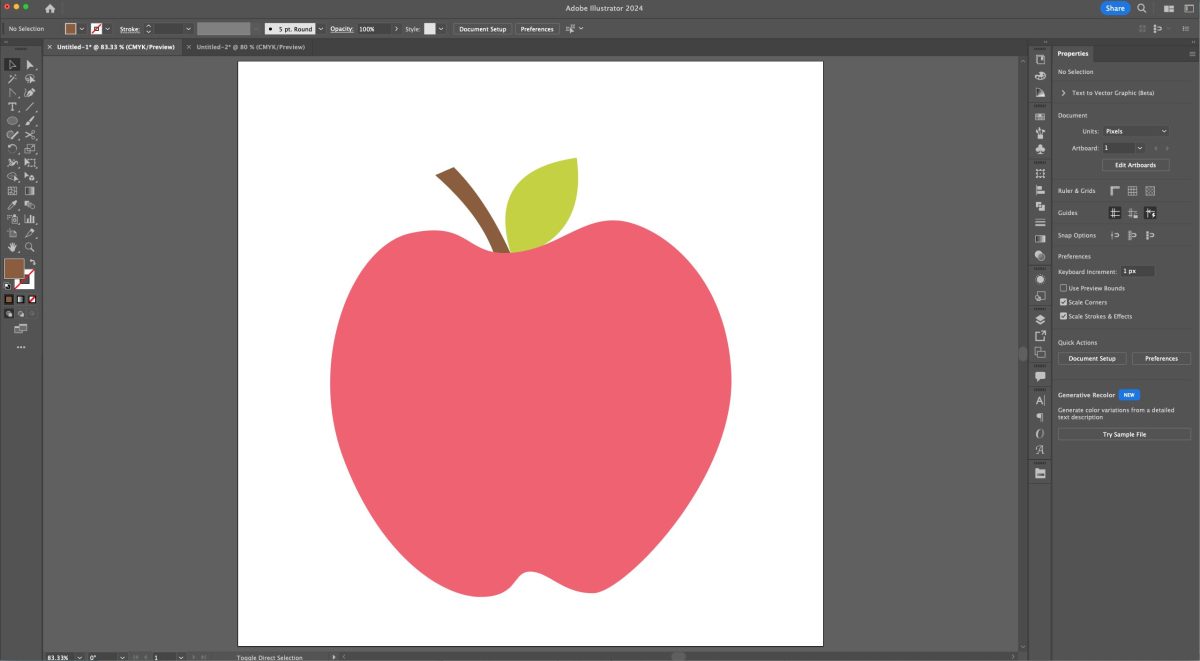
You could do refinements with all of the tools as well, if you’d like! I often do this after I see it in color. I made my leaf a bit bigger and moved some of my anchor points and handles a bit to reshape the apple until I was happy!
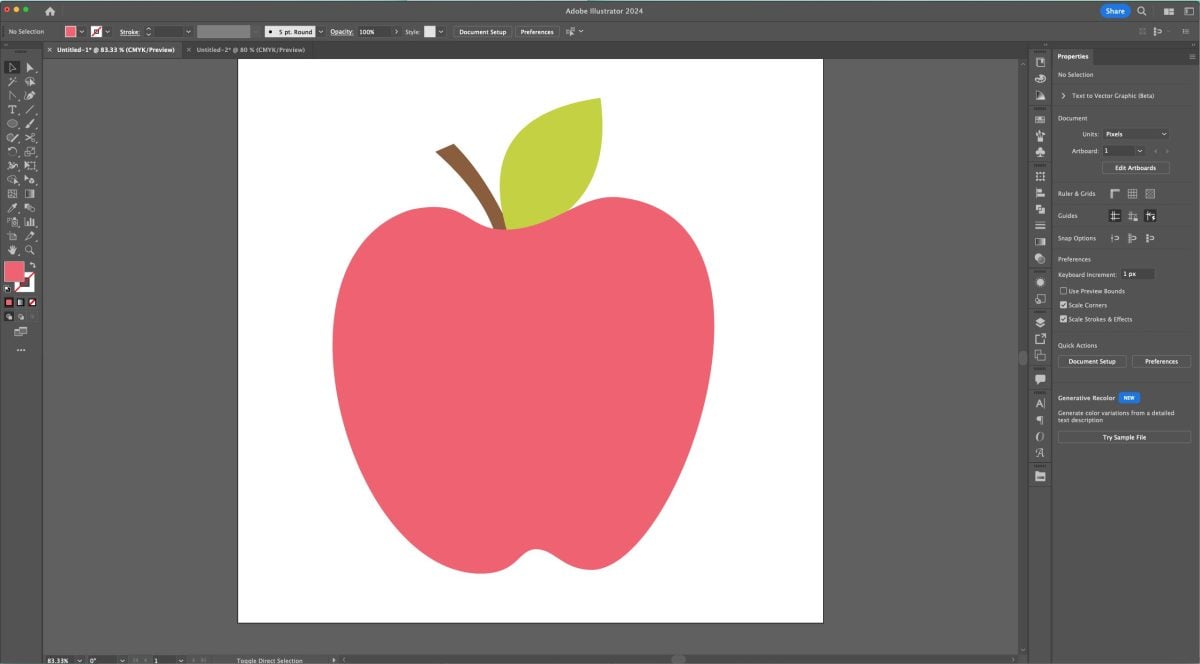
Our apple is just about done! Make each layer a compound path (Command+8 (Mac) / Control+8 (PC)). Double check your Layers Panel to make sure you don’t have any stray points. You should have a single layer with three compound paths below it. Then export!
This tutorial is just dipping our toes into the deep waters of the Adobe Illustrator pen tool! If you’d like some homework, find some shapes to make or trace and get used to how the pen tool works. It’s really the best tool for creating unique illustrations for your SVG files!


Leave A Reply!