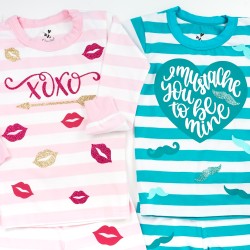
VALENTINE'S DAY PAJAMAS
Valentine's Day pajamas, made with your Cricut, are a fun way to celebrate the holiday with your kids! Get the files to make these fun Valentine's Day PJs, plus tips and tricks for using Cricut iron on.
Equipment
- Cricut Explore or other cutting machine with the Fine Point Blade
- Rotary cutter (optional)
Ingredients
- Cricut Everyday Iron On in a variety of colors
- Cricut Glitter Iron On in a variety of colors
- Pajamas (pre-wash)
Instructions
- Prepare the file in Cricut Design SpaceCreate a file in Cricut Design Space. You can find the file for this project by clicking here. They have been sized for this project for smaller 2T jammies, so if needed, change the size of the elements for your bigger or smaller pajamas. For larger sizes, you may also want to duplicate more lips and mustaches.
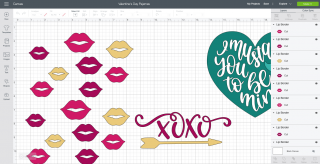
- Once you've edited the file to your liking, click Make It in the upper right. This will take you to the Prepare screen.Important: in this screen, click the little slider to "mirror" each layer of your project. If you don't do this, your words will be backward and unreadable!
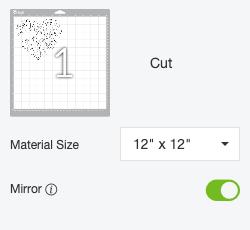
- Once you've mirrored all the layers, click Continue to go to the Make screen.From here, you'll connect your Cricut and select your material. If you are using different types of iron on—I'm using Everyday Iron On and Glitter Iron On, for example—then you'll need to make sure you have the correct material selected for each mat as you cut.
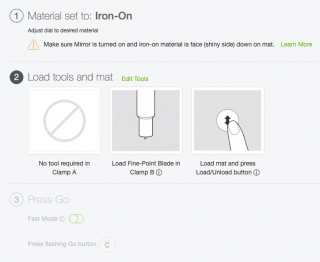
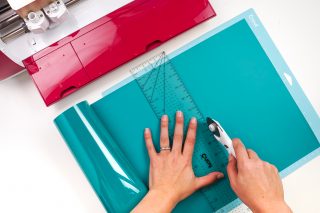
- Cut Your ProjectPlace your first iron on color shiny-side down on your mat. Double check that the material setting matches the type of iron on you are using. Then insert your mat into your Cricut and press the blinking "C" to cut your mat.

- TIP: Here a Cricut acrylic ruler and rotary cutter is used to make a straight line below where the shapes are being cut. This gives you a nice straight line for the next cut. and allows you to keep the vinyl on the mat for weeding (see the next section).
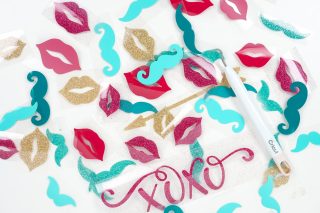
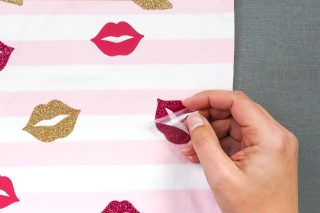
- Weed Your ProjectOnce you have your pieces cut, you'll need to weed out the negative space. You can do this using a weeding hook.There is an extensive post about weeding iron on that you can refer to if you need help with this particular part of the project!
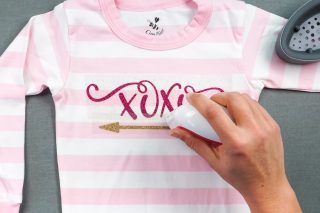
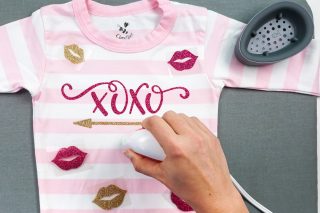
- Adhere Your Iron On VinylTo ensure the best adhesion for your iron on vinyl, make sure to pre-wash your pajamas.Then grab your heat source. For this project, the Cricut EasyPress Mini is being used. Here's a post about the Cricut EasyPress Mini that you might find helpful! You can also use a regular EasyPress (the small one is a great size for this!) as well as a household iron or heat press. See How to Use Cricut Iron On for tons of tips and tricks!XOXO PajamasLet's start with the main decal on the front of the XOXO pajama shirt. Preheat your EasyPress or other heating device. Lay your pajamas flat on an EasyPress mat or other pressing surface and center your decal on the shirt.
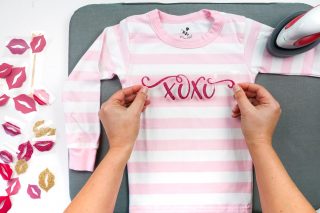
- Then use the EasyPress Mini or other heating device to adhere your iron on. With the Mini, you want to keep it moving, so slowly move it back and forth over the iron on, for a total of about 30 seconds depending on the size of your decal.
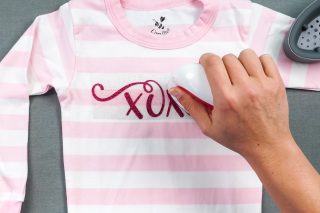
- Before removing the plastic liner, the arrow below the XOXO was added (making sure that the arrow didn't overlap the plastic backing liner of the XOXO). This was to prevent indentations in the XOXO from the liner of the arrow.
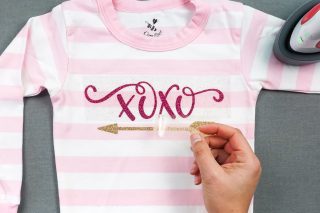
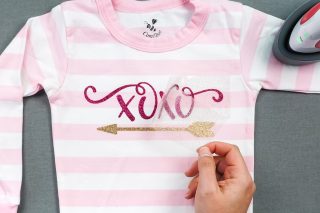
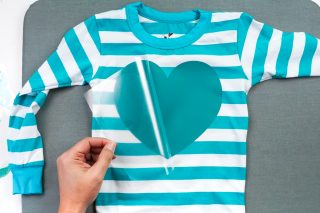
- Then carefully peel back the plastic liner. If your iron on hasn't adhered fully, place the plastic liner back down and iron until it's adhered. Then turn the shirt over and heat from the back for 15 seconds. Allow to fully cool before handling them (this helps with adhesion).
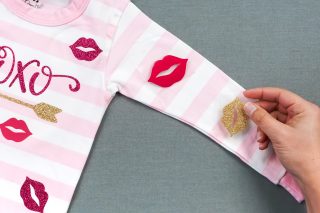
- Then do the rest of the smaller lips and mustaches, placing them randomly all over the pajama top and pants. Adhere them in the same way you did the main decal.
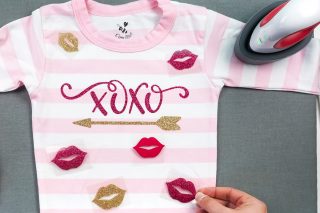
- And then don't forget to do the arms of the shirt and the pajama pants!
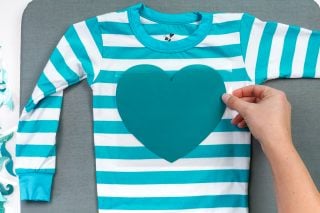
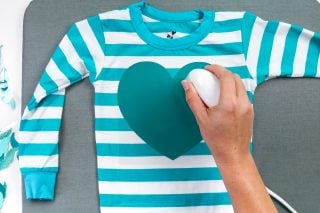
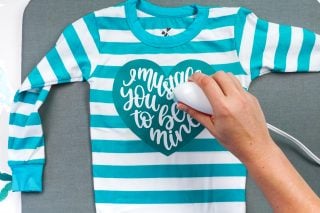
- Mustache PajamasNow let's do the mustache jammies. These are much the same, but here are a few tricks for layering iron on. Start by placing the large heart on the shirt and adhering it. It's much bigger than my EasyPress Mini, but it works just fine—just slide that Mini around all over the heart for 30-45 seconds until it's adhered.
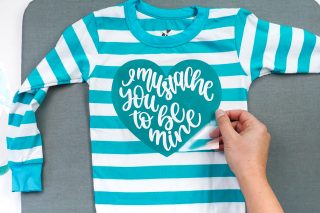
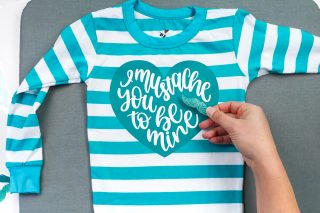
- Next we want to add the words on top of the heart: "I mustache you to be mine." Line up the words over the heart you already did.
- Then adhere in the same manner. One tip: Be careful to avoid the edges of the liner piece where they overlap the heart. It can create an outline of the liner piece in the heart, and the plate of the EasyPress can melt the already-pressed iron on. This is one reason the EasyPress Mini is preferred for projects like this—makes it easier to "stay within the lines"!For the mustache that goes within the heart, you'll find the same problem. If it is adhered as is, there's a good chance that it will leave a rectangle liner outline on the heart.
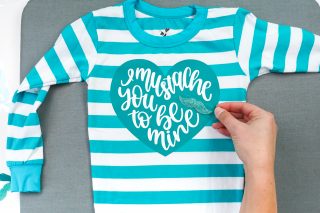
- So, use a sharp pair of scissors to trim right around the edge of the mustache, so it has no liner other than what's directly over the mustache.
- Here's where you should place something between the mustache and the heart —remember, you don't want the plate of the EasyPress coming into contact with the already-pressed iron on. Oftentimes, a piece of cotton is used as a pressing cloth, but in this case the liner of the large heart was used and put it over the mustache to act as a barrier between my heat plate and the already-pressed iron on.
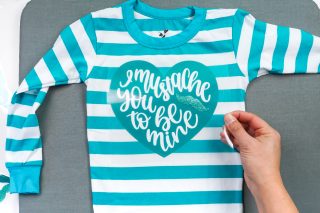
- Then press the mustache and peel back both the large liner as well as the liner that is directly over the mustache! Then repeat with the rest of the mustaches on the pajamas like you did with the XOXO jammies.
- Wait at least 24 hours before wearing and washing the jammies—this allows the adhesive to cure a bit and will help your iron on vinyl stick better and longer.