Using Contour in Cricut Design Space
Using Contour in Cricut Design Space makes it possible to hide different portions of a single image so you can customize Cricut Images even more! Here's how to use this feature, and a few tips and tricks for making the most of the Contour tool.
Instructions
- Rules & Guidelines for Using Contour There a few things to know about using the Contour feature, so double check you understand these rules:Only Works on a Single Layer: Contour only works if you have a single layer with more than one contour selected. If you have multiple shapes selected OR a single shape that is only an outline, the Contour button will be grayed out. No Print then Cut: If you are using a print then cut image (one that has been set to Print in the Operations dropdown) it won't have any contours. You can see the difference because a Print then Cut image does not have a black outline around each piece. Sometimes (not always) you can set the image to Cut instead of Print so you can access the contours. Images & Text: Contour should work with both images and text. Uploaded Files: If they are designed properly, Contour should also work with SVG files you upload yourself. For PNG and JPG files, it most often works, though I have found the contours can be glitchy if your original image isn't nice and clean. No need to UnGroup: For a long time, you had to ungroup to be able to use Contour on an individual layer. Now you can just click that layer in the Layer Panel on the left and Contour will be available. Un-contouring: Because you are only hiding contours, not deleting them, you can always select the image and go back into the Contour tool to re-add your contours if you'd like. Hidden Layers: In the past, when you contoured shapes, it would delete any hidden layers. But with newer updates, it seems that this bug has been fixed.
- How to Select Images to ContourIf you're unfamiliar with selecting a single image in Design Space, you have a few options. In the Canvas screen:Click the item you want to select.Put your mouse near the item you want to select and then click and drag your mouse over the item to select it.Click the layer that you want to select in the Layers Panel.
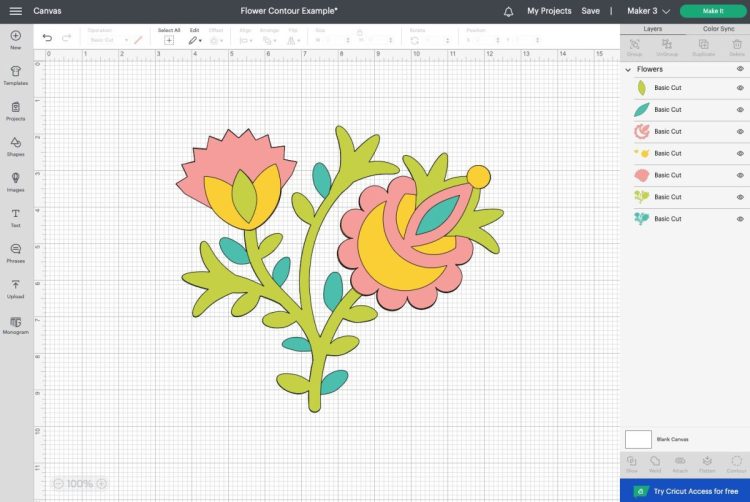
- Using Contour to Hide a Portion of an ImageHere's a flower with several layers (Cricut Image #M350EC). Let's say that for some reason we don't want any of those small green circles in this flower. We can't just hide or delete the green layer—we'd lose the stem and other integral parts of our flower, plus we'd still have the holes showing through to nothing.

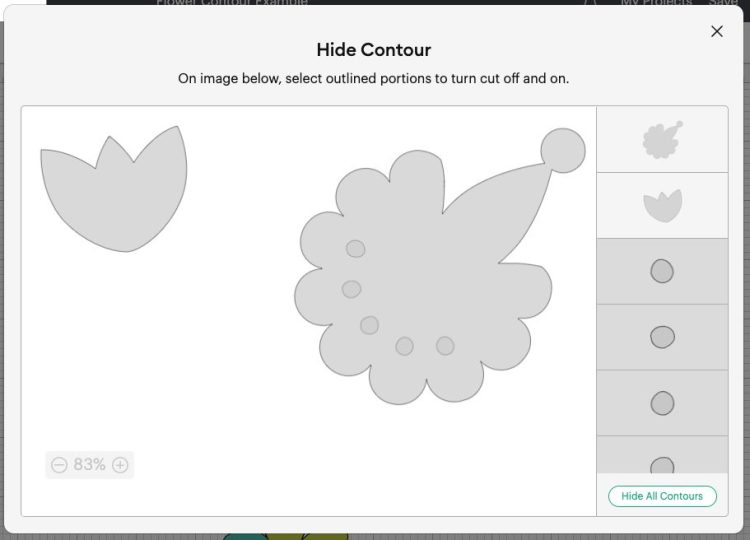
- So instead, let's use Contour.In the Layers Panel, click on the left pink flower piece with the holes that allows the green layer to show through. Click Contour at the bottom of the Layers Panel, and it will open the Hide Contour window.
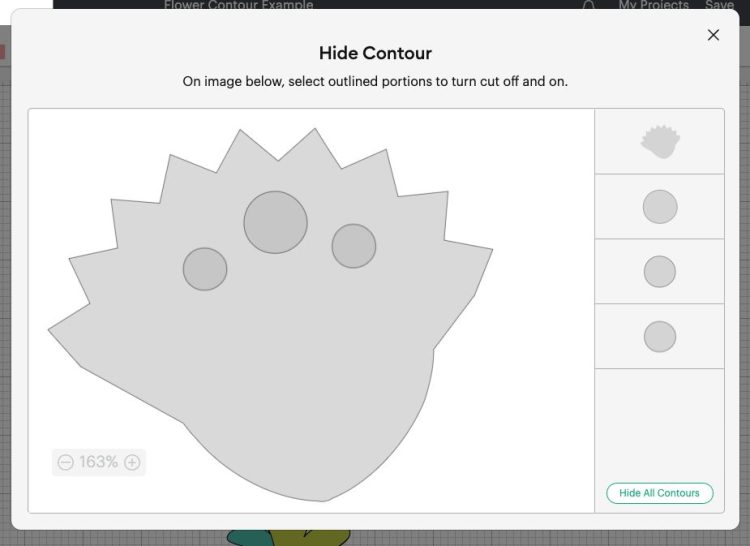
- Here you can hide a contour (a portion of an image layer). You'll see all the different image cut lines for this piece, rendered in light gray: the outline of the flower plus the three holes.To hide your contours, you can either click on the circles on the flower image itself, or in the list of contours on the right. Hidden cut lines will be a lighter shade of gray.

- Then click the X in the upper right corner to get back to your Canvas.Then do the same with the light pink flower piece on the right. Hide all five holes/circles there.
- Now go back to your image! You have hidden just the holes in the flowers without hiding any of the other important parts of the original flower.Contour is really helpful when you're trying to make these smaller changes to files in Design Space. It's just one more way to fully customize the images in Cricut Access and that you upload yourself!
- Can You "Un-Contour" an Image?Because you are only hiding contours, not deleting them, you can always select the same layer and use Contour to add parts of your design back in. Unlike the Weld Tool or the Slice Tool, Contouring is not permanent.
- Can you Contour Text?Yes! It's totally possible. Check out this post on Contouring Text to Write With Multiple Colors.
- Frequently Asked Questions about the Contour ToolWhy is my contour button grayed out on Cricut?Either your image has no contours (it is a single image with a single operation line) or you have more than one image selected. You need a single image that has more than one cut line to contour.How do you contour with Cricut Design Space?It's easy! Just select your image and click Contour at the bottom of the Layers Panel. There you can remove any individual parts of your image you don't want to use.Can you Contour SVG Files in Cricut Design Space?Yes! You should be able to contour any SVG file layer in Cricut Design Space, provided that the designer didn't do anything wrong when designing the file. Most files should work properly.