USING WELD IN CRICUT DESIGN SPACE
Using Weld allows you to combine multiple shapes into single pieces when cutting. Here's how to use Weld in Cricut Design Space, as well as sample images to show what welding images together actually looks like.
Ingredients
- Image from the Cricut Design Space image library, the word "Lucky" (#M3B8ED) and
- a four-leaf clover (#M9EE9F98).
Instructions
- IMPORTANT UPDATE: Cricut Design Space is adding tools in addition to Weld! Check out my post The Cricut Combine Tools: Weld, Unite, Subtract, Intersect, Exclude!Rules and Guidelines for Using WeldOnly Works on Two or More Layers: Weld does not work on a single layer, and Weld will be grayed out if only one layer is selected.Overlapping: If you want your image to cut as a single piece, you need to make sure that your separate starting images overlap.Or Not Overlapping: You can also use weld when things are not overlapping, as you'll see below.Combines Different Colors: If you Weld images of more than one color together, the colors will change to the color of the bottom layer. This is because Weld creates a single cut piece that will be cut on a single map.Ungroup Can Help: If you're finding that things are welding that you don't want welded, make sure that you don't have anything grouped. You can use the Ungroup tool at the top of the Layers panel to ungroup your images.No Un-welding: Welding is permanent. You can sometimes undo your weld (particularly if you haven't saved your file yet), but you can't un-weld an image after it's been welded.Hidden Layers: In the past, when you welded shapes, it would delete any hidden layers. But with newer updates, it seems that this bug has been fixed.Using Weld to Make a Single Shape / Cut PieceThe first example of using Weld is to turn more than one image into a single shape. This means it will cut as one single piece on your cutting mat and you won't have any overlapping cut lines or separate pieces.Upload the images from the Design Space Library under the Supply List above.
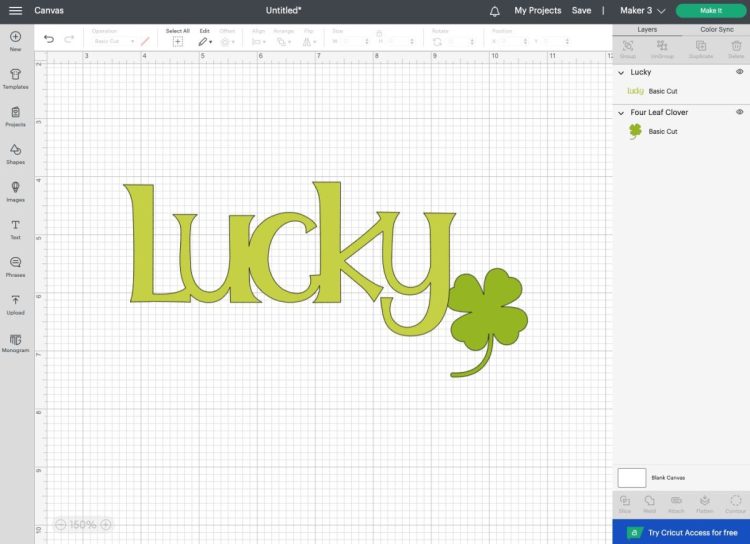
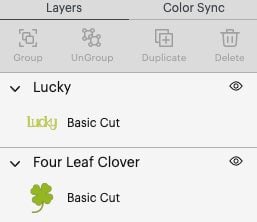
- Right now these are two separate images, as you can see in the Layers Panel on the left. You can also tell because the black outline around "Lucky" overlaps the clover AND because these are two different colors of green.
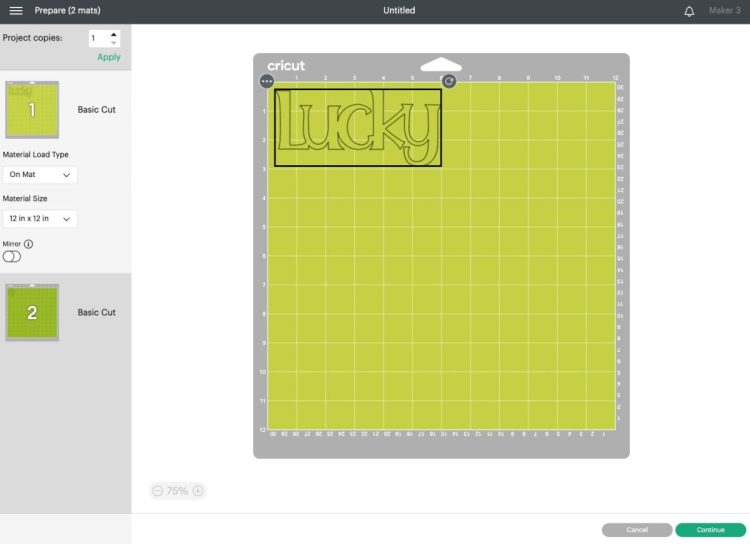
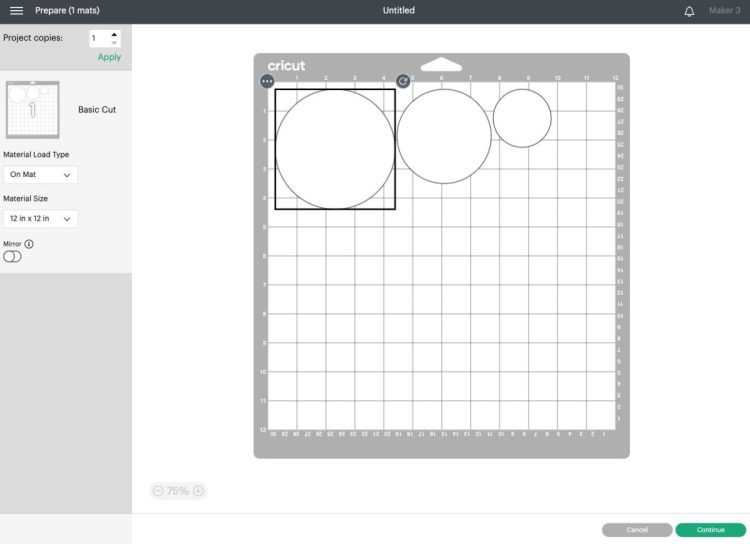
- If you go to cut this file as is, Cricut Design Space will put your images on two separate mats to cut individually, as you can see below with the two different green mats.
- So instead, select both the "Lucky" and the clover together and click the Weld button in the menu at the bottom of the Layers Panel on the right. The two shapes are united together into one shape. You can see that there's no longer any border between the two images.
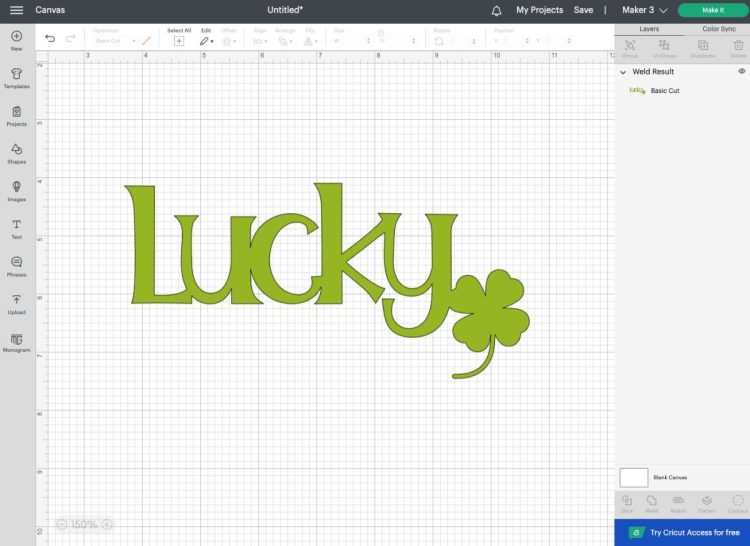
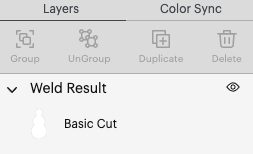
- You'll also see that it is one single piece under the heading Weld Result in the Layers Panel.
- It is now a single shape now that will cut as one piece, as you can see here in the Preview screen.

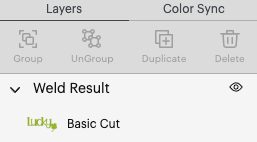
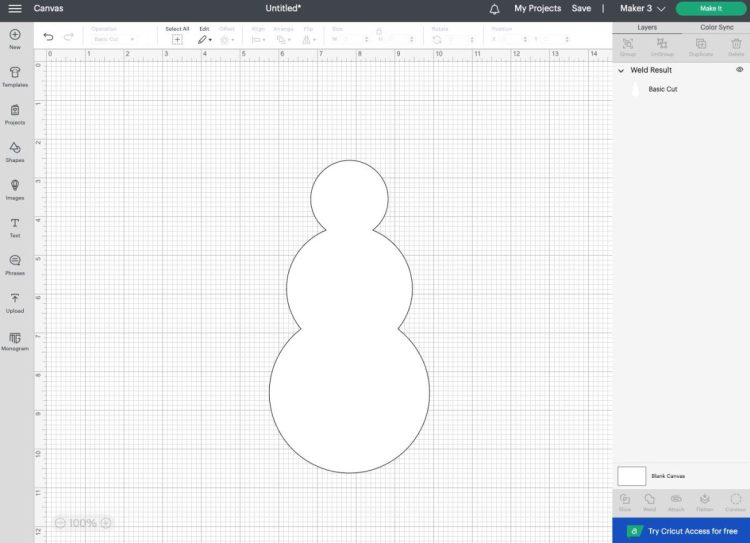
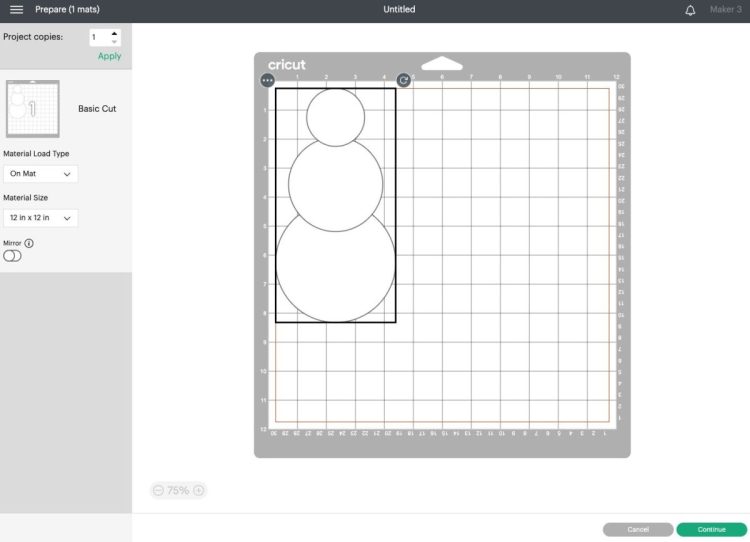
- Creating New Shapes Using WeldNow let's create a more complex shape out of the basic shapes in the Cricut Design Space Shapes tool in the Design Toolbar on the left side of the Canvas. You can create all sorts of different images using these shapes, which is great if you are making simple projects and don't want to pay for your images individually or through Cricut Access.Do you want to build a snowman? (Sorry, that song will be stuck in your head for a week!). Let's insert three circles from the Shapes toolbar.
- Resize them and stack them on top of each other. I colored them white, because, well, he's a snowman.
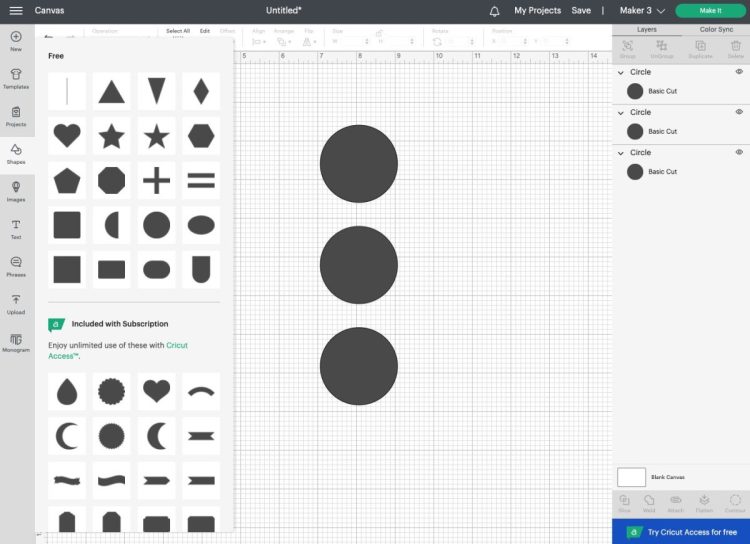
- Again, if you cut these as is, Cricut Design Space will separate them on the mat and try and save as much room as possible.
- Instead, head back to the Canvas and select all three circles and click Weld. This will take your three separate circles and make them into one single snowman welded image.
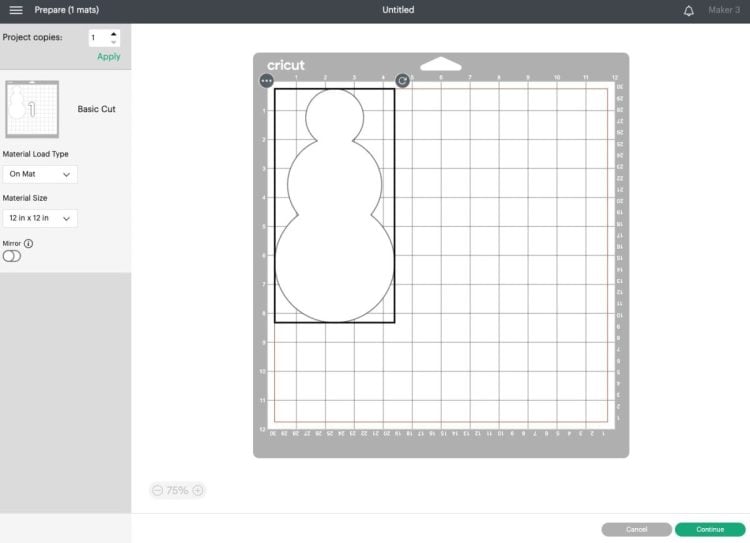
- Now it will cut properly!
- A Quick Note on Using AttachYou may be wondering why you can't use the Attach tool here instead of the Weld tool. Let's use Attach instead of Weld for this snowman. It still looks like a snowman on the Canvas, though you'll notice the overlapping lines on the image.

- If you make the Attached snowman, you will see that your Cricut will still cut the individual shapes, instead of the single piece.This is why you want to use Cricut Weld vs. Attach when making single shapes.
- Troubleshooting a Common Weld IssueThere's a common issue in Cricut Design Space where welding causes the centers of letters to become filled. Since upgrading to the newest version of Cricut Design Space (v7.11 as of the writing of these instructions), the issue cannot actually be recreated, so there is no example here.Basically imagine the word Hello written in a font, and when welded, the center of the "e" and "o" become filled in.The easy way to fix this issue is to make your image very large before welding. This gives Design Space more data to work with, and it fixes that problem 99% of the time.
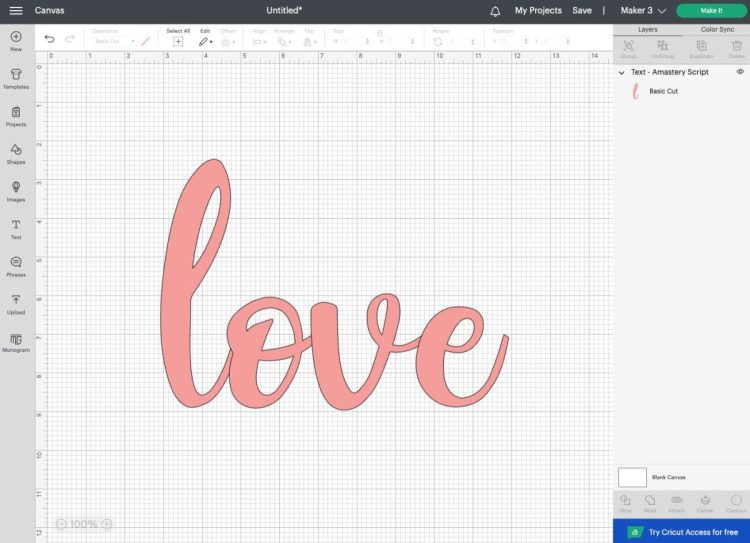
- Using Weld to Connect Script Fonts (and Other Connected Fonts)Finally, you will want to use Weld when connecting cursive fonts or other fonts that overlap each other. If you do not weld your letters, they will cut as individual letters, often leaving you with chewed-up cardstock, vinyl, or iron on vinyl where the letters overlap.UPDATE: With the release of DESKTOP Design Space v7.11 in June 2022, welding fonts is now automatic! This is great because so many people miss this vital step when cutting out words using their Cricut cutting machines. It also means that your text remains editable! If you notice, for instance, that you misspelled something after cutting it, you can go back and fix the problem because your text isn't permanently welded.This update is only for DESKTOP. You will still need to weld your fonts on mobile!You can see here that I have the word "Love" typed in a font called Amastery Script. You can see that each letter is individual because the black outline is around each letter.
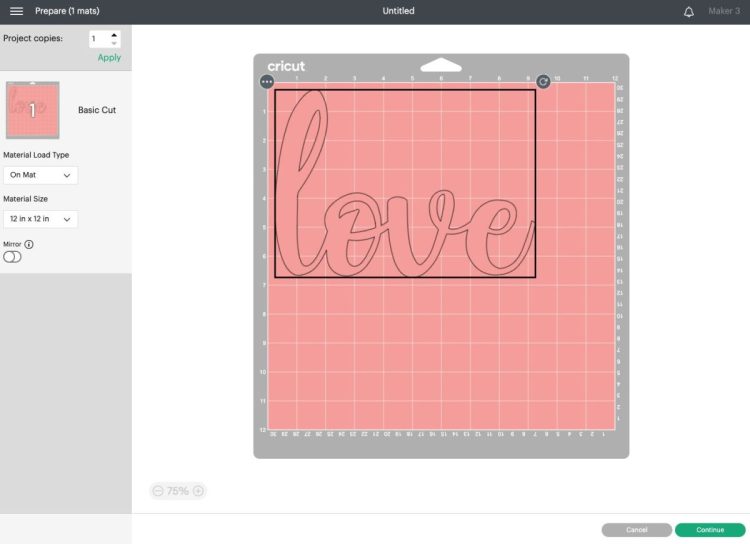
- BUT, when you go to cut the file in Cricut Design Space, the "Love" text is automatically welded for you in the Preview Screen and when you go to cut your image. There are no black outlines around the different letters.
- This worked for both Cricut Design Space fonts as well as system fonts (fonts you upload to your computer outside of Cricut Design Space). You can check out my post Cheap and Free School Fonts for Cutting Machines if you're looking for fun options!If for some reason you get to that Prepare Screen and you see the individual outlines of the letters, you can go back and Weld your text, just like you did in the other lessons in this tutorial.If you want to learn more about editing script text so it looks better (without weird letter spacing), check out my post Working with Script Fonts in Cricut Design Space.
- Can I Un-Weld Images?There is no way to un-weld your images. You can immediate undo, but if you save your file or close and reopen it, you won't be able to undo and your image will be permanently welded.
- Frequently Asked Questions about WeldingWhat is Welding in Cricut?Welding takes two or more shapes and combines them into a single cut shape.What is the difference between Weld and Attach in Cricut Design Space?The Weld tool turns more than one image into a single image. Attach keeps your images in the same arrangement on the cutting mat, though the images are still separate pieces. Read more about the Attach tool.Where is Weld in Cricut Design Space?The Weld tool is found at the bottom of the Layers Panel on the right on desktop, and under the Actions toolbar on mobile. It looks like an overlapped circle and square.Do You Have to Weld Text with a Cricut?Yes, you should Weld any overlapping text when cutting text on a Cricut. That being said, a recent update to Cricut Design Space welds most text automatically.Why is My Weld Button Grayed Out?Most likely, you have only one image selected, and to weld you need more than one image.